Hey there, fellow baker!
Let’s talk coconut cake. There’s just something about it, right? It feels like a warm hug and a party all at once. Like pure sunshine on a plate! People argue about where it first came from, but it definitely has roots in Southern American baking. Clever cooks down there turned tropical coconuts into amazing desserts. It’s a classic for a reason – perfect for gatherings, holidays, or just… because you really want some cake.
This recipe? It’s all about being rich and super moist. We’re using both butter (for that yummy flavor) and oil (for a tender cake that won’t dry out). Plus, a little sour cream adds extra moisture. Honestly, it’s a pretty Simple coconut cake to put together. No super tricky steps here.
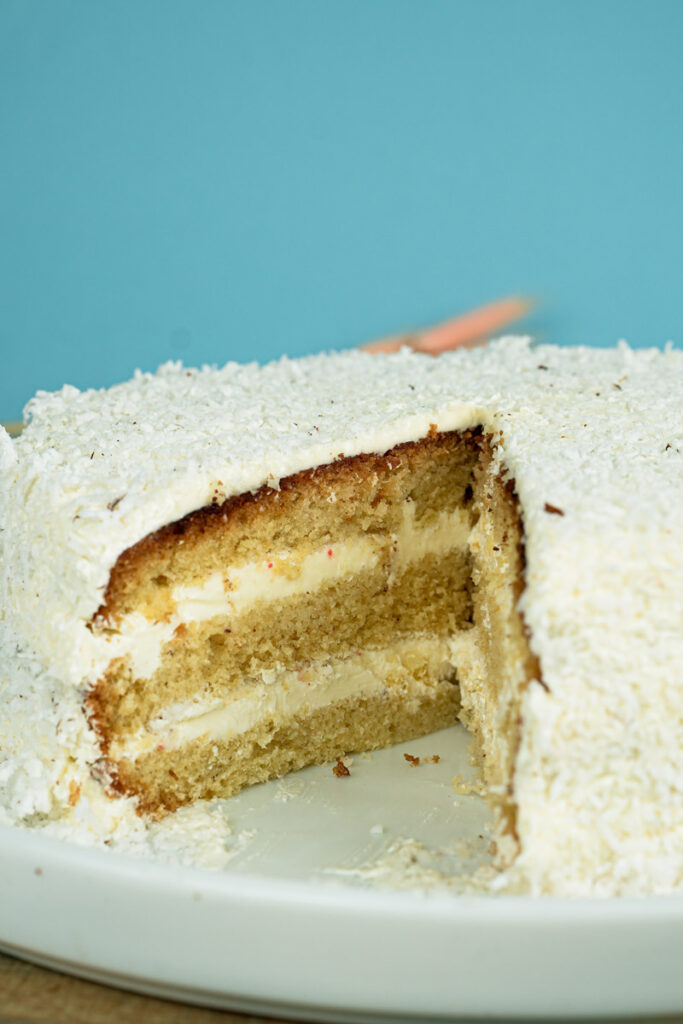
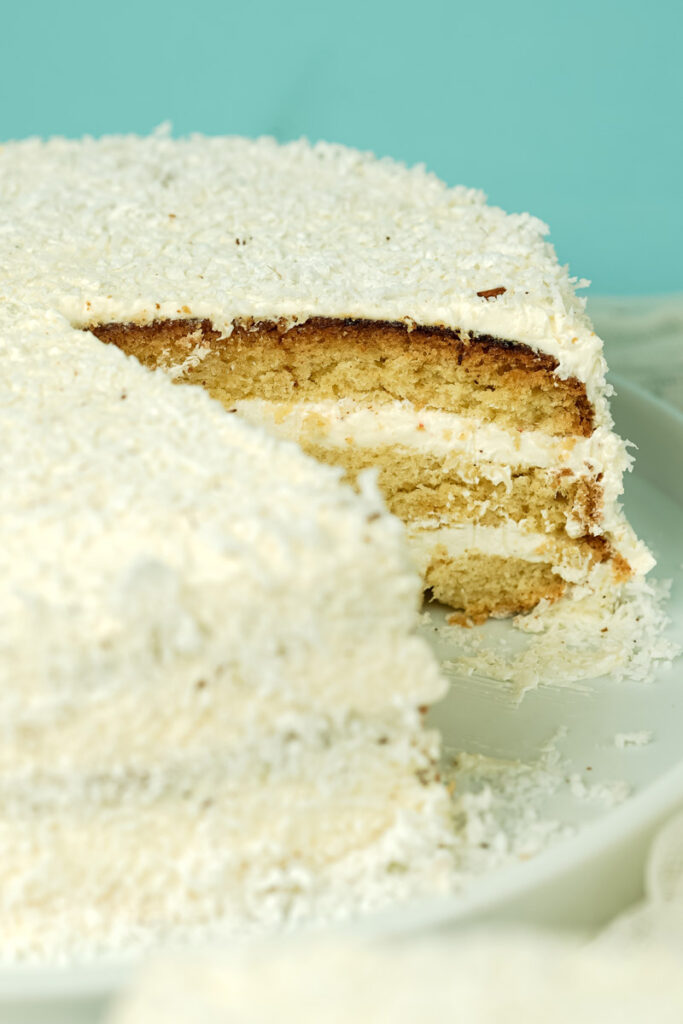
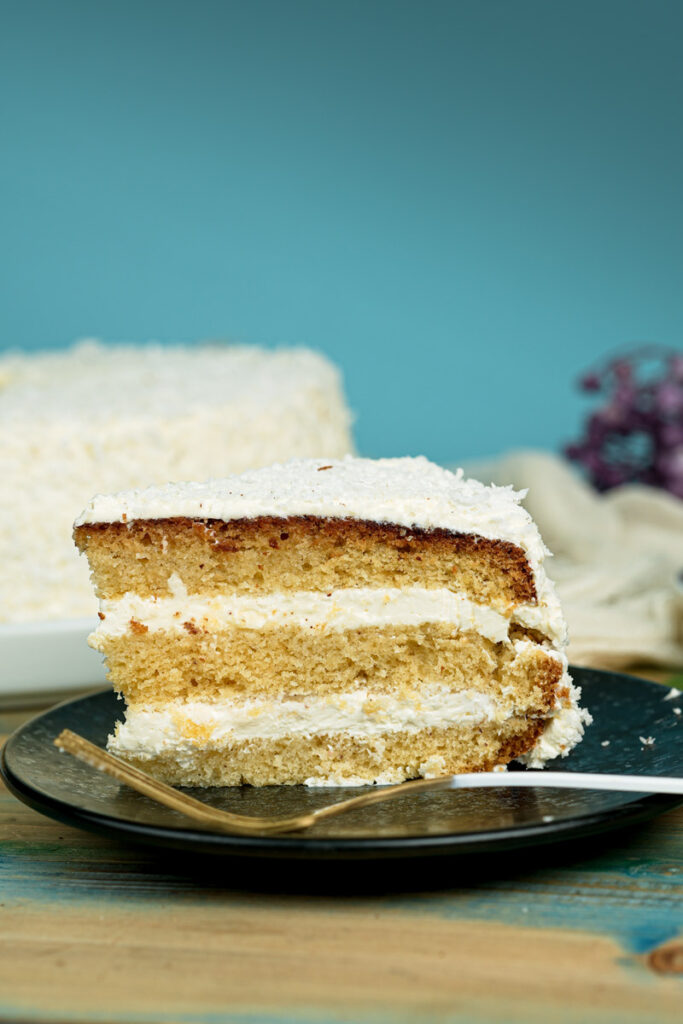
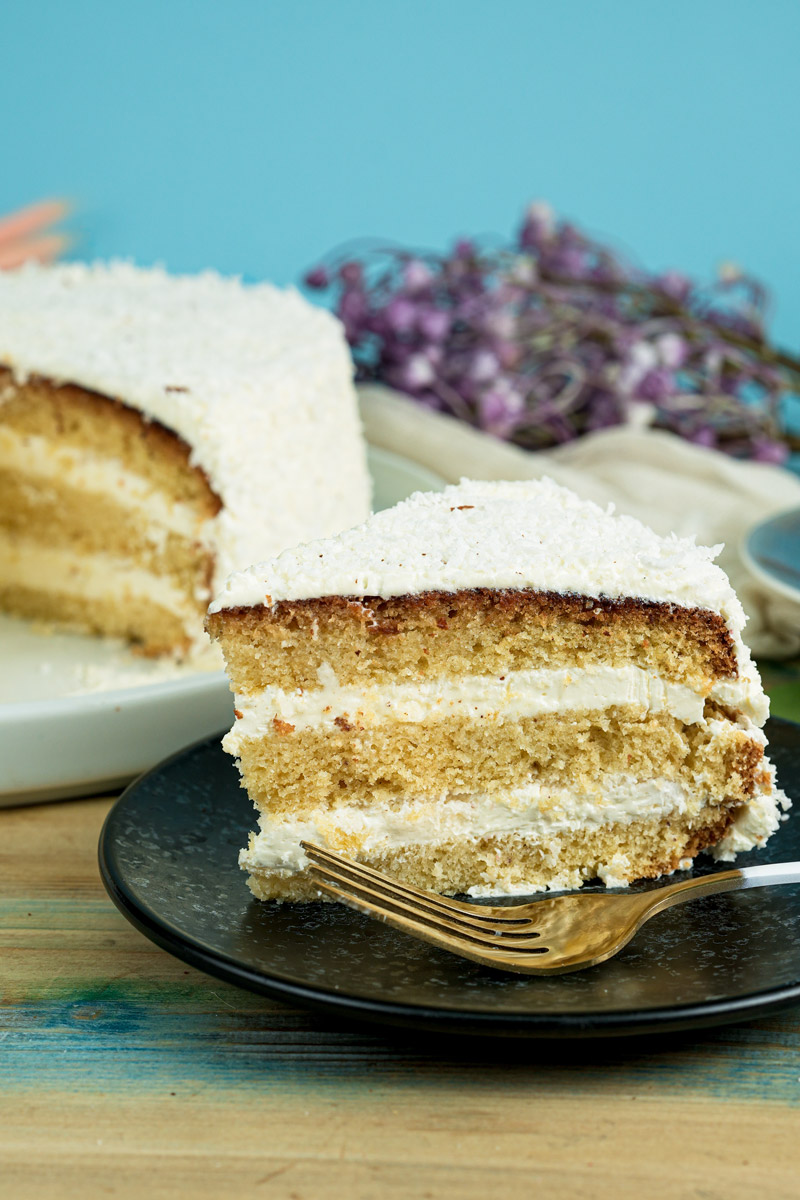
And the frosting! Oh, it’s a dream. A creamy buttercream made with coconut cake with coconut milk and loaded with coconut flakes. You get coconut flavor inside and out. It definitely reminds me of those old fashioned coconut cake recipes, but maybe a bit easier for today’s kitchens.
Ready to bake up some happiness? Let’s do this!
What You’re In For: Quick Look at Your Baking Adventure
Before we start cracking eggs, let’s get the lay of the land. Knowing the plan makes baking way less stressful!
Here’s a quick peek:
| Task | Estimated Time | Notes |
|---|---|---|
| Prep Work | 15-20 mins | Mixing batter & frosting |
| Baking | 30-35 mins | Keep an eye on it! |
| Cooling (Crucial!) | 1-2 hours+ | Don’t rush this step! |
| Total Time | ~2 – 2.5 hrs | Actual work time < 1 hour |
- How Much Cake? This recipe makes two 7-inch cake layers. Once you stack ’em and slice ’em, you should get about 14-15 servings. Need less? Halving it can be tricky with amounts like 1/3 cup oil, but doable if you’re good with fractions or scales. Need more? Doubling should work fine for a tall four-layer cake or two separate cakes.
- Heads Up on Layers: Okay, full disclosure. With only 1 cup of flour for two 7-inch pans, your cake layers will be on the thinner side. That’s totally fine! But if you dream of thick, chunky layers:
- Use smaller 6-inch pans instead.
- Or double the cake batter recipe for your 7-inch pans.
- Or this amount makes great cupcakes! Bake for about 18-22 minutes.
- How Tough Is It? I’d say Easy to Intermediate. The mixing itself is pretty standard. The “intermediate” part? Mostly just remembering to use room temperature ingredients (seriously, it matters!) and being careful not to overmix. Nail those, and you’ll get that amazing Moist Coconut cake texture.
- Gear You’ll Need:
- Electric Mixer (handheld is fine, stand mixer works too!)
- Big bowl (for cake batter)
- Medium bowl (for dry stuff)
- Another bowl (for frosting)
- Whisk
- Rubber spatula (my best friend in the kitchen!)
- Measuring cups and spoons
- Two 7-inch round cake pans
- Parchment paper (don’t skip this!)
- Wire rack for cooling
- Small baking sheet (if you toast coconut for the topping)
- Offset spatula or butter knife (for spreading frosting)
- Plan Ahead Power: I love recipes you can prep ahead. It makes party day so much easier!
- Cake Layers: Bake these bad boys up to 2 days early. Let them cool completely, wrap tightly in plastic wrap, and keep ’em on the counter.
- Frosting: Whip this up 3-4 days ahead. Store it in an airtight container in the fridge. Let it warm up on the counter for 30-60 minutes and give it a quick beat before using – it’ll get nice and fluffy again.
- Finished Cake: Assemble the whole thing a day before! Cover it and pop it in the fridge (especially if it’s warm out). Just remember to let it sit out for 30-60 minutes before serving. Cold cake = sad cake flavor.
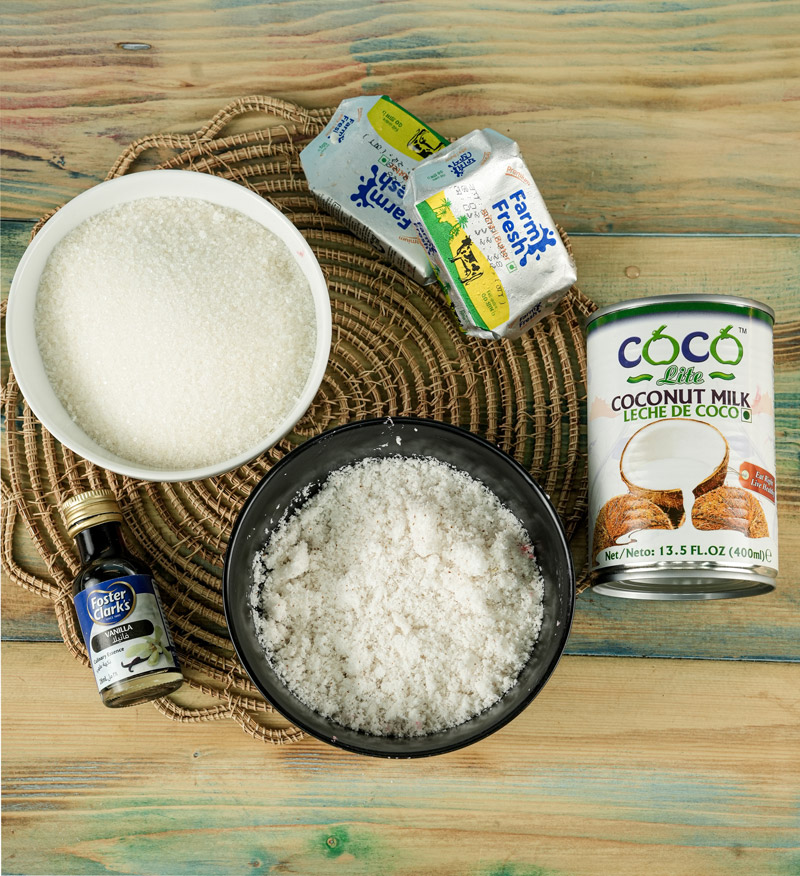
Grab Your Goodies: What You’ll Need
Okay, ingredient time! Good stuff in, good stuff out, right? Getting everything measured and ready before you start mixing is a game-changer. Trust me.
- For the Cake Batter:
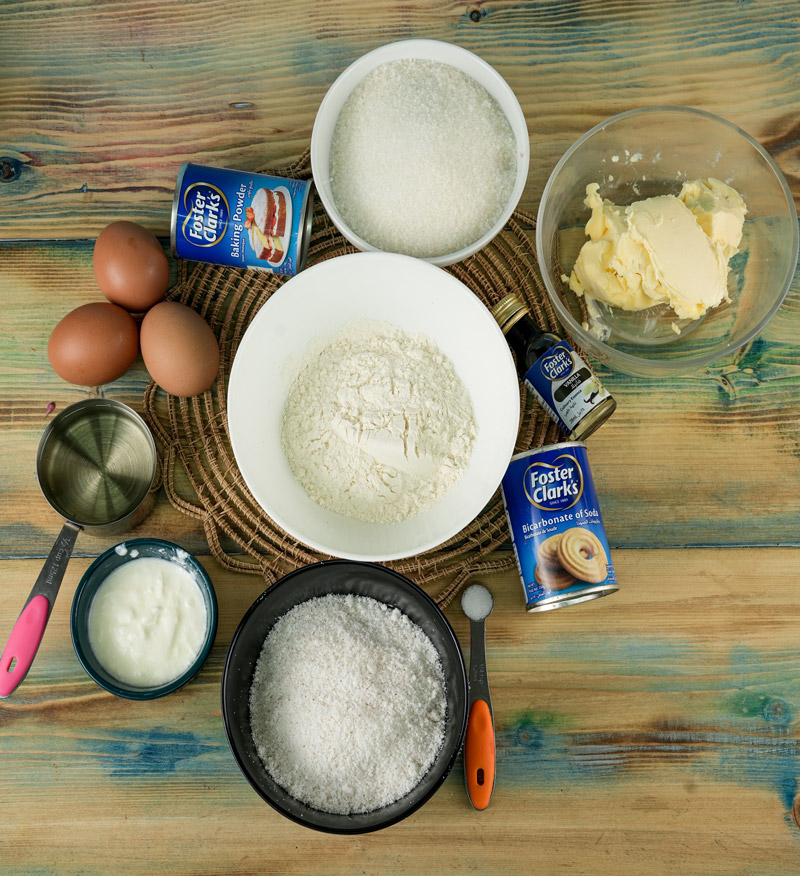
- Fats (Moisture Central!): You need 2 cups (that’s 4 sticks!) of unsalted butter. Yes, it sounds like a lot, but it’s key for the richness here. Make sure it’s really soft – like, room temperature soft. Also grab 1/3 cup of neutral oil (vegetable, canola, avocado work great). Why both? Butter = flavor, Oil = guaranteed moisture. Seriously, make sure that butter is soft!
- Sweet Stuff & Structure: 1 cup of regular granulated sugar. And 3 large eggs. Okay, quick note: you might notice eggs weren’t in the original list you had, but believe me, cakes like this NEED eggs! They hold it together, make it rich, and help it rise. Make sure these are at room temperature too.
- Tenderness & Tang: 1/2 cup of sour cream. Again, room temperature! It adds moisture and a little tang to cut through the sweetness. Full-fat plain yogurt works if you’re in a pinch.
- Flavor Time: 2 teaspoons of pure vanilla extract for that warm flavor. For the star of the show – coconut – you’ve got options: 1/2 cup of sweetened coconut flakes (the shredded kind you find everywhere) OR 1 teaspoon of coconut extract. Flakes give you texture and little bursts of coconut. Extract gives a smoother, all-over flavor. Feeling wild? Use both!
- The Dry Stuff: 1 cup of all-purpose flour. You also need 1 teaspoon of baking powder AND 1/2 teaspoon of baking soda to make it rise nice and fluffy. Plus 1 teaspoon of table salt – don’t skip it, it makes everything else taste better! My advice? Whisk these dry bits together in a bowl before adding them.
- For that Dreamy Coconut Buttercream:
- The Base: 1 cup (2 sticks) of butter, softened to room temperature. Salted or unsalted is fine here. If you use salted, maybe skip adding extra salt later.
- Sweetness: 1 cup of icing sugar (powdered sugar). Pro tip: Sift it first! It gets rid of annoying lumps.
- Flavor & Creaminess: 1 teaspoon of vanilla essence (or extract) and 1/4 cup of canned full-fat coconut milk. Shake that can well! Using coconut cake with coconut milk in the frosting? Delicious! Make sure it’s room temp, maybe slightly warm if it’s solid.
- Texture & Topping: 1/2 cup of sweetened coconut flakes. You might want extra for decorating. Toasting some makes it look and taste amazing (more on that later!).
Why Room Temp is a Big Deal: I know I keep saying it, but using room temperature butter, eggs, and sour cream is so important. Cold stuff just doesn’t mix smoothly. You can end up with a heavy cake or weird greasy spots. We want light and fluffy! Aim for ingredients around 65-70°F (18-21°C). Soft butter should squish easily when you press it, but not look melted.
Let’s Bake! Your Step-by-Step Guide
Alright, apron on? Oven heating up? Let’s get our hands dirty!
Oven On, Pans Prepped: First up, get that oven going at 180°C (356°F). Stick a rack in the middle. Now, grab your two 7-inch round cake pans. Grease the bottoms and sides really well – butter or baking spray works. Trace the pan bottoms onto parchment paper, cut out the circles, and pop ’em in the pans.
This is my secret weapon against stuck cakes! (Optional extra credit: Want toasted coconut for garnish? Spread about 1/2 cup on a small baking sheet now. Pop it in the preheating oven for 5-8 minutes. Stir halfway through. Watch it like a hawk – it burns fast! Pull it out when it’s lightly golden. Let it cool completely.)
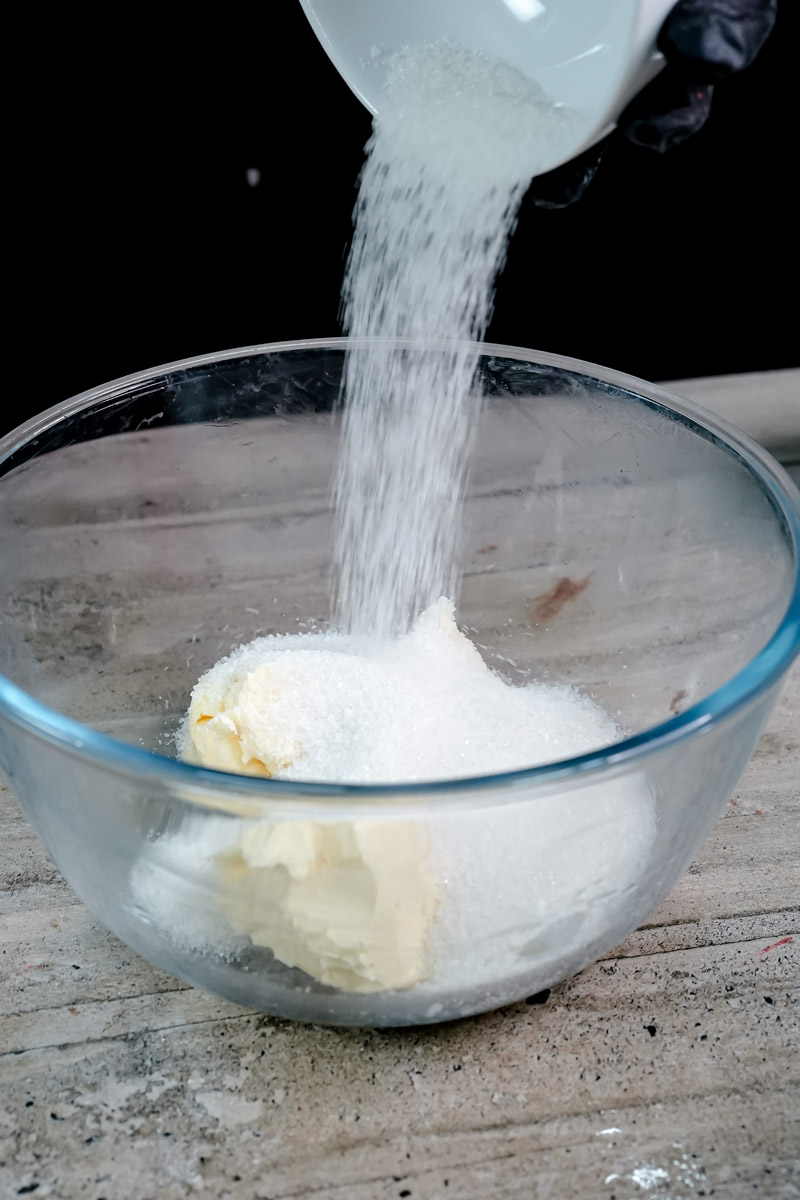
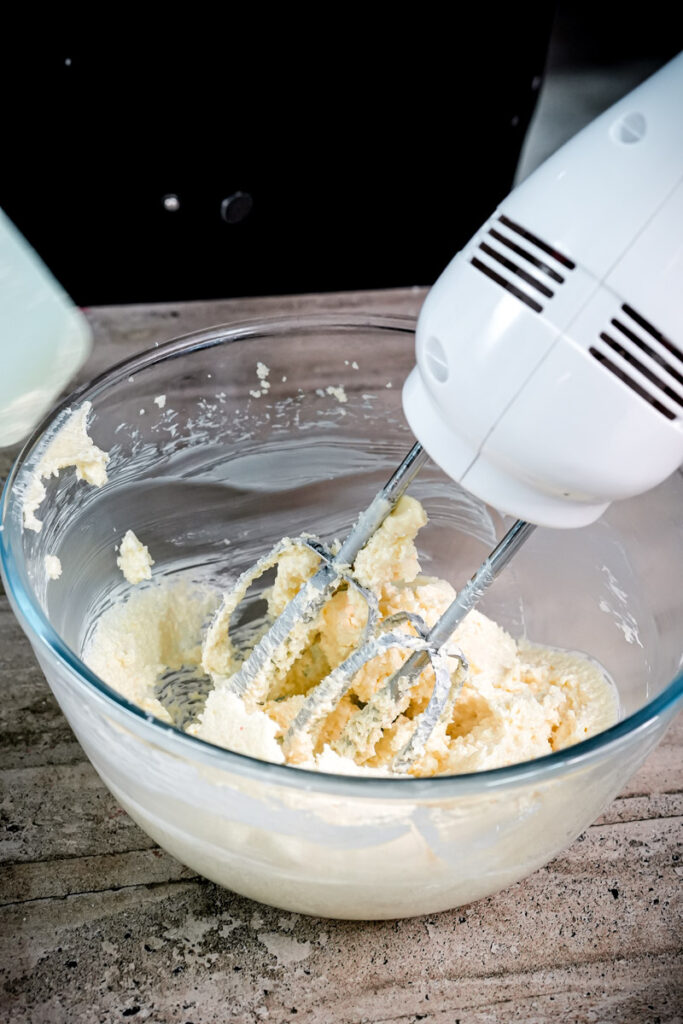
Cream Butter, Oil & Sugar: In your big mixing bowl, toss in the 2 cups of super soft butter, the 1/3 cup oil, and the 1 cup sugar. Grab your electric mixer. Start on low, then crank it up to medium-high. Beat ’em together for a good 3-5 minutes. You want it to get lighter in color (almost white!) and look really fluffy. This is called creaming – it beats air into the batter, helping the cake rise later. Don’t skimp on this step!
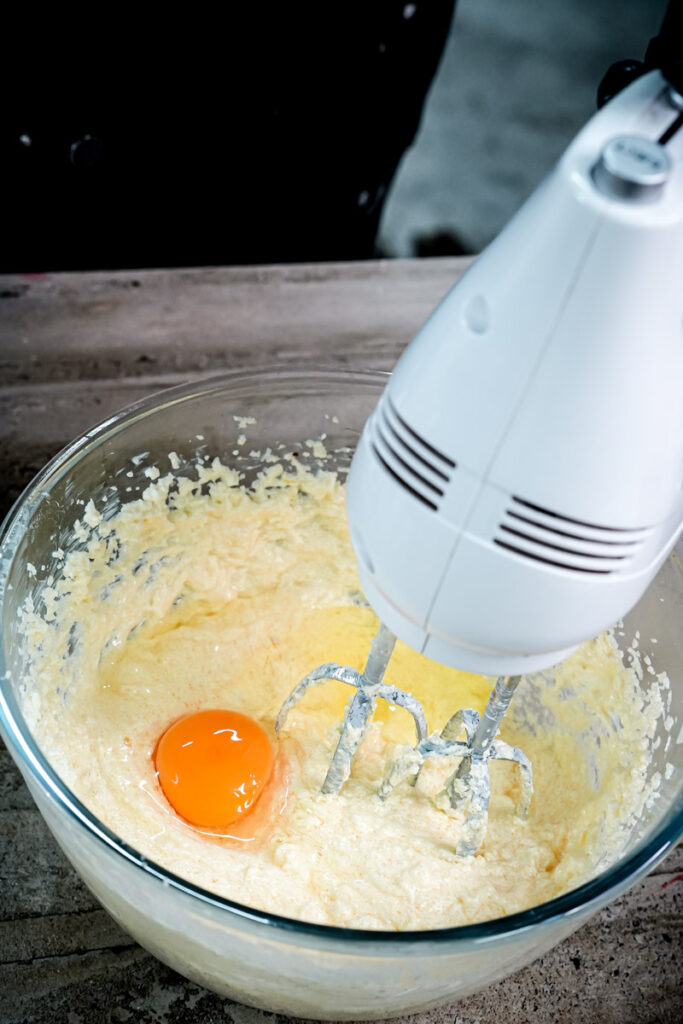
Add the Wet Stuff: Pour in the 2 teaspoons vanilla extract. Now add the 3 large room temp eggs, but do it one at a time. Beat for about 30 seconds after each egg before adding the next one. Use your spatula to scrape down the sides and bottom of the bowl now and then – gotta make sure everything gets mixed in! Lastly, beat in the 1/2 cup room temp sour cream. The mixture might look a little weird or separated right now. Totally normal! It’ll smooth out when we add the flour.
Whisk the Dry Stuff: In that medium bowl, whisk together the 1 cup flour, 1 teaspoon baking powder, 1/2 teaspoon baking soda, and 1 teaspoon salt. Whisking helps spread the baking powder/soda and salt evenly. No surprise salty or bitter bites!
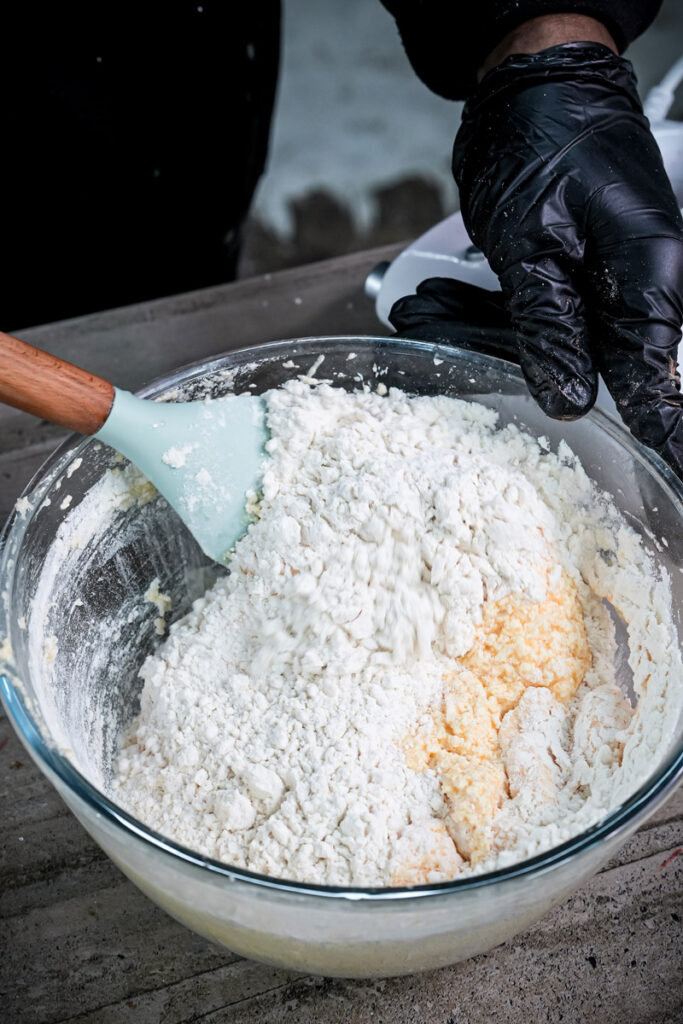
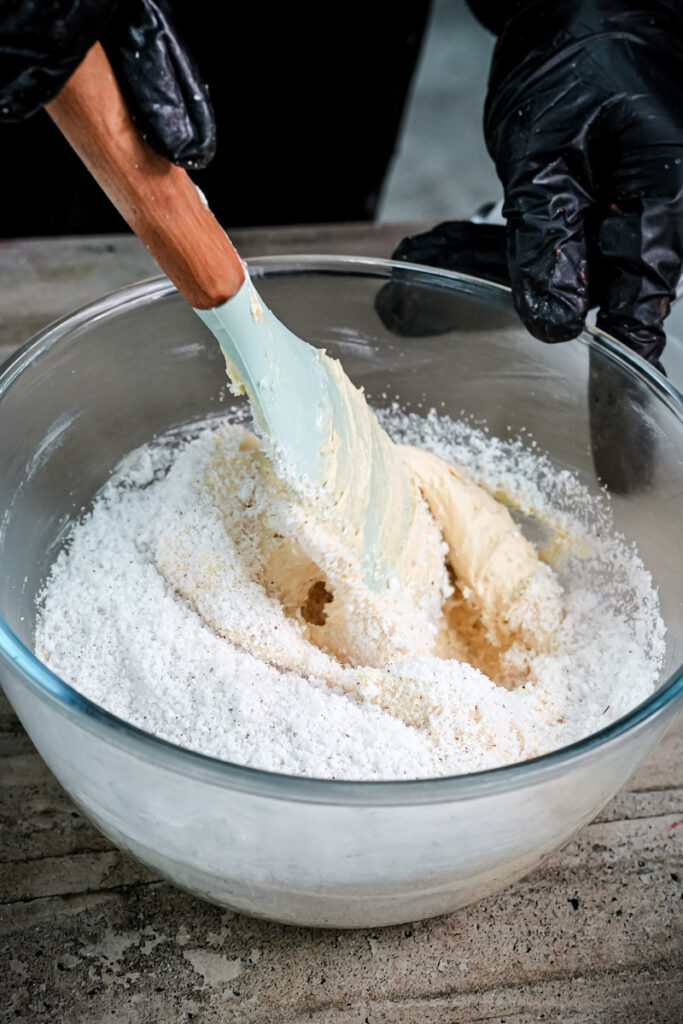
Mix Wet & Dry (Gently!): Turn your mixer down to low speed. We’re going to add the dry ingredients to the wet stuff. I usually do it in two goes. Add about half the flour mix, mix just until it starts to disappear. Add the rest of the flour mix, and again, mix only until you don’t see big streaks of flour. Super Important Tip: Stop mixing as soon as it comes together! If you mix too much now, the cake can get tough. We want tender, not chewy.
Fold in Coconut (Optional): Take the bowl off the mixer (if using a stand mixer). If you decided to use the 1/2 cup coconut flakes in the batter, gently fold them in now with your rubber spatula. If you used coconut extract earlier, skip this. Give the batter one last gentle stir from the bottom up, just to be sure it’s all combined. Remember: gentle!
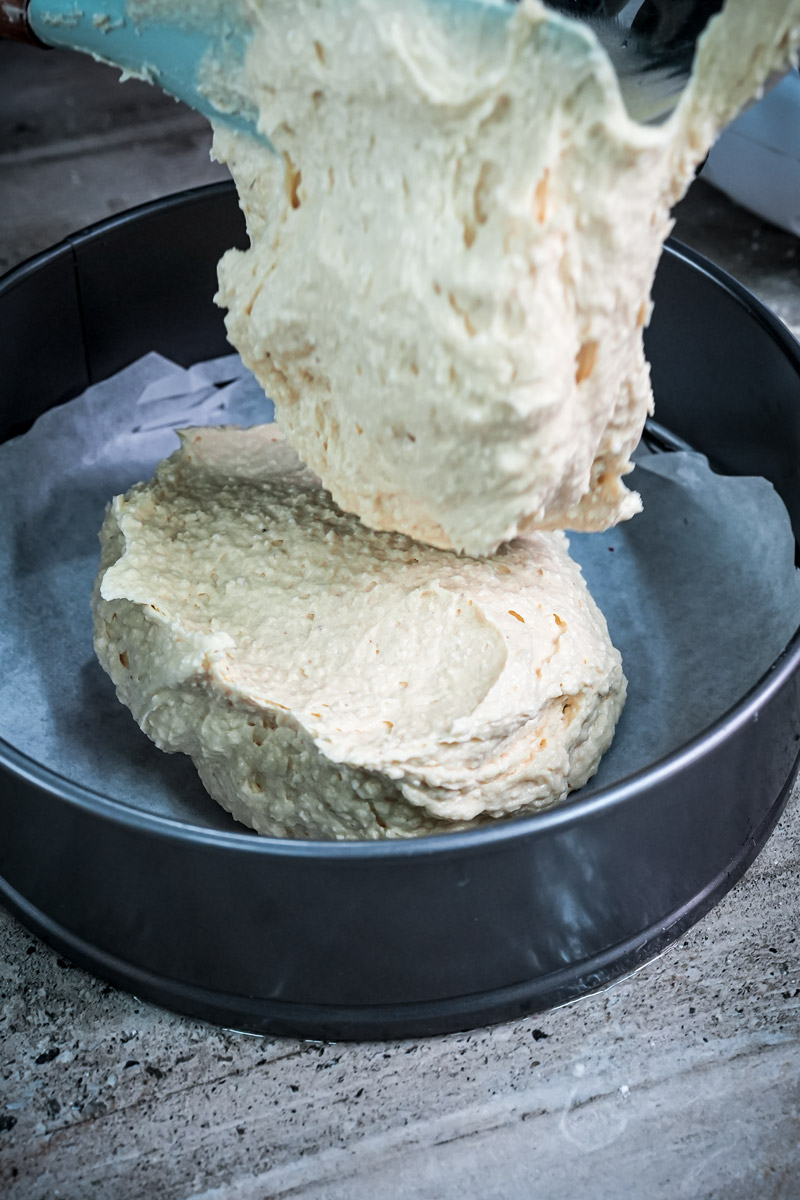
Fill Pans & Bake: Carefully divide the batter between your two prepared 7-inch pans. It might not look like a lot of batter in each pan – that’s okay! Smooth the tops a little. Pop them into the hot oven, on the center rack. Bake for 30 to 35 minutes.
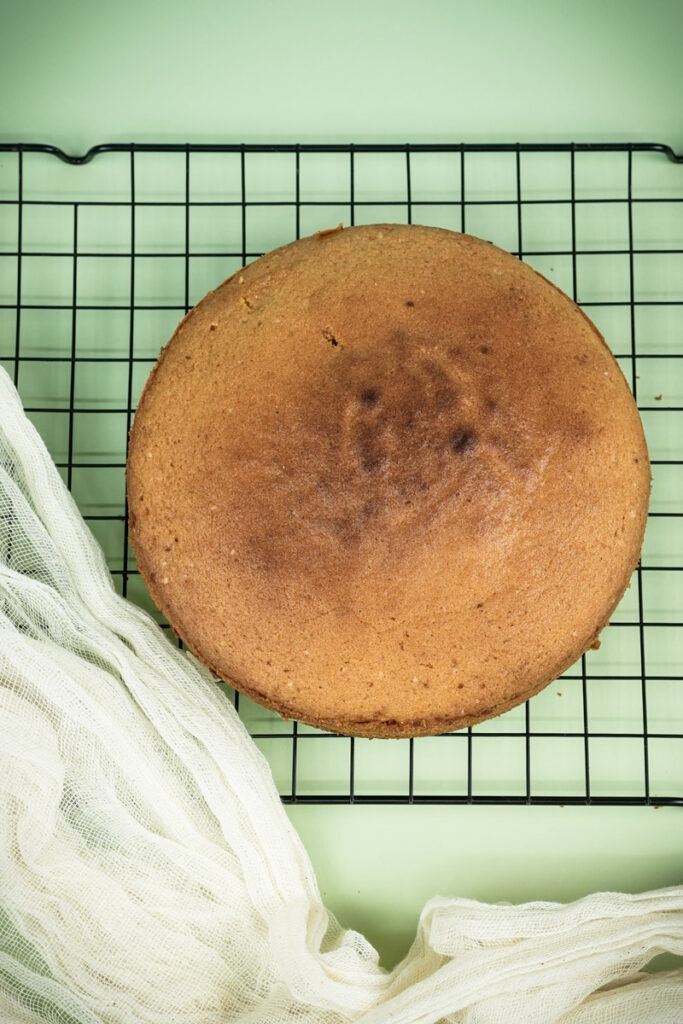
Is It Done Yet? How to tell: The cake should look golden brown. The edges should be pulling away just a tiny bit from the pan sides. Gently poke the top with your finger – it should spring back lightly. The best test? Stick a toothpick or a thin wooden skewer into the very center. If it comes out clean, or with just a few moist crumbs (no wet batter!), you’re golden! Ovens can be quirky, so maybe peek around 30 minutes.
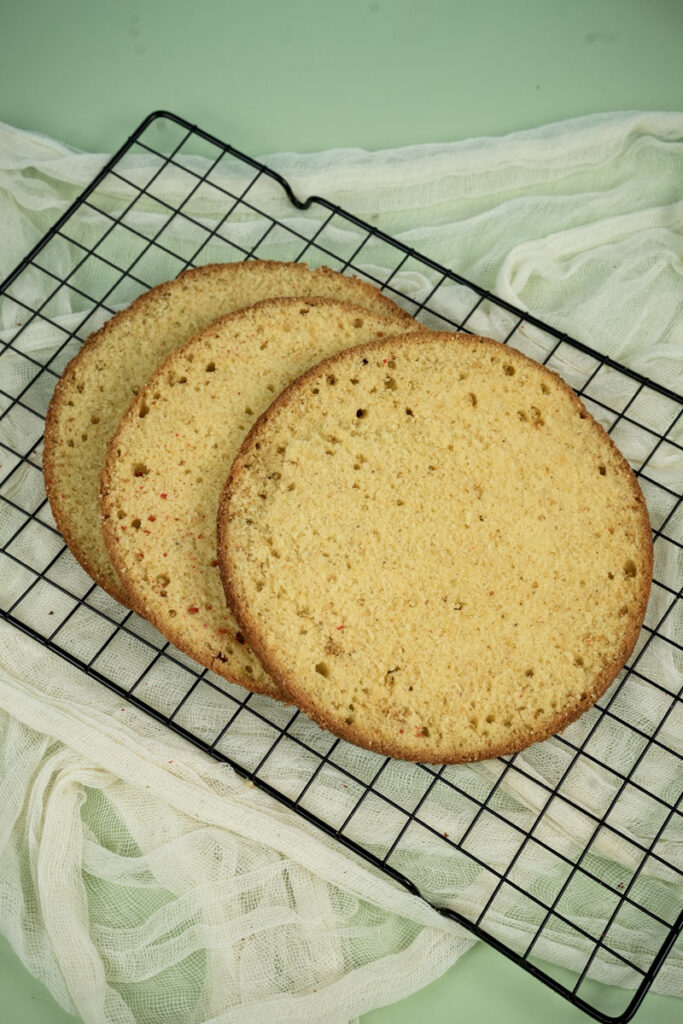
Cool Down Time (Be Patient!): Carefully take the pans out of the oven. Put them on a wire cooling rack. Let the cakes cool in the pans for about 15-20 minutes. This lets them set up a bit. Then, run a thin knife around the edges if they seem stuck, and flip the cakes out onto the wire rack. Peel off the parchment paper. Now, the hard part: let them cool completely. I mean it! At least an hour, maybe two. If you try to frost a warm cake… disaster. Sliding frosting, melty mess. Not pretty!
Make the Frosting: While those cakes are chilling out, let’s whip up the frosting! In a clean bowl (mixer bowl is perfect), beat the 1 cup softened butter on medium-high speed for 2-3 minutes. Get it really smooth and creamy. Turn the speed down to low. Gradually add the 1 cup sifted icing sugar. Mix until it’s just combined. Add the 1 teaspoon vanilla essence and the 1/4 cup room temp coconut milk.
Now, turn the speed back up to medium-high. Beat for another 2-3 minutes until the frosting is light, white, and looks like a fluffy cloud. Scrape the bowl down. Finally, use your spatula to stir in the 1/2 cup coconut flakes. Give it a taste! Need more sugar? Add a little. Too thick? A tiny splash more coconut milk (like, a teaspoon). Too thin? A spoonful more icing sugar.

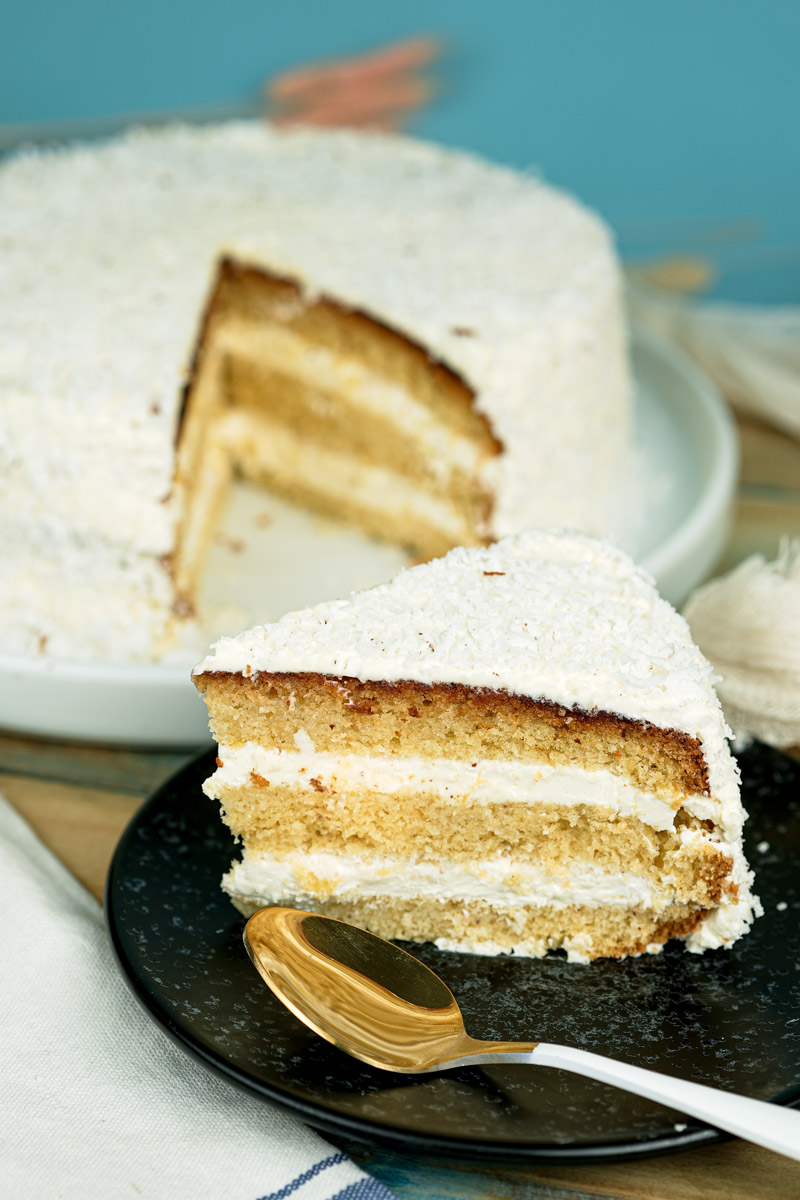
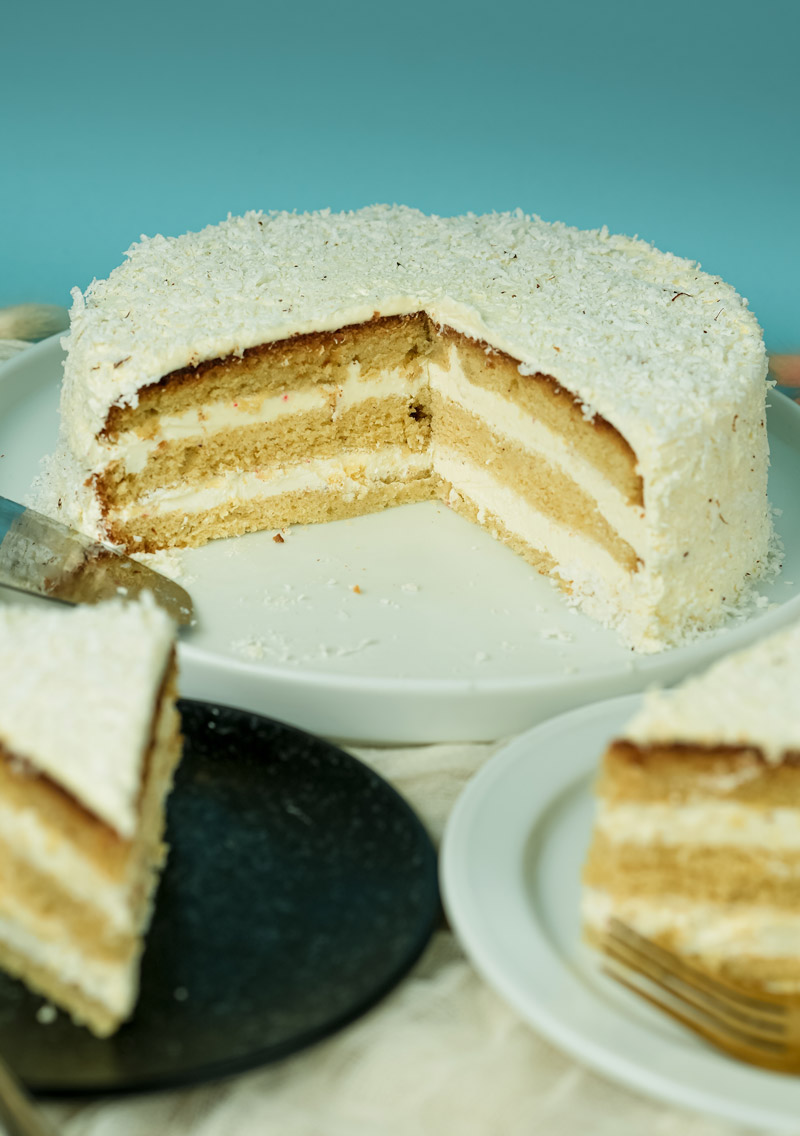
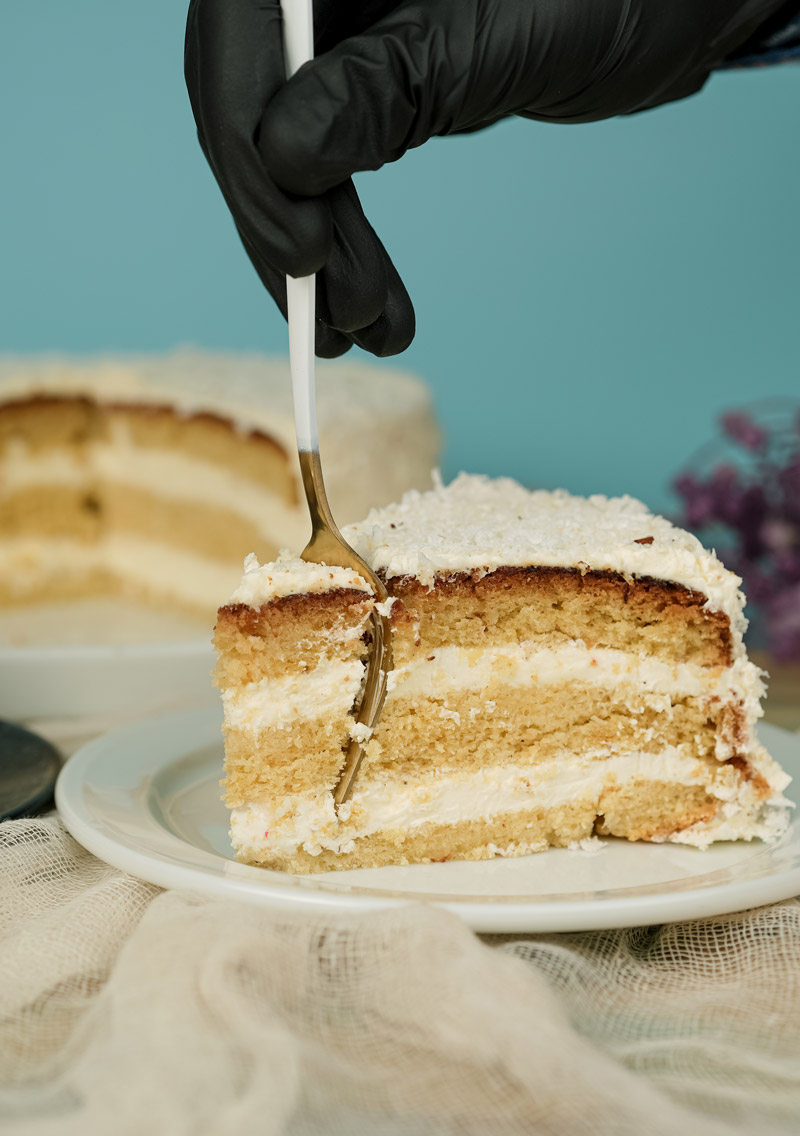
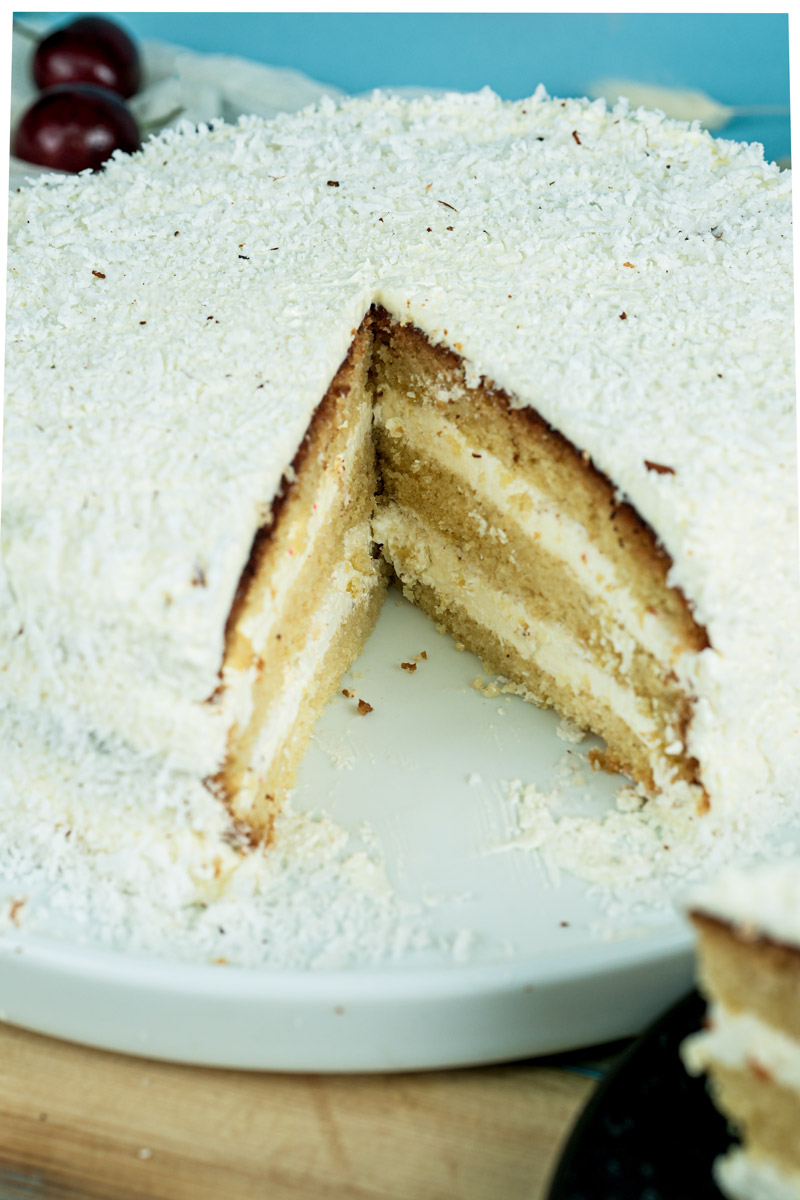
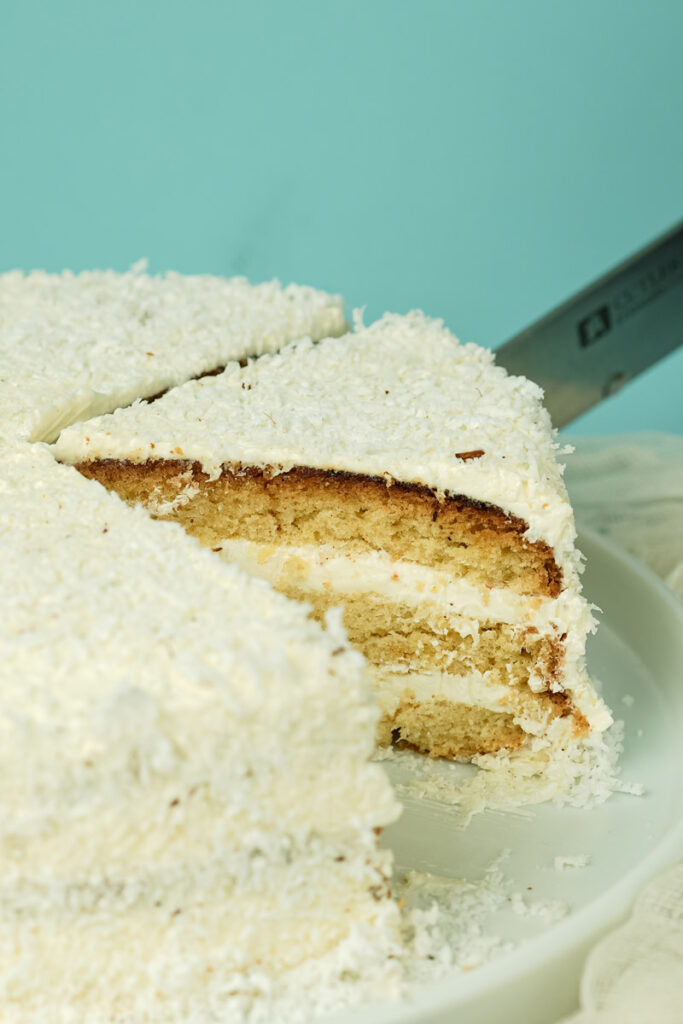
Put It All Together! Once the cakes are 100% cool, it’s assembly time! Put one layer, flat-side up (usually the bottom is flatter), on your serving plate. Plop about 1/3 of the frosting on top. Spread it evenly, almost to the edges. Carefully place the second layer on top (pick the flatter side to be the top surface).
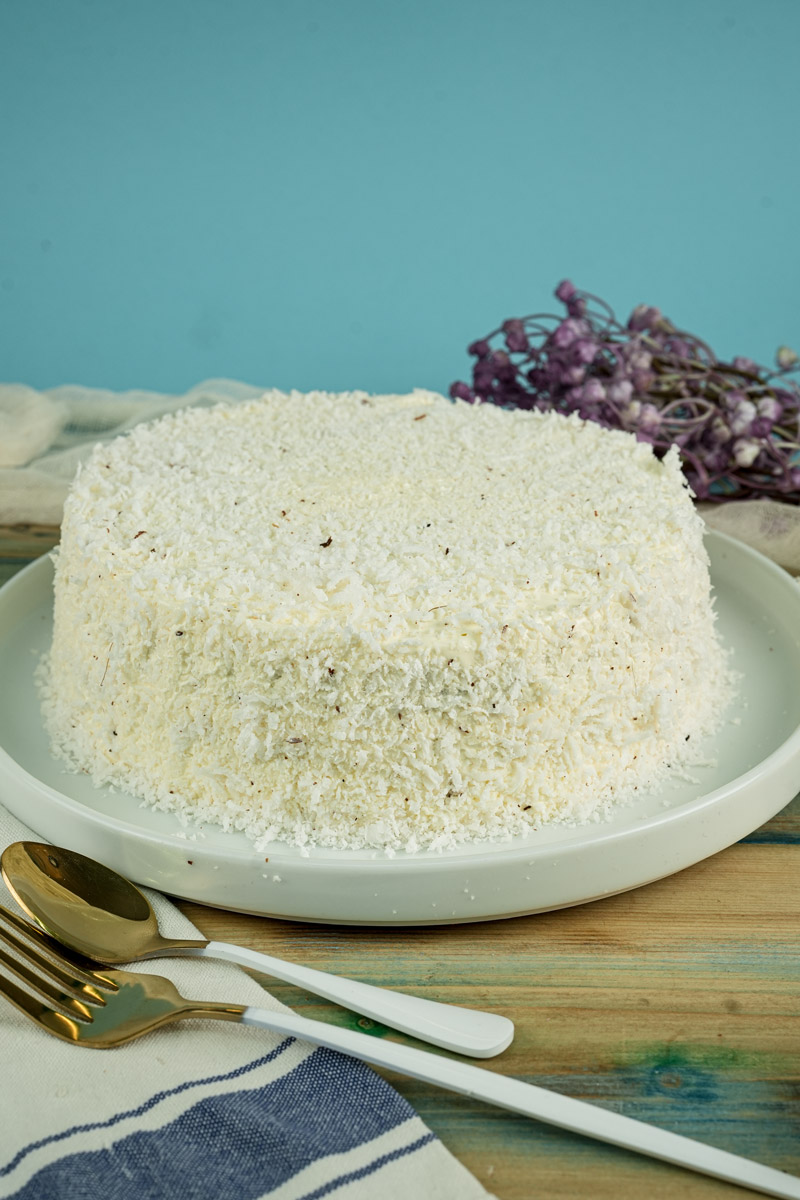
Use the rest of the frosting to cover the top and sides. Smooth it out with your offset spatula or knife, or make pretty swirls! Finally, gently press those toasted coconut flakes (if you made ’em) or just regular flakes onto the sides. Sprinkle some more on top. Ta-da!
Make It Your Own: Fun Twists & Ideas
Baking is awesome because you can totally play with recipes. Here are a few ideas to get you started:
- Dietary Tweaks:
- Gluten-Free? Try a good 1-to-1 gluten-free flour blend (make sure it has xanthan gum). The texture might be a little different, maybe a bit denser, but it’s worth a shot!
- Dairy-Free/Vegan? This needs bigger changes. Use a quality vegan butter block (like Miyoko’s or Melt) for the cake and frosting. Use vegan sour cream or maybe unsweetened applesauce in the cake. Check your coconut milk is dairy-free (most canned ones are). For eggs, try flax eggs (1 tbsp flaxseed meal + 3 tbsp water per egg, let it sit 5 mins) or a store-bought replacer. Results might vary a bit with this rich cake, though.
- Flavor Fun:
- Zing It Up: Add the zest of 1 lime or lemon to the cake batter and the frosting. So good with coconut!
- Go Tropical: Fold 1/2 cup of finely chopped dried pineapple or mango into the batter with the coconut. Or spread some pineapple jam between the layers! Yum.
- Get Nutty: Add 1/2 cup of chopped toasted pecans or walnuts to the batter. Or just sprinkle them on top. A little almond extract (maybe 1/2 tsp) is also amazing with coconut.
- Simple vs. Showstopper:
- Easy Peasy: Bake it in a 9×13-inch pan instead (bake time will be longer, maybe 35-45 mins). Just frost the top. Done! Or make cupcakes (bake 18-22 mins).
- Fancy Pants: Make a coconut soak! Gently heat 1/2 cup coconut milk, 1/4 cup sugar, and 1/4 cup rum (optional!) or water until the sugar dissolves. Cool it down. Brush it all over the cooled cake layers before frosting. Extra moist, extra flavour! You could also get fancy with piping bags for the frosting.
- Seasonal Vibes: Coconut is great year-round, but imagine this cake layered with fresh strawberries or raspberries in the summer! Piled high on top? Gorgeous.
Serving and Storing Your Masterpiece
You did it! High five! Now comes the best part – eating it.
- How to Serve: Honestly, this cake is amazing all by itself. A slice with coffee or tea? Perfect. Want to dress it up? Add whipped cream, vanilla ice cream, maybe some pineapple sorbet, or drizzle passion fruit sauce over it. Tip for neat slices: Use a long, sharp knife. Dip it in hot water and wipe it dry between each cut.
- Keeping it Fresh:
- Store the finished cake in an airtight cake carrier or cover it well.
- It’s fine at room temperature for 1-2 days, unless your kitchen is super hot.
- Need it to last longer? Pop it in the fridge for up to 5 days. The frosting will get firm when it’s cold.
- Super Important: If you refrigerate it, always let the cake sit out on the counter for at least 30-60 minutes before serving. Cold cake tastes kinda dull and dry. Letting it warm up brings back that amazing Moist Coconut cake texture and all the flavor.
- Freeze for Later? Totally!
- Unfrosted Layers: Cool them completely. Wrap tightly in two layers of plastic wrap, then a layer of foil. Freeze for up to 2 months. Thaw overnight in the fridge (still wrapped!).
- Frosted Cake: You can freeze the whole thing, or individual slices. First, freeze it uncovered until the frosting is solid (a couple of hours). Then wrap it well in plastic wrap and foil. Freeze for up to 1 month. Thaw overnight in the fridge. Just know that freezing might change the frosting texture a tiny bit when it thaws.
And there you have it! Everything I know about making this fantastic, rich, and moist coconut cake. I really hope you enjoy baking (and eating!) it. Happy Baking!
PrintCoconut Cake
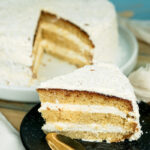
Get ready for a slice of sunshine! This easy coconut cake recipe is wonderfully rich and stays incredibly moist thanks to a mix of butter and oil. Topped with a dreamy, creamy coconut milk frosting, it’s a simple, old-fashioned style cake perfect for any occasion. Seriously delicious!
- Prep Time: 20 mins
- Cook Time: 30-35 mins
- Total Time: Approx. 2.5 hours (includes cooling)
- Yield: 14–15 servings (two 7-inch layers) 1x
- Category: Dessert
- Cuisine: American
Ingredients
For the Moist Coconut Cake:
- 2 cups (4 sticks) unsalted butter, very soft (room temperature!)
- 1/3 cup neutral oil (vegetable, canola, etc.)
- 1 cup granulated sugar
- 3 large eggs (room temperature!)
- 1/2 cup sour cream (room temperature!)
- 2 tsp pure vanilla extract
- 1 cup all-purpose flour
- 1 tsp baking powder
- 1/2 tsp baking soda
- 1 tsp salt
- Optional: 1/2 cup sweetened coconut flakes OR 1 tsp coconut extract (or both!)
For the Dreamy Coconut Frosting:
- 1 cup (2 sticks) butter, softened (room temperature!)
- 1 cup icing sugar (powdered sugar), sifted
- 1/4 cup canned full-fat coconut milk (room temperature!)
- 1 tsp vanilla essence (or extract)
- 1/2 cup sweetened coconut flakes
- Optional: Extra coconut flakes for garnish (toasted or plain)
Instructions
- Get Ready: Heat your oven to 180°C (356°F). Grease and line two 7-inch round cake pans with parchment paper. Optional: Toast extra coconut for garnish now (5-8 mins at 180°C, watch closely!).
- Cream Fats & Sugar: In a large bowl, beat the soft butter, oil, and sugar with an electric mixer on medium-high until light and fluffy, about 3-5 minutes. Don’t skip this! It adds air.
- Add Wet Ingredients: Beat in the vanilla. Add eggs one at a time, beating well after each. Scrape the bowl. Beat in the sour cream. (It might look curdled – totally fine!).
- Whisk Dry Stuff: In a separate bowl, whisk together flour, baking powder, baking soda, and salt.
- Combine Gently: On low speed, add the dry ingredients to the wet mixture in 2-3 parts. Mix just until the flour disappears. Stop mixing! Overmixing = tough cake.
- Fold in Coconut (If Using): If adding coconut flakes (or extract, if you didn’t add it earlier) to the batter, gently fold them in now with a spatula.
- Divide & Bake: Pour batter evenly into the prepared pans. Smooth the tops. Bake for 30-35 minutes.
- Check Doneness: Cake is done when golden, edges pull away slightly, and a toothpick inserted in the center comes out clean.
- Cool Down: Let cakes cool in the pans for 15-20 mins, then flip onto a wire rack. Peel off parchment. Cool completely (1-2 hours). Seriously, wait until they’re cool!
- Make Frosting: While cakes cool, beat 1 cup softened butter until smooth (2-3 mins). On low, add sifted icing sugar, then vanilla and coconut milk. Beat on medium-high until light and fluffy (2-3 mins). Stir in 1/2 cup coconut flakes by hand.
- Assemble: Place one cool cake layer on a plate. Top with 1/3 of the frosting. Add the second layer. Frost the top and sides. Garnish with extra coconut flakes (toasted or plain). Yum!
Notes
- Serving: Delicious on its own! Also great with berries, whipped cream, or vanilla ice cream. For neat slices, use a hot, clean knife.
- Why Room Temp?: Using room temperature butter, eggs, and sour cream is key for a smooth batter and a tender moist coconut cake. Don’t cheat this step!
- Thin Layers?: This recipe makes slightly thinner layers in 7-inch pans. For thicker layers, use 6-inch pans or double the cake batter recipe.
- Storage: Store covered at room temp for 1-2 days or in the fridge for up to 5 days.
- Serve Right: Always let refrigerated cake sit at room temperature for 30-60 minutes before serving. Cold cake = muted flavor! Let it warm up to taste its best.
- Freezing: Wrap unfrosted layers tightly and freeze up to 2 months. Freeze frosted cake (whole or slices) uncovered until firm, then wrap tightly (up to 1 month). Thaw overnight in the fridge.