Hey everyone!
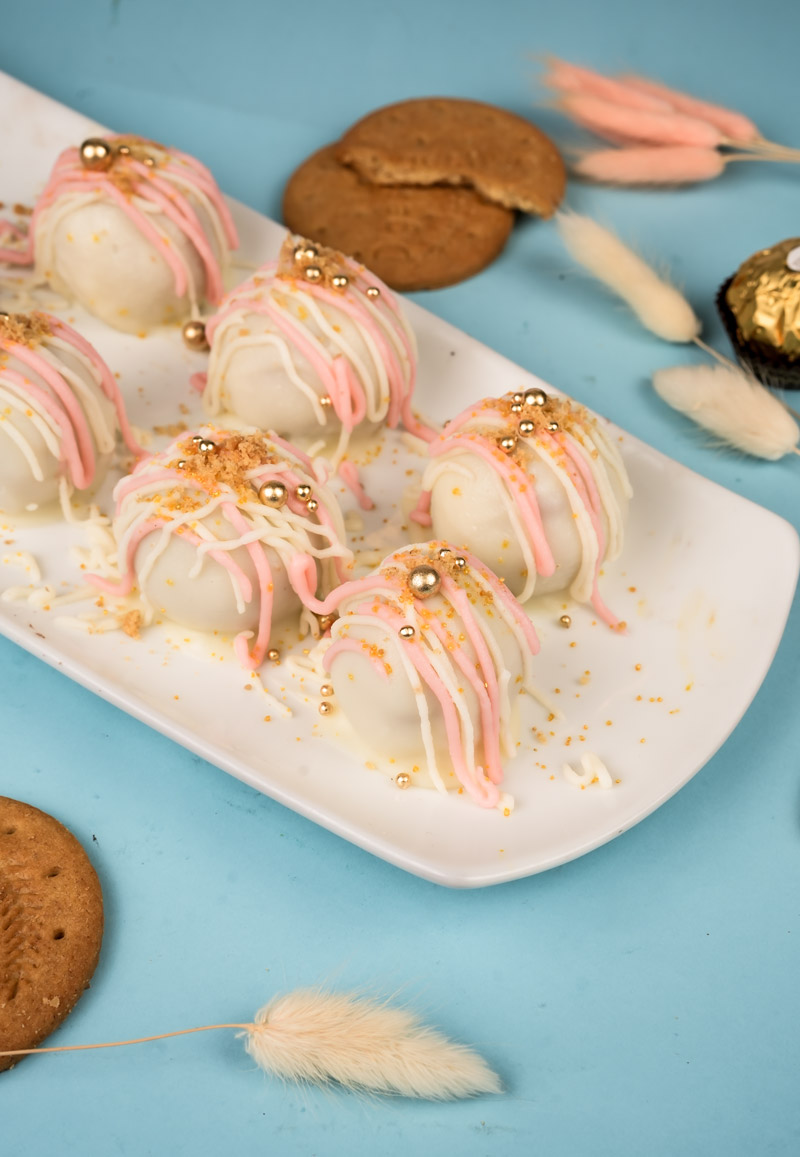
Today I want share a recipe that’s become a total lifesaver in my kitchen. You know those times when you want something sweet, impressive, but really easy? These Digestive cookies and cake balls (just 3 ingredients!) are the answer. Seriously.
If you’re like me, you love a treat that tastes amazing but doesn’t take all day to make. These little guys are exactly that.
Think of them like fancy chocolate truffles’ easy-going cousin. Or maybe those chocolate biscuit balls your grandma used to make? Lots of recipes use condensed milk or butter. But this one? It uses cream cheese. Sounds different, right? But trust me, it adds this tiny tang that cuts through the sweet white chocolate perfectly. Makes them taste kind of grown-up, but still so good.
Best part? No baking needed! Just mix, roll, chill, and dip. Let’s get to it!
Recipe Lowdown: What You Need to Know
Before we dive in, here’s the quick scoop:
- Prep time: About 10-15 minutes. Mostly just crushing cookies and mixing! Easy peasy.
- Cook time: Zero cooking! But you do need 1 hour of chill time. This is super important so the balls get firm before dipping. Don’t skip it!
- Makes: About 9-10 yummy cake balls (around 1-inch size).
- Need more or less?
- Double it: Easy! Just use twice the amount of everything.
- Halve it: Works great too! Perfect for a smaller batch.
- Skill Level: Super easy! Great for first-timers, cooking with kids (just watch them with the melted chocolate!), or anytime you want a quick win in the kitchen.
- Stuff You’ll Need:
- A big mixing bowl
- A spatula or wooden spoon
- Something to crush the cookies (Food processor = fast. Ziploc bag + rolling pin = good workout!)
- Bowl for melting chocolate (microwave-safe or one that fits over a pot)
- Baking sheet or big plate lined with parchment paper (stops sticking!)
- Nice to have: Small scoop (for same-size balls), forks or toothpicks for dipping.
- Make Ahead? Totally! They need chilling anyway. Make the mixture and roll the balls a day before. Keep ’em covered in the fridge. You can even coat them a day early too. Easy planning!
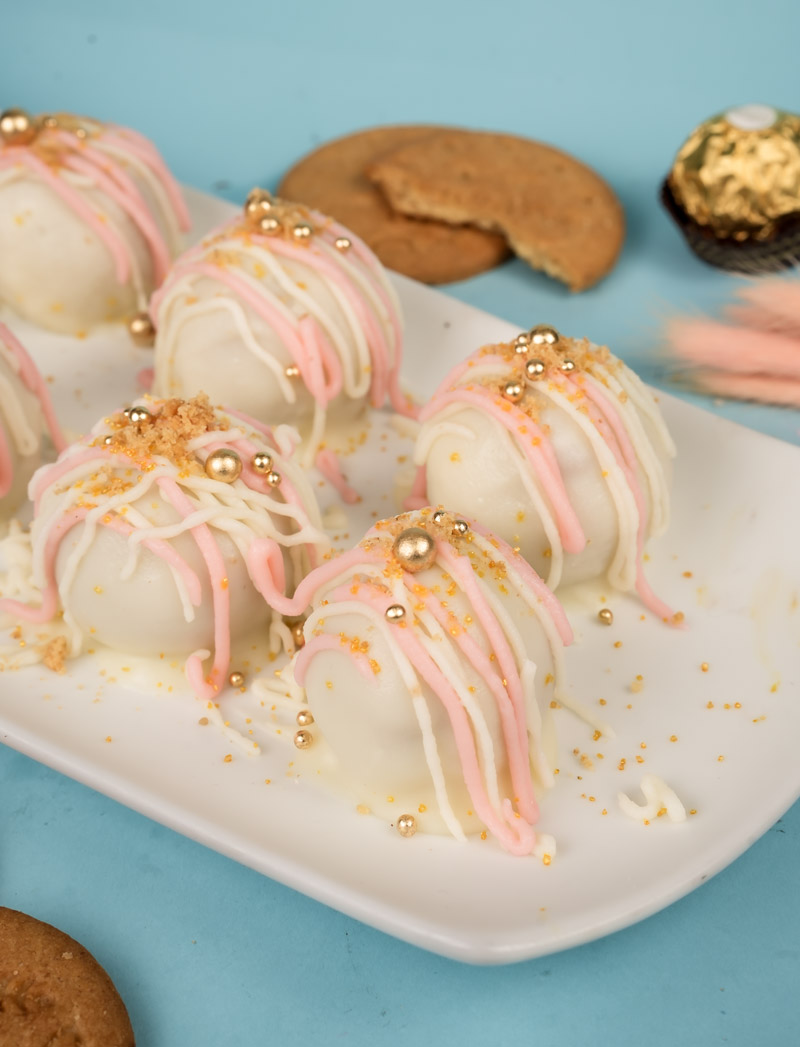
Just Three Things: Your Ingredients
The magic of these no bake digestive cake balls is how simple they are. Just three things! Let’s break ’em down:
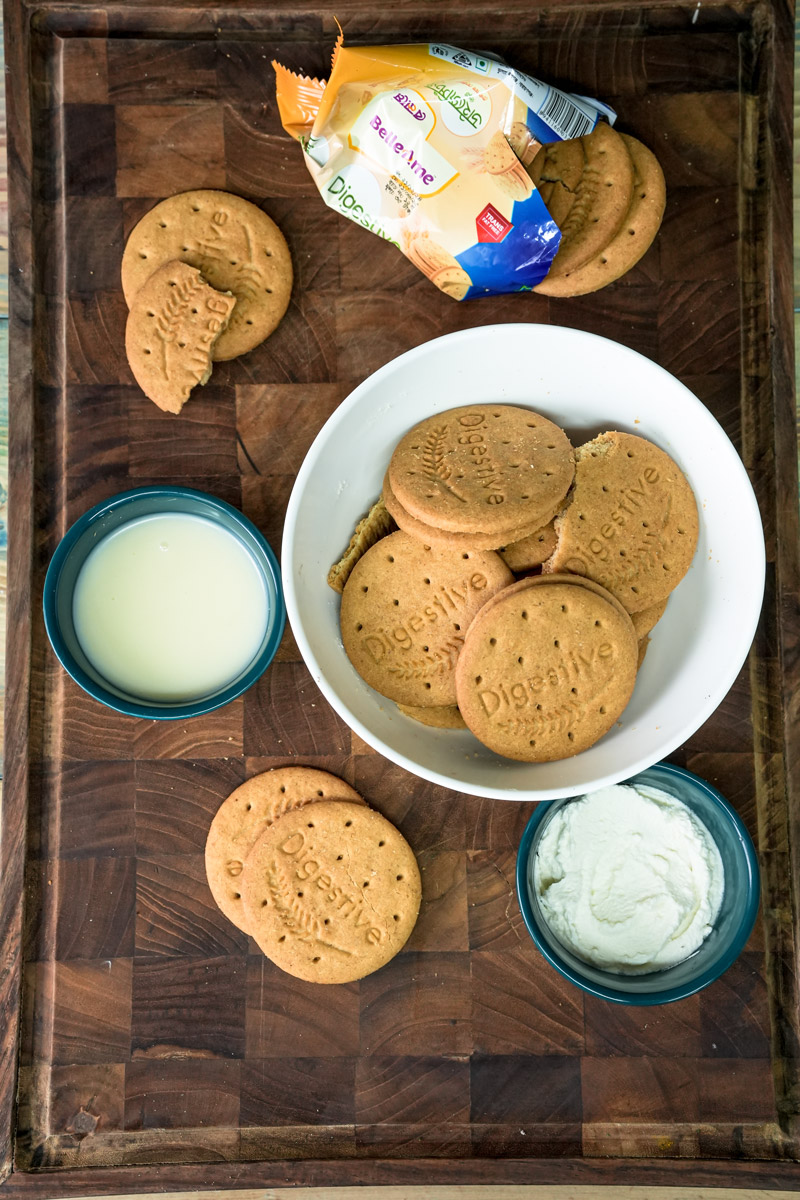
- Digestive Cookies (150-200g): These are the star! Digestives have that crumbly texture and slightly wheaty, not-too-sweet taste. Perfect base. Regular ones work great.
- Can’t find them? Graham crackers are a good swap if you’re in North America. Similar vibe. Plain sweet cookies like Marie biscuits could work, but the taste will change a bit.
- Get Ready: We need to crush these bad boys into fine crumbs. More on that in a sec!
- Cream Cheese (50-60g): This holds it all together and adds that yummy tang. Makes them creamy and balances the sweetness.
- Best Kind: Use the full-fat block kind if you can. It’s firmer. The stuff in tubs can be softer and might make your mix too sticky.
- Can I swap? Neufchâtel cheese works if you want lower fat, but they might not be quite as rich.
- Super Important: Your cream cheese needs to be soft, like room temperature soft. Leave it out for about 30-60 minutes before you start. Cold cream cheese = lumpy mess. Nobody wants that.
- White Chocolate (80-100g): The sweet coating!
- Use Good Stuff: Pick a white chocolate you actually like eating! Baking bars or good quality chips melt best. Some “white coating” or “candy melts” are okay, but real white chocolate (with cocoa butter) just tastes better, in my opinion.
- Not a fan? No problem! Use milk, semi-sweet, or dark chocolate instead. Same amount.
- Get Ready: If using a bar, chop it up small so it melts nice and easy.
Okay, Let’s Make These Things! Step-by-Step
Alright, got your stuff? Let’s turn these three simple ingredients into little bites of awesome. I’ll walk you through it.
Step 1: Crush Those Cookies!
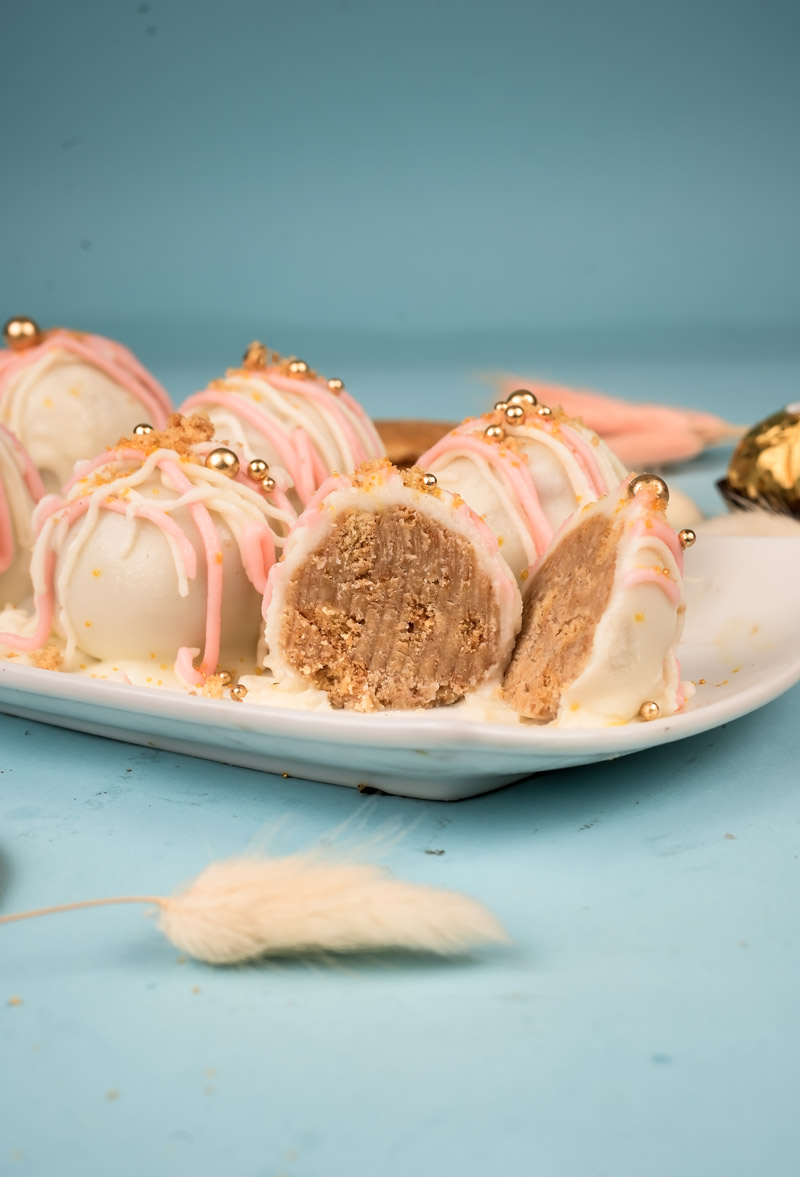
First things first, let’s smash those digestives. They’re the backbone of our cake balls. We want fine crumbs, kinda like damp sand. Don’t sweat it if there are a few bigger bits – adds character!
- Food Processor Way (Fast!): Got one? Awesome. Break the cookies up a bit, toss them in. Pulse a few times, then run it in short bursts. Keep an eye on it – you want crumbs, not dust! Scrape the sides if needed. It’ll start smelling amazing.
- Bag & Bash Method (Good Stress Relief!): No processor? No worries. Put cookies in a strong plastic zipper bag. Squeeze the air out, seal it up. Lay it flat. Grab a rolling pin, a heavy can, or even the bottom of a sturdy glass. Start whacking gently, then roll or press firmly. Flip the bag, repeat. Keep going ’til you have fine crumbs. Takes longer, but hey, it works!
- Check Your Crumbs: Look in the processor or bag. Looks like coarse sand? Perfect! You should have about 1.5 to 2 cups of crumbs. Take a whiff – smells like cookies!
Step 2: Mix It Up!
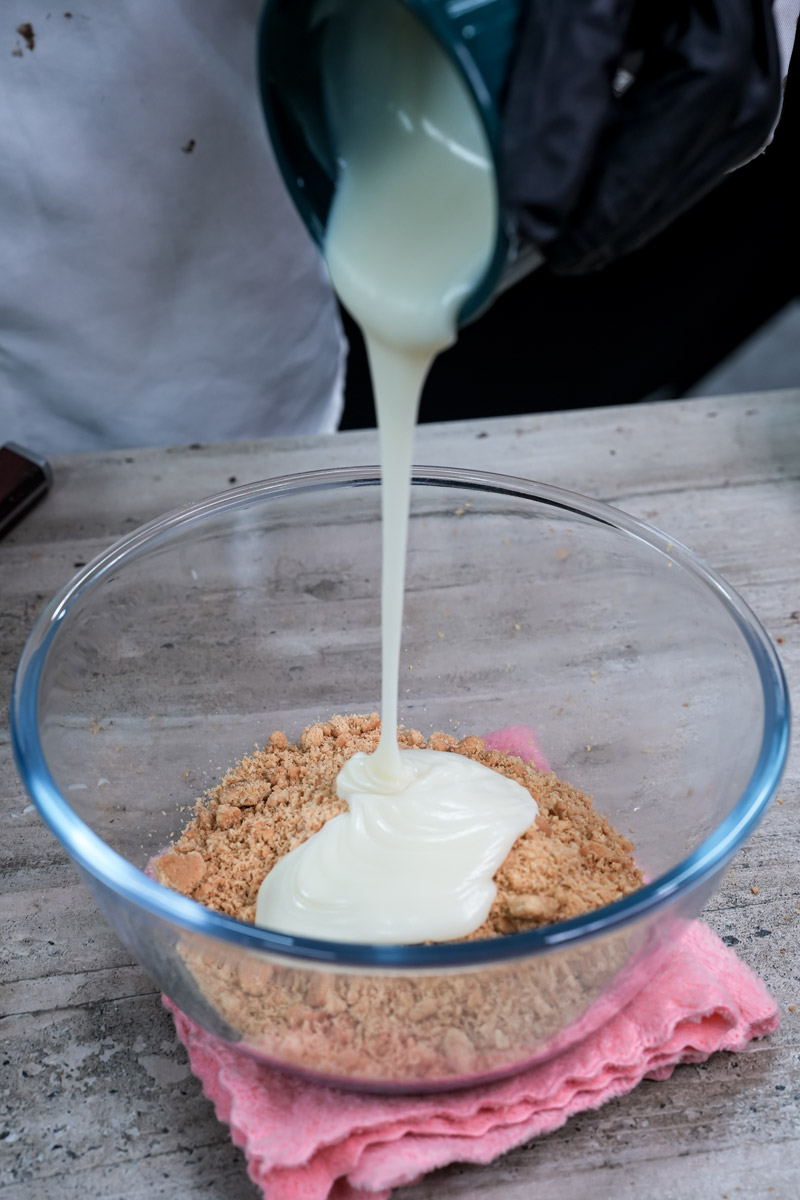
Now, let’s mix the crumbs and that lovely cream cheese. Get a big bowl – you need room! Dump in the crumbs. Add the softened cream cheese. Seriously, make sure it’s soft. Cold cream cheese just won’t mix well.
- Get Started: Use a strong spatula or spoon. Start folding the cream cheese into the crumbs. It might look dry at first. That’s okay! Just keep mixing, squishing the cream cheese against the bowl, folding it in.
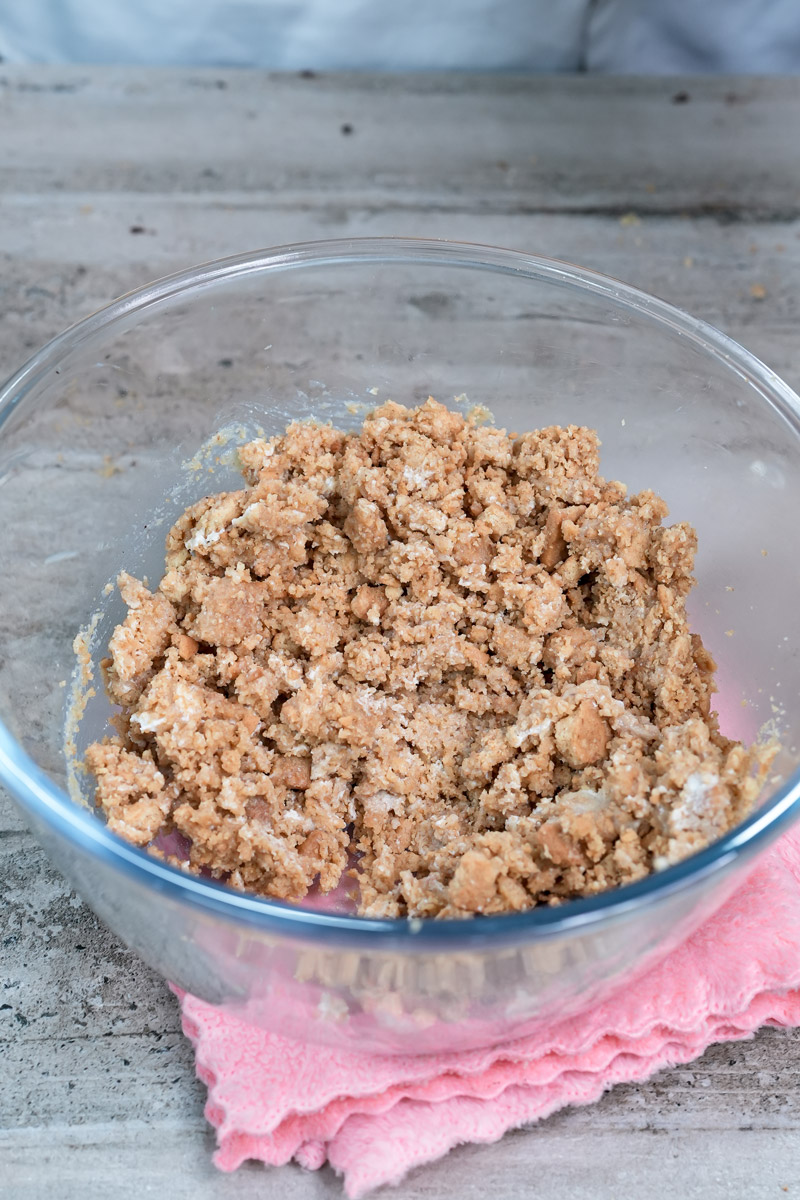
- Use Your Hands: Honestly? Clean hands work best here. Once it starts coming together, get in there! Knead and squeeze gently. You’ll feel the crumbs soak up the cream cheese. It turns from loose bits into something that sticks together, like soft playdough.
- Is it Right? Squeeze a bit in your hand. Does it hold its shape? Great! It should be easy to mold, not too wet or sticky.
- Too dry? Add a tiny bit more soft cream cheese (like, 1 teaspoon).
- Too sticky? (Unlikely, but maybe). Add a tablespoon more crumbs. Trust your gut! It should smell like cookies and cream cheese now. Yum!
Step 3: Roll ‘Em Up!
Time for the fun part – rolling! Get your baking sheet lined with parchment paper ready. This stuff is magic – stops everything from sticking. You’ll thank me later.
- Scoop & Roll: How big do you want them? A small cookie scoop (about 1 tablespoon) makes them all the same size. Or just use a tablespoon. Scoop some mix. Roll it between your hands. Nice and firm, but gentle. Make a smooth ball, about 1-inch across (or whatever size you like!).
- Sticky Hands? If the mix sticks too much:
- Dampen your hands slightly with cool water. Not soaking wet!
- Or, pop the whole bowl of mix in the fridge for 10-15 mins to firm up a bit.
- Line Them Up: Put each finished ball on the parchment paper. Leave a little space between them. Look at those cute little balls!
Step 4: Chill Out! (This is Important!)
Okay, I know you want to get to the chocolate. But please don’t skip this step! Especially with cream cheese. Chilling makes the balls firm.
Why does this matter? Because firm balls are way easier to dip in warm chocolate. Soft balls? They tend to fall apart or melt into the chocolate. Total mess. We don’t want that!
- Into the Fridge: Put the whole baking sheet of balls into the fridge. Make sure it’s flat.
- Wait for It: Leave them there for at least 1 whole hour. Yep, set a timer! They should feel cool and quite firm when you poke one gently. This lets the cream cheese firm up and hold everything together. Do not rush this step! It’s the secret to easy dipping.
Step 5: Melt That Chocolate!
While the balls are chilling, let’s melt the white chocolate. Remember: be gentle! White chocolate can burn easily and hates water.
- Chop Chop: If using a bar, chop it into small, even pieces. Smaller pieces melt faster and smoother. Chips? You’re good.
- Microwave Method (My Fave): Put chocolate in a clean, totally dry, microwave-safe bowl. Heat on medium power (like 50%) for 30 seconds. Take it out, stir well (even if it doesn’t look melted). Heat again in short bursts (15-20 seconds), stirring really well every time. Stop heating when it’s almost melted but still has a few lumps. The heat already in the chocolate will melt those last bits as you stir. Keep stirring gently off the heat until it’s smooth and shiny. Easy does it!
- Double Boiler Method: Or, put water in a small pot (just an inch or so). Simmer gently (no boiling!). Put a heatproof bowl with the chocolate on top. Make sure the bowl doesn’t touch the water. Stir the chocolate gently and constantly as it melts from the steam. Be super careful no water gets in – even one drop can make it seize up and get grainy! Once smooth, take the bowl off the heat (use oven mitts!).
- The Goal: Smooth, flowing, melted white chocolate. Ready for dipping!
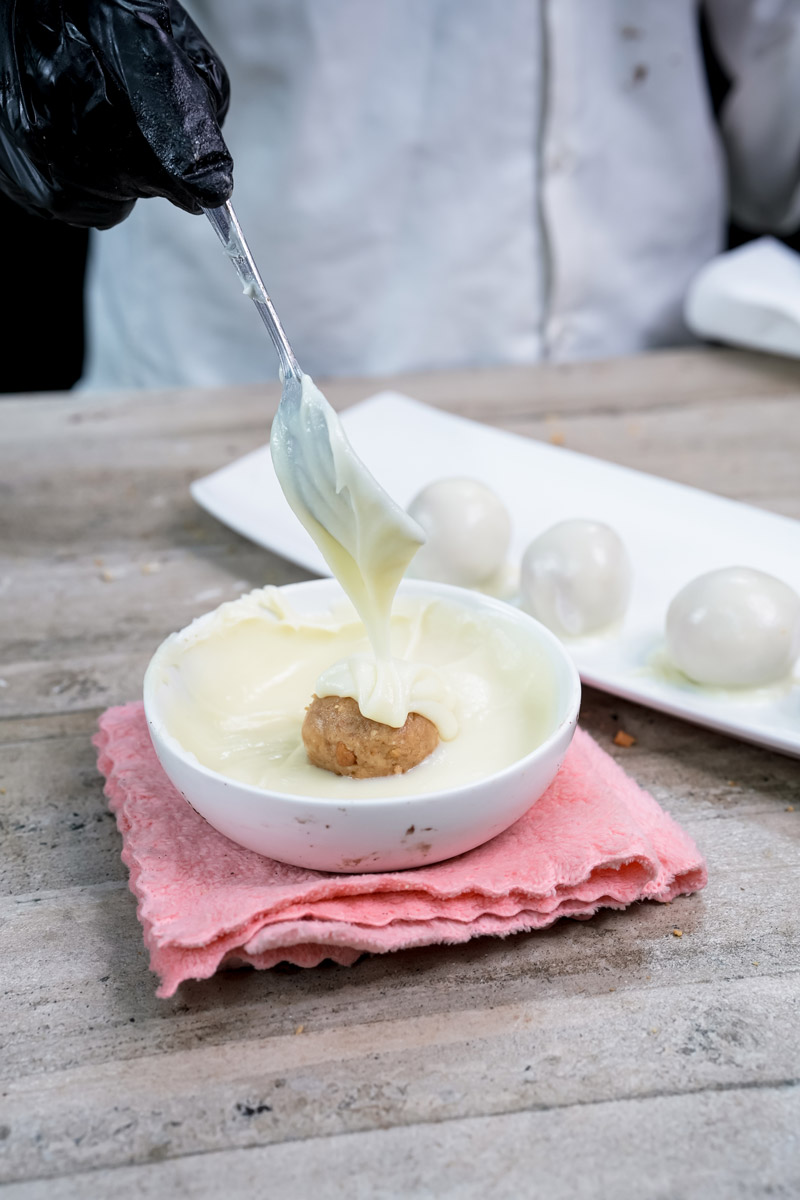
Step 6: Take the Plunge – Dipping Time!
It’s time! Get your firmly chilled cake balls out of the fridge. Have your lovely melted white chocolate ready.
- How To Dip: Work with one ball at a time so the others stay cold. Gently drop a cold ball into the chocolate. Use two forks – one to roll it around until coated, the other to lift it out.
- Let it Drip: Hold the fork with the coated ball over the bowl for a few seconds. Tap the fork handle gently on the side of the bowl. This lets extra chocolate drip off. Makes for a cleaner look!
- Back to the Paper: Carefully slide the coated ball off the fork onto the parchment paper. Use the other fork or a toothpick to help nudge it off if needed.
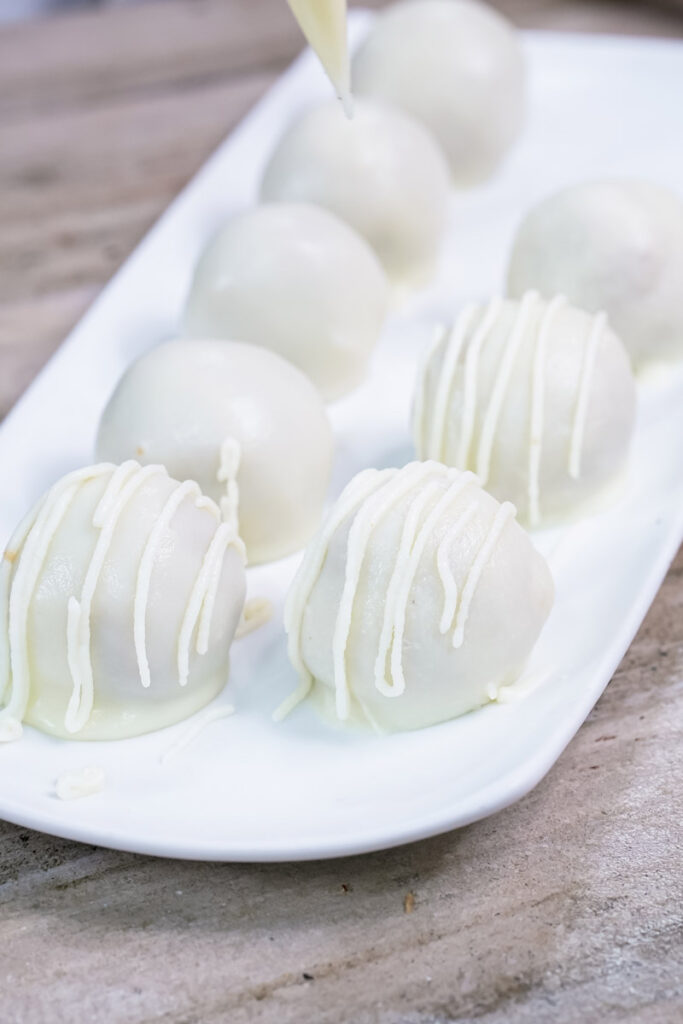
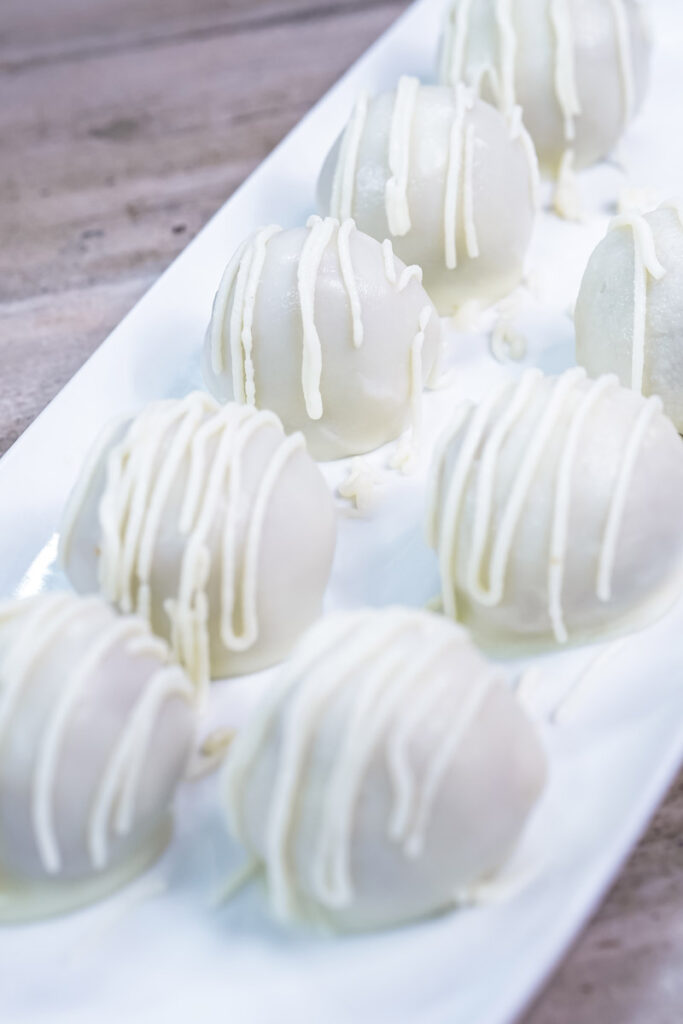
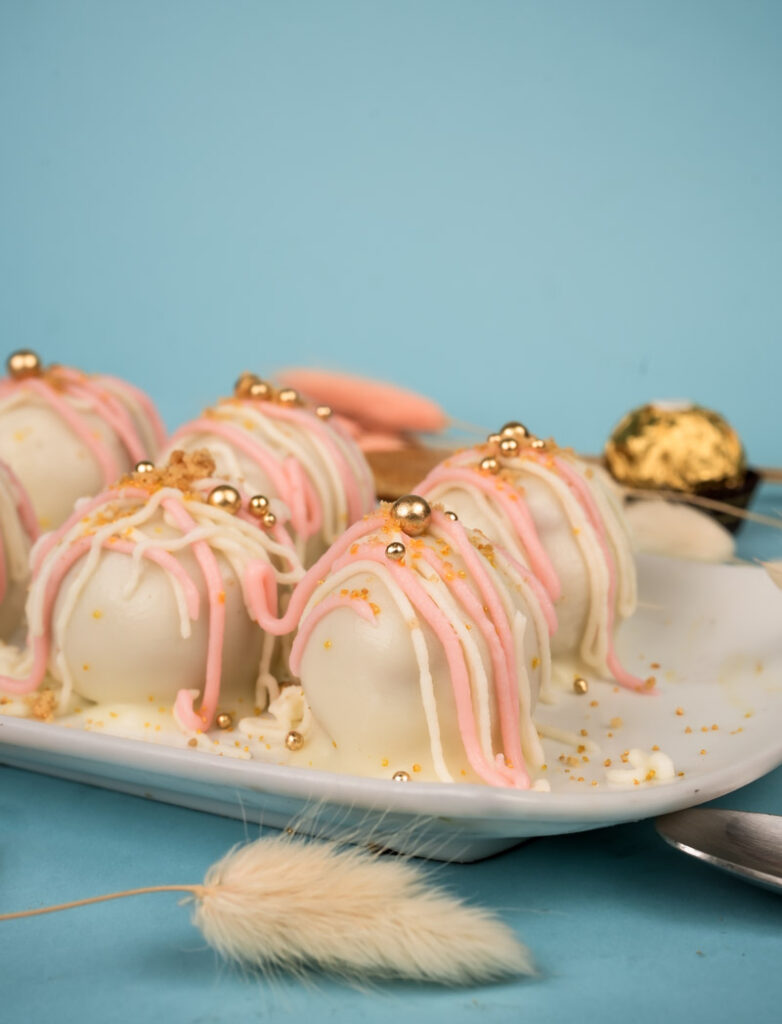
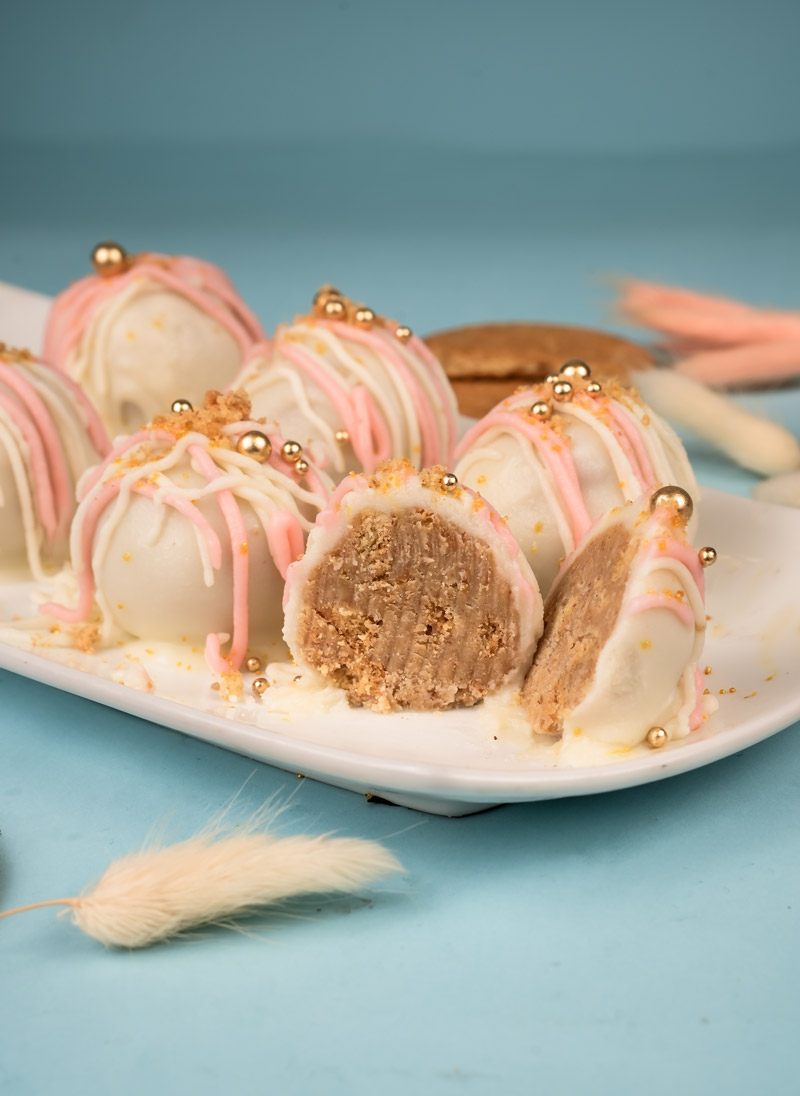
- Decorate NOW! Want sprinkles? Chopped nuts? Coconut? Add them right away while the chocolate is still wet. Once it sets, nothing will stick. Work kinda fast here! Repeat for all the balls.
Step 7: Final Chill – Almost There!
You did it! Your gorgeous coated treats just need one last quick chill so the chocolate sets hard.
- Back in the Cold: Slide that baking sheet back into the fridge.
- Set Time: This usually takes about 15 to 30 minutes. You’ll know they’re ready when the chocolate looks firm and dry, not wet or shiny.
- Ready to Eat! Once they’re set, they’re ready! Show them off, share them, eat them!
Make Them Your Own: Fun Ideas
These Easy Digestive cookies and cake balls are great as is, but why not play around?
- Need Swaps?
- Gluten-Free: Easy! Use gluten-free digestive-style cookies. Just check your chocolate/cream cheese are GF too if needed.
- Vegan: A bit trickier! Use vegan cookies, vegan cream cheese (find one that holds shape well), and vegan white chocolate. Texture might be slightly different, but worth a try!
- Add Some Flavour!
- Citrus Zing: Mix zest from half an orange or lemon into the cream cheese. So good with white chocolate!
- Warm Spice: Add a pinch of cinnamon or cardamom to the cookie crumbs.
- Vanilla Touch: A little vanilla extract (1/2 tsp) in the cream cheese mix? Yes please.
- More Texture: Mix in 1-2 tablespoons of finely chopped nuts (walnuts?), mini chocolate chips, or shredded coconut with the crumbs.
- Dress Them Up (or Down):
- Simple: Delicious just as they are. Maybe roll in sprinkles?
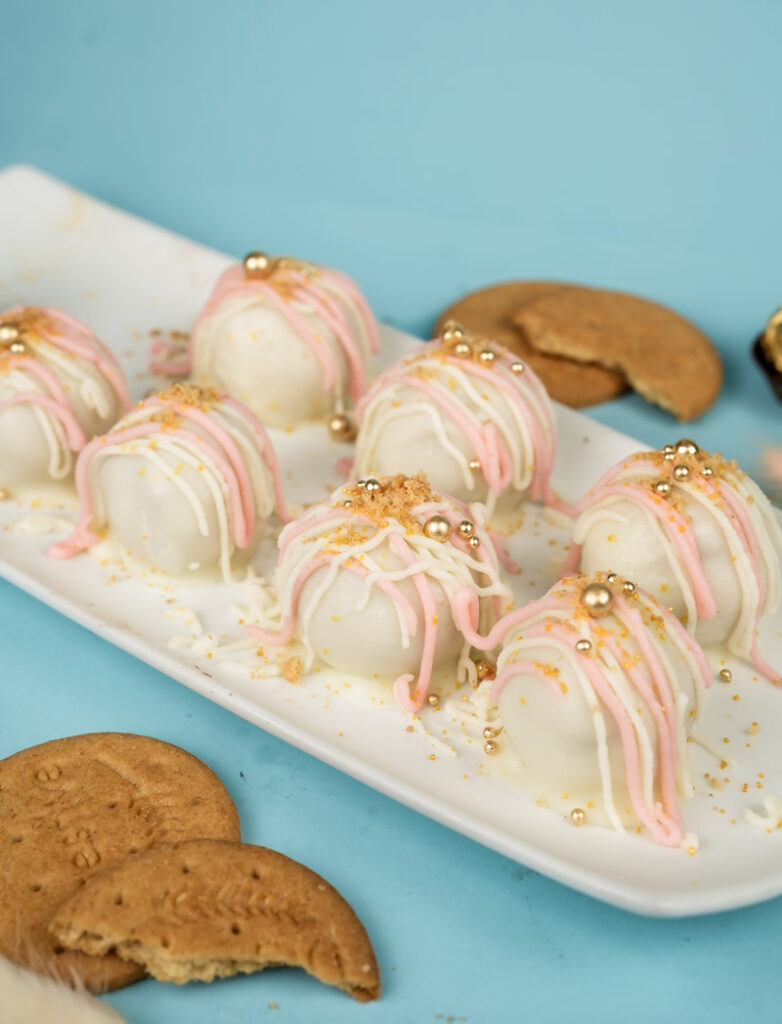
- Fancy: After the white chocolate sets, drizzle with melted dark chocolate. Sprinkle with edible glitter, chopped pistachios, or crushed freeze-dried raspberries for colour. Stick lollipop sticks in before chilling to make cake pops!
- Seasonal Fun: Crushed candy canes for Christmas? Pastel sprinkles for Easter? Go for it!
Serving & Storing Your Treats
Okay, you made them! Now what?
- How to Serve: Serve chilled, straight from the fridge. Pile them on a plate or put each one in a mini paper liner – looks cute and less messy fingers!
- Goes Great With: Coffee! Tea! Cold milk! Perfect little sweet snack or easy dessert.
- Storage: Super important! Because of the cream cheese, keep these in an airtight container in the fridge. They’ll stay good for about 3-5 days (if they last that long!).
- Reheating? Nope! Eat ’em cold.
- Make Ahead & Freezing:
- Make Ahead: Roll the uncoated balls, cover, and fridge for up to 2 days before dipping. Coated balls last 1-2 days in the fridge before serving.
- Freezing: Freeze uncoated balls on the sheet till solid, then pop in a freezer bag (up to 1 month). Thaw overnight in the fridge before dipping. You can freeze coated balls too (same way), but the chocolate might get a little condensation when thawing (just pat gently with paper towel). Thaw in fridge.
And there you have it! A super simple, totally tweakable, and seriously tasty recipe for Digestive cookies and cake balls (3 ingredients). I really hope you have fun making – and eating! – these little guys. Happy treat making!
PrintDigestive Cookies and Cake Balls
Seriously easy no-bake treats! Creamy, tangy cheesecake-like balls made from crushed Digestive cookies, bound with cream cheese, and dipped in sweet white chocolate. Your new favorite quick dessert!
- Prep Time: 15 minutes
- Cook Time: None
- Total Time: 1 hour 15 minutes (includes chilling)
- Yield: 9–10 balls 1x
- Category: Dessert, No-Bake
- Cuisine: Easy Treats
Ingredients
- 150–200g Digestive Cookies (about 1.5 – 2 cups crumbs)
- 50–60g Cream Cheese, softened to room temp (block style works best!)
- 80–100g White Chocolate (good quality for melting)
Instructions
- Crush Cookies: Blitz the Digestive cookies into fine crumbs. Like damp sand! A food processor is fastest, but a bag and rolling pin work great too.
- Mix: In a bowl, combine the cookie crumbs and the softened cream cheese. Get your hands in there and mix until it comes together like soft dough.
- Roll: Shape the mixture into small balls (about 1-inch). Place them on a plate or baking sheet lined with parchment paper (so they don’t stick!).
- Chill (Super Important!): Pop the sheet of balls into the fridge for at least 1 hour. They need to get really firm for dipping. Don’t skip this!
- Melt Chocolate: Gently melt the white chocolate. Use short bursts on low power in the microwave (stirring often!) or a double boiler. Careful not to burn it!
- Dip: Take the chilled balls out. Dip each one into the melted white chocolate, coating it completely. Let any extra chocolate drip off.
- Set: Place the coated balls back on the parchment paper. If adding sprinkles, do it now while the chocolate is wet! Chill again for 15-30 minutes, just until the chocolate is hard.
Notes
- Serving: These are best served chilled straight from the fridge! Perfect with coffee or tea. Pop them in mini cupcake liners to look extra fancy.
- Tips & Tricks:
- Make sure your cream cheese is softened – it makes mixing way easier.
- The 1-hour chill before dipping is crucial so the balls don’t fall apart.
- Want to swap? Milk or dark chocolate works just as well!
- Storage: Keep leftover cake balls in an airtight container in the fridge because of the cream cheese. They’ll last for about 3-5 days. Enjoy cold!