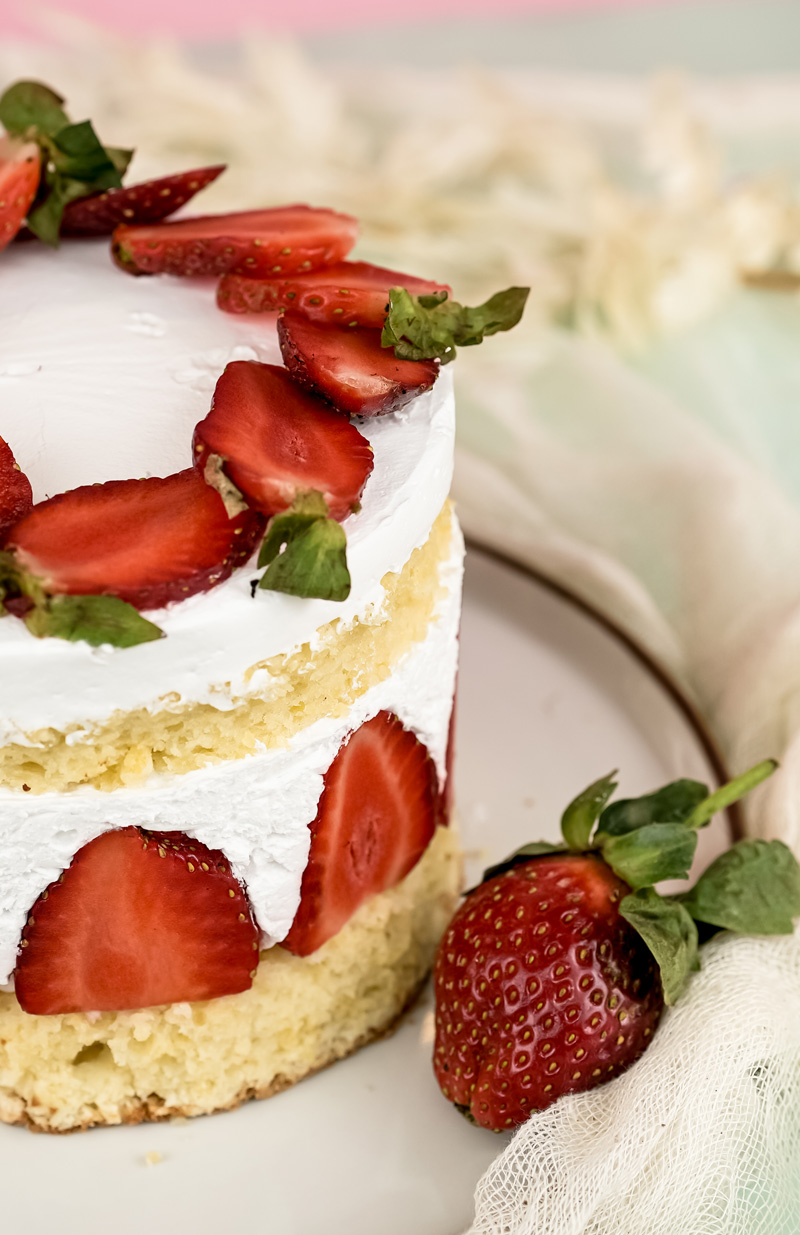
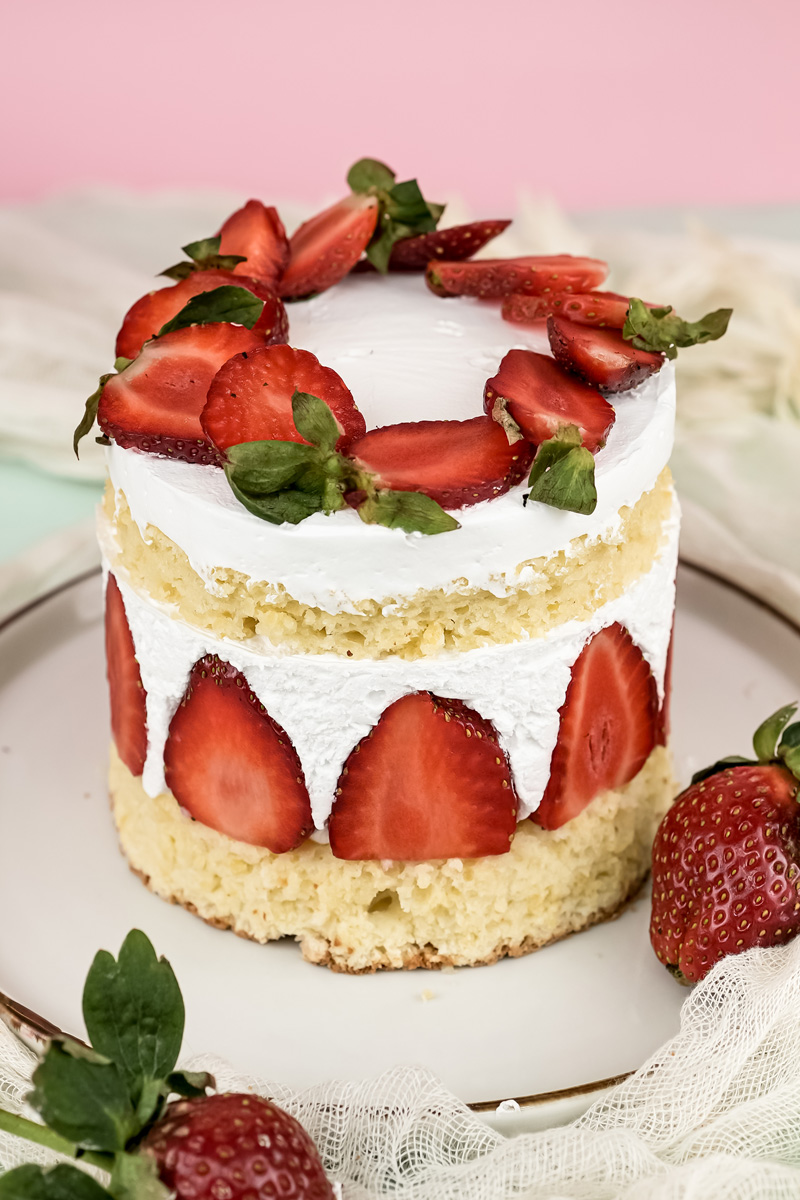
Hey friends, welcome to my kitchen! Today, we’re tackling a recipe that looks like it came straight from a fancy French bakery window, but is totally something you can make at home. I’m talking about the Fraisier Cake.
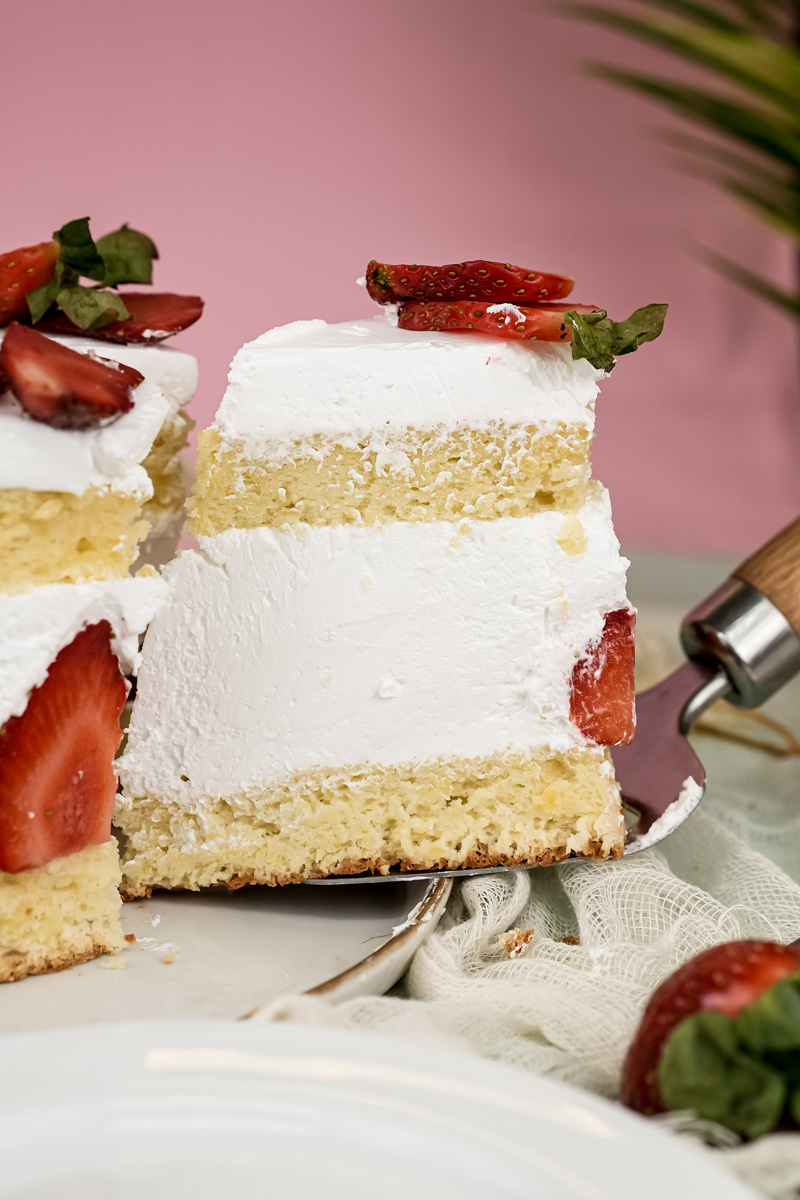
If you’ve ever seen a cake with a perfect ribbon of strawberries around the edge, that’s the one. The name “Fraisier” is just French for strawberry plant, and this cake is all about celebrating them.
The first time I saw one in Paris, I was completely mesmerized. How did they get the strawberries to line up so perfectly? How was the cream so smooth? It seemed like some kind of baking magic. The good news? It’s not magic. It’s a process, and I’m going to walk you through every single step.
A traditional Fraisier has a really rich, buttery cream called crème mousseline.1 It’s delicious, but it can be a bit heavy. My version is a little different, a little lighter. We use two amazing fillings instead of one:
- A silky, rich vanilla pastry cream for that classic custard flavor.
- A light, stabilized whipped cream for an airy texture.
The combo is just perfect. It lets the fresh, juicy flavor of the strawberries be the real star of the show. And the cake itself? We’re making a super moist sponge that’s baked in a water bath. Think of it as giving the cake its own personal steam room. The result is a tender, melt-in-your-mouth crumb.
So, grab your apron. Let’s make something amazing together. I promise, with a little patience, you’ll have a stunning cake that will make you feel like a total pro.
So, What’s the Plan?
Breaking a big recipe down makes it feel way less intimidating. Here’s the game plan.
Prep & Cook Time: You’ll need about an hour of hands-on prep time and around 75 minutes for baking. The cake also needs a good chill in the fridge—at least 3-4 hours, but overnight is even better. This makes it a great recipe to spread out over a weekend.
Servings: This recipe makes one 7-inch cake, which will give you about 8-10 nice slices. If you need to make a bigger one, I’ve got you covered. Just check out the table below.
How Hard Is It, Really?: I’d call this an intermediate recipe. There are a few different parts to make and the assembly needs a careful hand. But don’t let that scare you! Just follow the steps one by one. You’ve got this.
The Tools You’ll Need:
- Stand Mixer: I really recommend one for this. It makes whipping the meringue and cream so much easier. A hand mixer works too, it just takes a bit more elbow grease.
- 8-inch Round Cake Tin: This is for the sponge.
- 7-inch Cake Ring: This is the key to getting those super clean, sharp sides.
- Acetate Strips: These are clear plastic sheets that you line the cake ring with.2 They give you that flawless, professional finish. I get mine online, they’re cheap and a total game-changer. If you’re in a pinch, a strip of parchment paper will do, but the acetate is smoother.
- The usual suspects: Piping bags, an offset spatula, saucepans, mixing bowls, and a whisk.
Can I Make It Ahead?
Yes! And you absolutely should. It makes life so much easier.
- 1-2 Days Before: Go ahead and bake the sponge cake and make the vanilla pastry cream. Let the sponge cool completely, wrap it tightly in plastic wrap, and just leave it on the counter. The pastry cream needs to be stored in the fridge. The trick is to press a piece of plastic wrap directly onto its surface so it doesn’t form a skin.
- Day of Serving: All you have to do is whip the cream and assemble the cake. Let it set for a few hours, and you’re ready to impress.
Scaling Your Fraisier Cake
Need a bigger cake for a party? No problem. Here’s a quick guide to adjusting the recipe.
| Cake Tin Size | Sponge Ingredients | Pastry Cream | Whipped Cream | Strawberries |
| 7-inch (This Recipe) | As listed | As listed | As listed | 500g |
| 8-inch | x 1.3 | x 1.3 | x 1.3 | ~650g |
| 9-inch | x 1.6 | x 1.6 | x 1.6 | ~800g |
Let’s Talk Ingredients
In baking, good ingredients are everything. Let’s break down what you’ll need.
For our incredibly soft Japanese-Style Soufflé Sponge, you’ll need unsalted butter, vegetable oil, and milk. We gently heat these together to create a smooth base that makes the cake super tender. Then we have our eggs, which we’ll separate. The yolks get mixed into that warm milk mixture, and the whites get whipped up into a beautiful, glossy meringue with plain white sugar. A bit of plain flour holds it all together.
Next is the heart of the cake: our Silky Vanilla Pastry Cream. This is a classic custard. You’ll need milk, sugar, an egg yolk for richness, and cornstarch to make it nice and thick. The real star here is high-quality vanilla paste. I love using paste because you get those pretty little vanilla bean specks without having to scrape a pod. A pat of unsalted butter gets whisked in at the end to make it extra smooth.
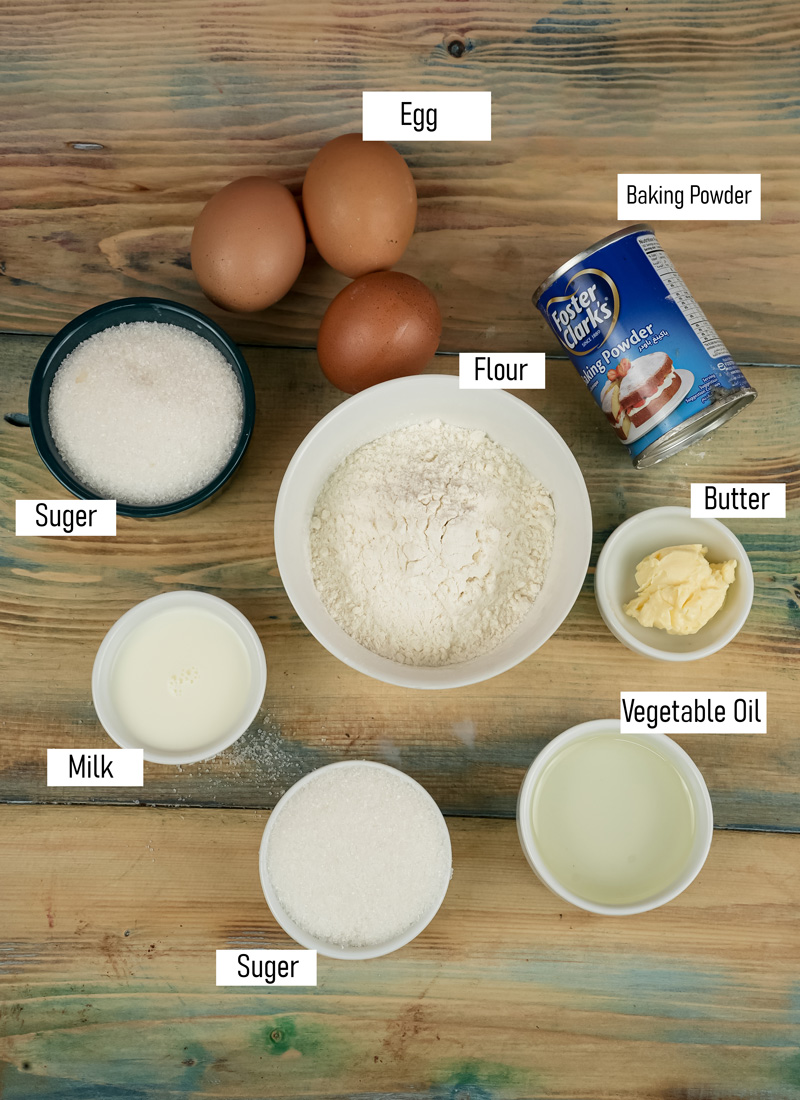
To give the cake a light, airy feeling, we’ll make a Cloud-Like Stabilized Whipped Cream. The secret weapon? A tiny bit of gelatine. This gives the cream enough structure to hold its shape perfectly in the finished cake. No sad, weepy cream here! Just add a bit of sugar to your heavy cream, and you’re good to go.
And finally, the main event: fresh strawberries. You’ll want about 500g (or 17 oz). My advice? Try to find strawberries that are ripe, sweet, and all about the same size. This will make that signature strawberry wall look incredibly sharp and neat. Just make sure to wash and dry them well before you start.
The Step-by-Step Method: Let’s Get Baking!
Alright, time for the fun part. We’ll do this in four stages: the sponge, the pastry cream, the whipped cream, and finally, the assembly.
Part 1: The Japanese-Style Soufflé Sponge
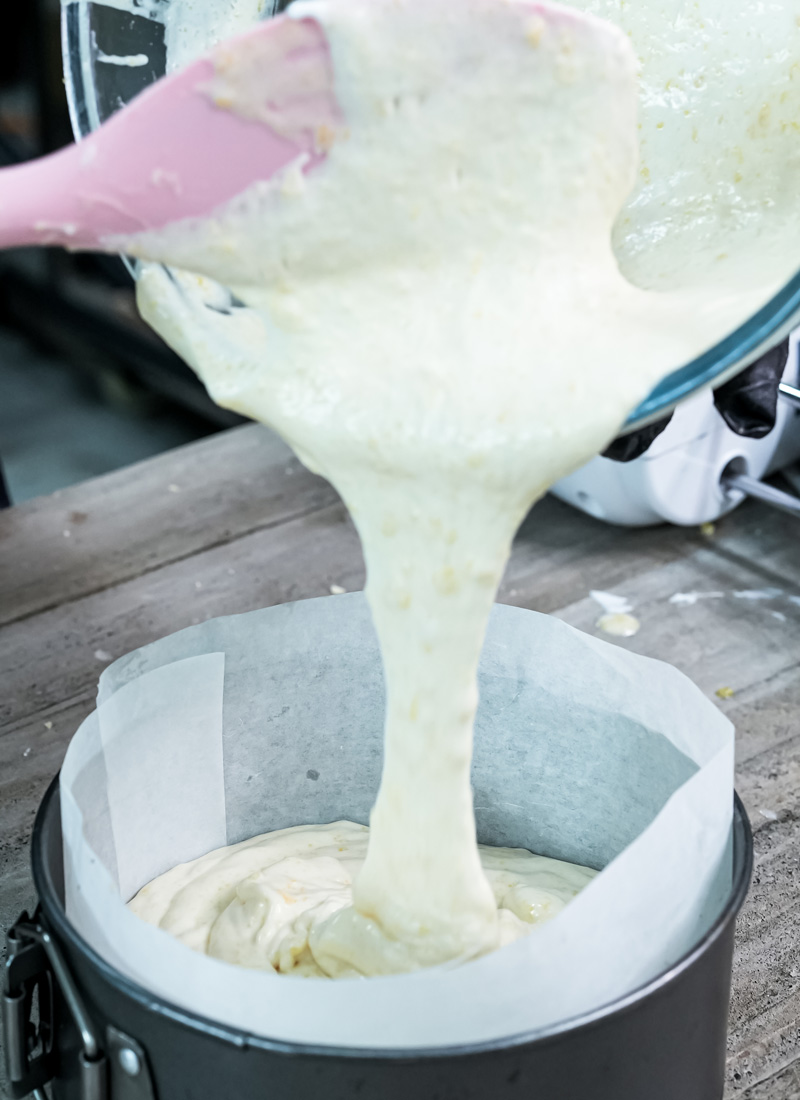
This sponge is unbelievably soft because we’re baking it in a water bath, which gently steams the cake as it bakes.
First things first, preheat your oven to 160°C (320°F) with the fan on. Line the bottom of your 8-inch cake tin with parchment paper. Don’t grease the sides! The batter needs to grip the sides to climb high. Grab a larger roasting pan that your cake tin can sit inside for the water bath later.
In a medium bowl, give your egg yolks a quick whisk.
Now, in a small saucepan, gently heat the milk, oil, butter, and the first part of the sugar (Sugar I) over low heat. You just want to melt the butter and dissolve the sugar, not boil it.
This next step is called tempering. While you whisk the egg yolks with one hand, slowly pour in the warm milk mixture with the other. Going slowly prevents the eggs from scrambling. Once it’s all smooth, sift your flour into the bowl and mix just until it’s combined. Don’t go crazy here; we don’t want a tough cake.
Set that bowl aside. In the clean bowl of your stand mixer, whip the egg whites on medium speed. When they start to look foamy, slowly add the second part of the sugar (Sugar II). Keep whipping until the meringue is glossy and forms stiff peaks. That means when you lift the whisk, the peak stands up straight and doesn’t flop over.
Now for the most important part: folding. Gently fold about a third of your stiff meringue into the yolk mixture. This lightens it up and makes it easier to combine. Then, add the rest of the meringue. Use a spatula to scoop from the bottom and fold it over the top. Stop when you still see a few white streaks. The goal is to keep all that air you just whipped in!
Pour the light, airy batter into your cake tin. Place the tin inside the larger roasting pan. Pour boiling water into the outer pan until it comes about halfway up the sides of your cake tin.
Bake for 60 minutes. The cake will be golden and puffed up. Turn the oven off, but leave the cake inside with the door closed for another 15 minutes. This helps it cool down slowly so it doesn’t shrink. Once it’s out, run a thin knife around the edge and flip it onto a wire rack to cool completely. Then, wrap it in plastic and put it in the fridge.
Part 2: The Silky Vanilla Pastry Cream
While the cake bakes, you can make the pastry cream. Warm the milk in a small saucepan until it’s steaming. In a separate bowl, whisk the egg yolk, sugar, cornstarch, and vanilla paste until it’s pale and smooth.
Time to temper again! Slowly pour the hot milk into the egg mixture, whisking the whole time. Pour everything back into the saucepan and put it on low heat. Now, stir! Use a whisk and make sure you get into the corners. My biggest tip: do not walk away. It will seem thin for a while, and then suddenly, it will thicken up. Keep stirring until it looks like a thick pudding.
Take it off the heat and whisk in the butter until it’s melted and smooth. Pour the cream into a clean bowl. Here’s the pro tip: press a piece of plastic wrap directly onto the surface of the cream. This is non-negotiable! It’s what prevents a gross skin from forming. Pop it in the fridge to chill completely. When it’s cold, give it a good whisk to loosen it up, and then scoop it into a piping bag.
Part 3: The Cloud-Like Stabilized Whipped Cream
Last component! In a tiny bowl, sprinkle the gelatine over the cold water. Let it sit for 5 minutes to “bloom.” It will turn into a thick, jiggly blob. That’s perfect.
In your stand mixer, pour in the heavy cream and sugar. Whisk on medium-high until you see soft peaks forming.
While that’s whipping, put the bloomed gelatine in the microwave for just 5-10 seconds. You just want it to melt back into a liquid. Now, quickly grab a big spoonful of the whipped cream and mix it into the warm gelatine. This little step tempers the gelatine so it doesn’t seize up and get clumpy when it hits the rest of the cold cream.
With the mixer running on medium, pour the gelatine mixture into the bowl. Keep whisking until you have firm, medium-stiff peaks. Be careful not to turn it into butter! Transfer this beautiful cream into a piping bag. You’re ready to build.
Part 4: Assembling Your Masterpiece
Okay, deep breath. This is where the magic happens!
- Prep the Cake: Take your chilled sponge out of the fridge. Carefully slice off the thin, dark brown layer from the top. Then, slice the cake in half horizontally to create two even layers. Use your 7-inch cake ring to cut both layers into perfect 7-inch circles.
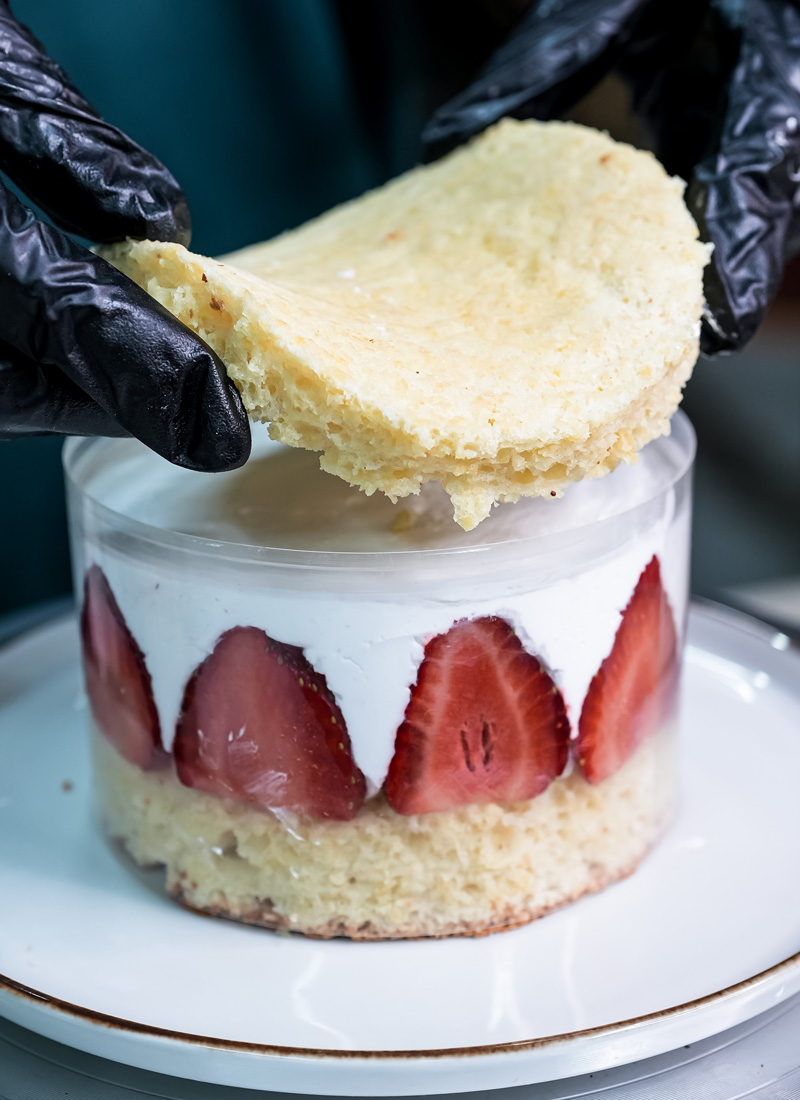
- Line the Ring: Place the cake ring on your serving plate. Line the inside wall of the ring with your acetate strip. Place one of the cake layers snugly in the bottom.
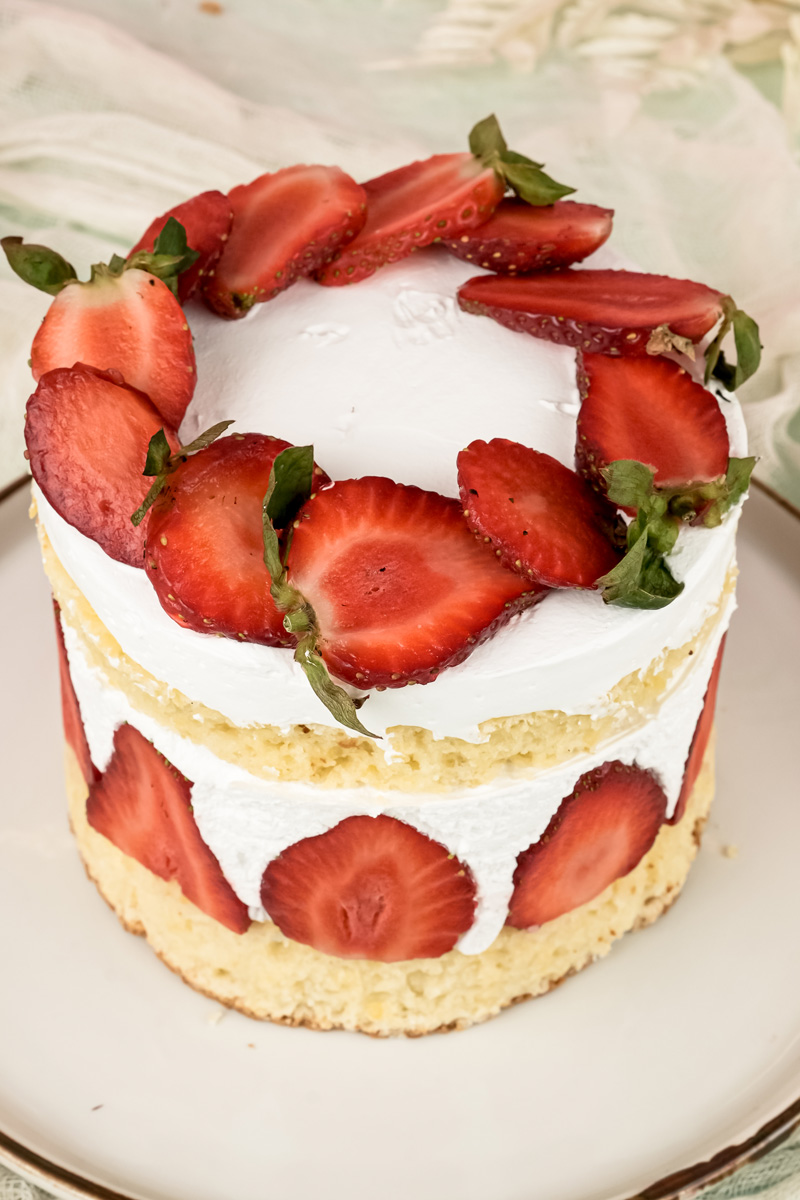
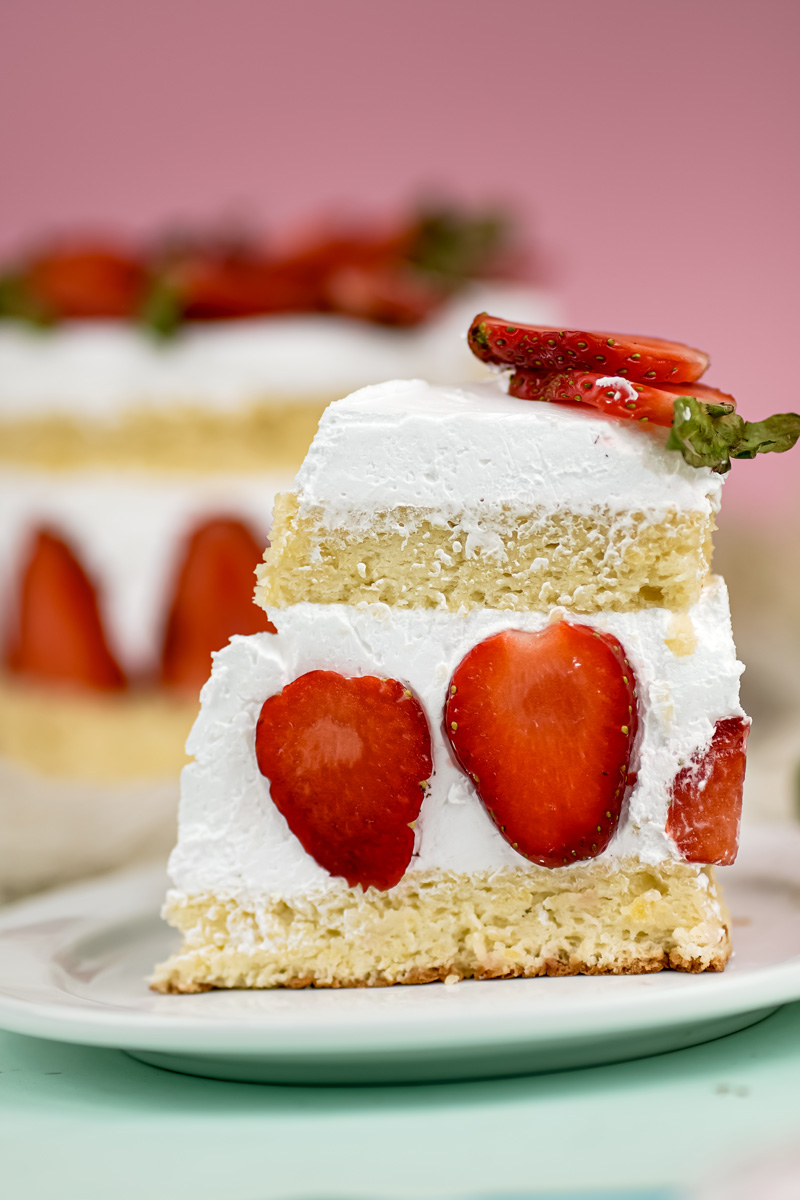
- The Strawberry Wall: Now for the signature look. Choose your most beautiful, similar-sized strawberries and slice them in half from top to bottom. Place them tightly against the acetate wall, cut-side facing out, all the way around the cake.
- Pipe and Fill: Grab your whipped cream. Carefully pipe it into all the little gaps between the strawberries and the cake. You want to create a solid white background. Next, pipe a layer of the vanilla pastry cream into the center.
- More Strawberries! Chop up the rest of your strawberries and scatter them in a single layer over the pastry cream. Fill in any gaps with more whipped cream. Save a little cream for the top.
- The Final Layers: Gently place the second layer of cake on top. Pipe the rest of the whipped cream over it and use your offset spatula to smooth the top perfectly flat. You can decorate it with a few extra strawberry halves.
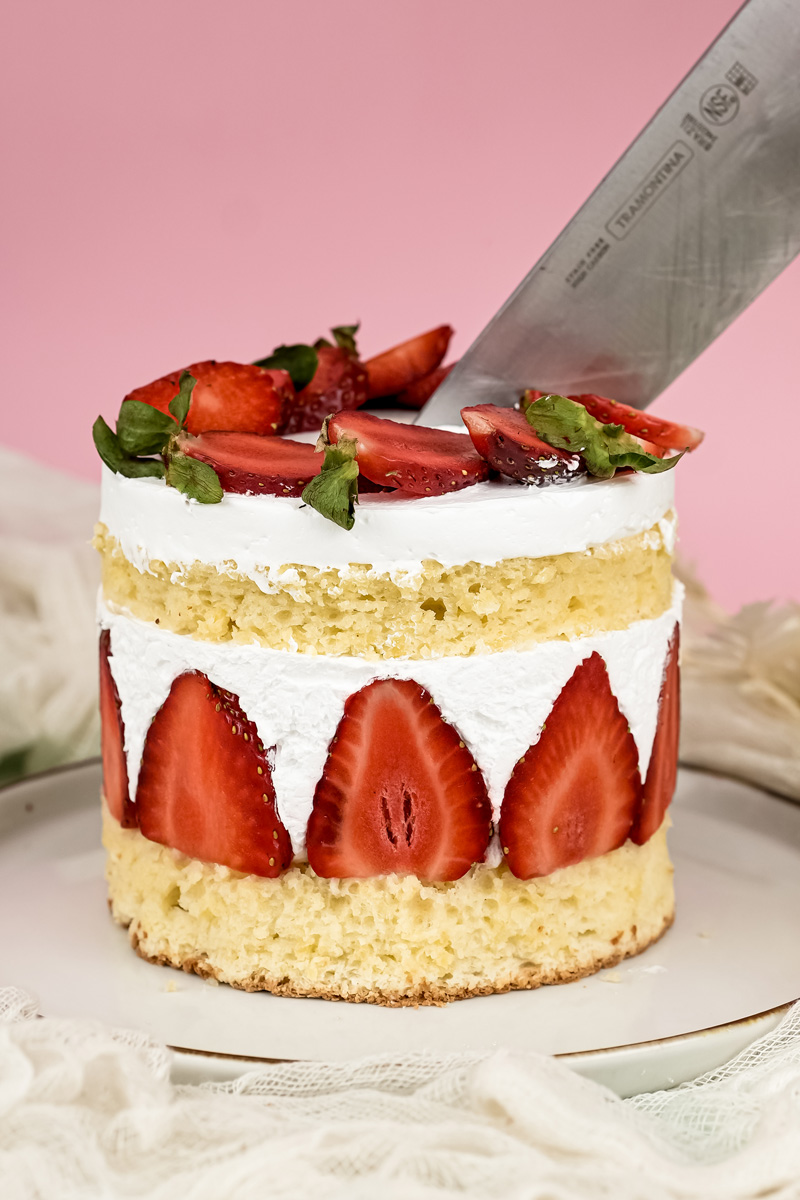
- The Hardest Part: Now, you have to wait. Put the whole cake in the fridge to set for at least 3-4 hours. Honestly, overnight is best. This time lets the flavors all meld together and helps the creams firm up so you can get clean, beautiful slices.
When you’re ready to serve, just lift the cake ring off and gently peel away the acetate strip. Stand back and admire your work!

Want to Mix It Up?
Once you’ve made this once, feel free to play!
- A Boozy Kick: For a more traditional taste, make a simple syrup (equal parts sugar and water, boiled and cooled).3 Add a splash of Kirsch (strawberry brandy) and brush it over the cake layers before you assemble.
- Different Fruits: This cake is amazing with other fruits. Try a “Framboisier” with raspberries in the summer, or even one with sliced peaches.
- Fancy Finish: For a super traditional look, you can top the cake with a thin layer of pink-tinted marzipan. Or, for something easier, a simple dusting of powdered sugar looks just as lovely.
Serving and Storing Your Cake
You did it! To make sure every slice is perfect, here are a few final tips.
This cake is a showstopper all by itself. Serve a clean slice on a simple plate to let the colors pop. It’s best served chilled, right from the fridge. It doesn’t need anything else, but a cup of tea or a glass of bubbly prosecco is a perfect partner.
To store leftovers, cover the cake with a cake dome and keep it in the fridge for up to 3 days. The cake will only get more moist and delicious.
A quick note on freezing: Just don’t. The assembled cake, anyway. Fresh strawberries get watery and weird when they thaw, and it ruins the texture of the creams. This cake is meant to be enjoyed fresh!
I hope you have a blast making this Homemade Fraisier Cake. It’s a project of love, and it’s so rewarding to make and even better to eat. Happy baking!
PrintFraisier Cake

This stunning French Fraisier Cake looks like it came straight from a Parisian bakery, but you can absolutely make it at home! It features layers of an incredibly soft sponge cake, a rich vanilla pastry cream, and a light-as-air whipped cream, all wrapped in a beautiful wall of fresh strawberries. It’s the perfect showstopper for any special occasion.
- Prep Time: 60 minutes
- Cook Time: 75 minutes
- Total Time: 6 hours 15 minutes
- Yield: 8–10 people 1x
- Category: Dessert
- Cuisine: French
Ingredients
For the Soufflé Sponge:
- 15g Unsalted Butter
- 30g Vegetable Oil
- 40g Milk
- 30g White Sugar (I)
- 70g Plain Flour
- 3 Large Eggs, separated
- 60g White Sugar (II)
For the Vanilla Pastry Cream:
- 200g Milk
- 100g White Sugar
- 16g Cornstarch
- 1 Egg Yolk
- ½ tsp Vanilla Paste
- 20g Unsalted Butter
For the Stabilized Whipped Cream:
- 450g Heavy Cream
- ¼ tsp Gelatine Powder
- 1 tbsp Cold Water
- 50g White Sugar
For Assembly:
- 500g Fresh Strawberries, washed and dried
Instructions
1. Make the Sponge Cake:
- Heat oven to 160°C (320°F). Line the bottom of an 8-inch cake tin with parchment.
- In a small pot, gently heat milk, oil, butter, and Sugar (I) until just melted.
- In a bowl, whisk egg yolks. Slowly stream in the warm milk mixture while whisking constantly. Sift in the flour and mix until just combined.
- In a separate clean bowl, whip egg whites until foamy. Gradually add Sugar (II) and whip until stiff, glossy peaks form.
- Gently fold the meringue into the yolk mixture in three parts. Pour batter into the prepared tin.
- Place the tin in a larger pan and create a water bath by pouring boiling water halfway up the sides. Bake for 60 minutes. Turn the oven off and let it rest inside for 15 minutes before cooling on a wire rack.
2. Make the Pastry Cream:
- Heat milk in a saucepan. In a bowl, whisk together egg yolk, sugar, cornstarch, and vanilla.
- Slowly pour hot milk into the egg mixture, whisking constantly. Return everything to the saucepan.
- Cook on low heat, stirring constantly, until the cream thickens to a pudding-like consistency.
- Remove from heat, stir in the butter until melted. Transfer to a bowl, press plastic wrap directly onto the surface, and chill completely.
3. Make the Whipped Cream:
- Sprinkle gelatine over cold water and let it “bloom” for 5 minutes.
- Whip heavy cream and sugar until soft peaks form.
- Melt the bloomed gelatine in the microwave (5-10 seconds). Mix a spoonful of whipped cream into the melted gelatine, then pour this back into the main bowl of cream while whipping on medium speed until medium-stiff peaks form.
4. Assemble the Cake:
- Slice the cooled sponge into two even layers. Use a 7-inch cake ring to trim both layers into perfect circles.
- Line the inside of the 7-inch ring with an acetate strip. Place one cake layer at the bottom.
- Halve your most uniform strawberries and place them, cut-side out, against the acetate wall.
- Pipe whipped cream into the gaps between strawberries. Pipe a layer of pastry cream in the center. Top with chopped strawberries.
- Add the second cake layer. Cover with the remaining whipped cream and smooth the top with a spatula.
- Chill in the fridge for at least 4 hours, or overnight, before serving.
Notes
- Serving Suggestions: This cake is stunning on its own! Serve a chilled slice on a simple plate. It pairs beautifully with a cup of tea or a glass of sparkling wine.
- Tips & Tricks: Using an acetate strip inside the cake ring is the secret to getting those super clean, professional-looking sides. Don’t skip the chilling time—it’s crucial for the cake to set properly for clean slicing. Be careful not to over-mix the sponge batter after folding in the meringue to keep it light and airy.
- Storage: Store any leftovers in an airtight container or under a cake dome in the refrigerator for up to 3 days. I don’t recommend freezing the assembled cake, as the texture of the fresh strawberries and cream will not be the same after thawing.