Gluten Free Pancakes
Tired of dense, gritty gluten-free pancakes? This recipe is your answer. After tons of experimenting, I landed on this simple method for making perfectly light, fluffy, diner-style pancakes that no one will ever guess are gluten-free. They’re the perfect weekend breakfast!
- Prep Time: 10 minutes
- Cook Time: 10 minutes
- Total Time: 20 minutes
- Yield: 16-18 pancakes 1x
- Category: Breakfast
- Cuisine: American
Ingredients
Scale
- 2 cups gluten-free 1-for-1 flour (like Bob’s Red Mill)
- 4 tbsp sugar
- 1 tbsp aluminum-free baking powder
- 1 tsp sea salt
- 4 tbsp unsalted butter, melted
- 1 ½ to 2 cups whole milk
- 2 large eggs
- 2 tsp pure vanilla extract
Instructions
- Combine Dry Ingredients: In a large bowl, whisk together the gluten-free flour, sugar, baking powder, and salt. Mixing this well ensures every pancake gets a nice, even rise.
- Mix Wet Ingredients: In a separate large measuring cup or bowl, combine the melted butter and 1 ½ cups of milk. Warm it in the microwave for about 45 seconds—just until warm, not hot. Whisk in the eggs and vanilla until everything is a pale yellow color.
- Make the Batter: Pour the wet ingredients into the dry ingredients. Gently mix with a spatula or whisk just until combined. A few lumps are perfect! This is the secret to keeping them fluffy. If the batter is too thick, gently fold in another splash of milk.
- Cook the Pancakes: Heat a lightly oiled griddle or non-stick pan over medium heat. Pour ¼ cup of batter for each pancake. Cook for 2-3 minutes, until bubbles form across the surface and the edges look set. Flip confidently and cook for another 1-2 minutes until golden brown.
Notes
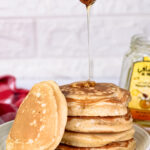
- Serving Suggestions: These are best served immediately! A classic stack with butter and warm maple syrup is my favorite way to enjoy them. Fresh berries, a dollop of yogurt, or chocolate chips are also delicious.
- Tips & Tricks: The most important tip is do not overmix the batter. Lumps are your friend! For the best texture, let the batter rest for 5 minutes after mixing while your pan heats up. This lets the flour hydrate.
- Storage & Reheating:
- Fridge: Store cooked, cooled pancakes in an airtight container for up to 3 days. To reheat, just pop them in the toaster!
- Freezer: Freeze cooled pancakes in a single layer on a baking sheet, then transfer to a freezer bag. They’ll last for up to 2 months. Reheat in the toaster or microwave.
Find it online: https://recipesh.com/gluten-free-pancakes/