Welcome! Today, we’re diving into one of the most elegant yet surprisingly simple desserts you can make: the Charlotte Cake. If you’ve ever gazed at a French patisserie window, you’ve likely seen this masterpiece—a crown of delicate ladyfinger biscuits holding a cloud-like mousse. It’s a dessert with history, famously refined by the legendary French chef Marie-Antoine Carême in the 19th century.1
But we’re giving this classic a vibrant, tropical twist. Forget the traditional berries for a moment and imagine the sweet, luscious flavor of ripe mangoes whipped into a silky, airy mousse. This easy no-bake mango charlotte cake recipe is your ticket to creating a show-stopping dessert without ever turning on your oven. It’s the perfect centerpiece for a summer party, a special celebration, or simply when you want to treat yourself to something truly spectacular. Let’s make something beautiful together!
Recipe Overview
Your Path to Success
This easy mango charlotte cake is all about assembly and patience. The active work is minimal, but the chilling time is essential for the magic to happen. It’s a fantastic recipe for beginners looking to impress, as it teaches fundamental techniques like blooming gelatin and folding mousse without the stress of baking.
- Prep Time: 1 hour
- Chilling Time: 4+ hours (preferably overnight)
- Total Time: 5+ hours
- Difficulty: Easy to Intermediate. The steps are straightforward, but handling the mousse and assembling the cake requires a gentle touch.
Equipment You’ll Need
Having the right tools makes any job easier. Here’s what you’ll need, along with some handy substitutes if you don’t have the exact item.
| Equipment | Substitute | Why It’s Used |
| 9″ Springform Pan | 8″ Cake Pan (lined) or a Charlotte Mold | Provides structure and allows for easy removal of the cake. |
| Electric Hand Mixer | Stand Mixer with a whisk attachment or a good old-fashioned whisk & arm | For whipping cream to the perfect, airy consistency. |
| Piping Bag & Tip | Ziploc bag with the corner snipped off, or a spoon | For creating a professional-looking whipped cream topping. |
| Blender or Food Processor | Immersion blender | To create a silky-smooth mango puree. |
| Parchment or Acetate | Plastic wrap (though less ideal) | Creates a clean barrier for a flawless finish on the sides. |
Make-Ahead and Scaling Magic
This is the ultimate make-ahead dessert! In fact, it must be made at least 4 hours in advance, and it’s even better when left to set overnight. This gives the mousse time to firm up completely and for the flavors to meld beautifully.
Want to make a smaller, more intimate cake? You can easily scale this recipe down.
Scaling Guide:
| Pan Size | Ingredients Scale | Approx. Ladyfingers |
| 9-inch | 100% (Full Recipe) | ~40 |
| 6-inch | 50% (Half Recipe) | ~25 |
The Cast of Ingredients
Great desserts start with great ingredients. Let’s talk about what you’ll need and why each component is so important.
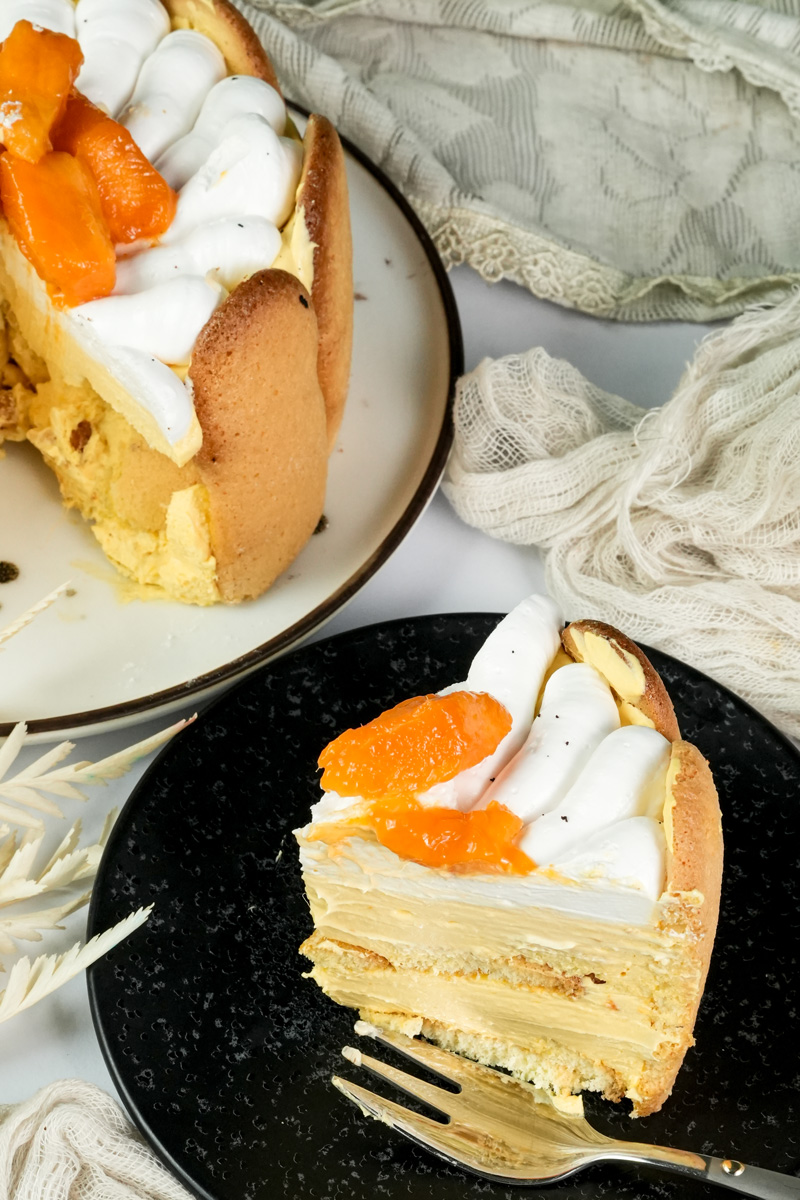
The foundation of our cake is built with Savoiardi ladyfingers—those crisp, sugar-dusted biscuits are perfect for the job. Look for a firm, dry variety, as they hold their shape better than the softer, cake-like ones. You’ll need about 40 biscuits for a 9-inch pan. The star of the show, of course, is the mango. For the absolute best flavor, choose ripe, sweet, and low-fiber mangoes. Varieties like Ataulfo (honey mangoes) or Kent are fantastic because they are less stringy and blend into a perfectly smooth puree. You’ll need about four medium mangoes in total—three for the mousse and one for the topping.
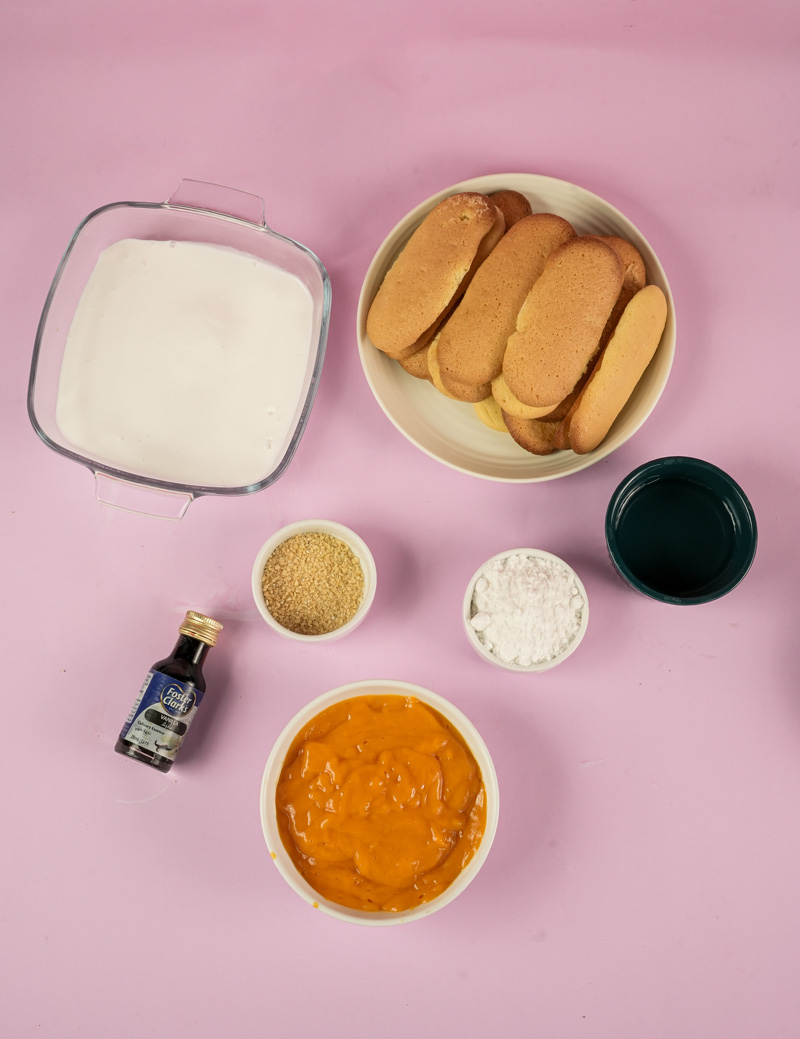
The heart of the mousse is a luscious, airy whipped cream. You’ll need heavy whipping cream (at least 35% fat content) kept very cold, as this helps it whip up to stable, firm peaks. We’ll sweeten it with a bit of powdered sugar, which dissolves instantly without any graininess, and add a splash of vanilla extract for warmth and depth.
Finally, the secret ingredient that gives our no-bake mousse its structure is gelatin powder. When bloomed in a little cold water, it becomes the invisible scaffolding that holds our dessert together, ensuring it slices cleanly without collapsing.
Your Step-by-Step Guide to Mango Perfection
Take a deep breath and let’s walk through this together. We’ll break it down into simple stages.
Stage 1: The Setup
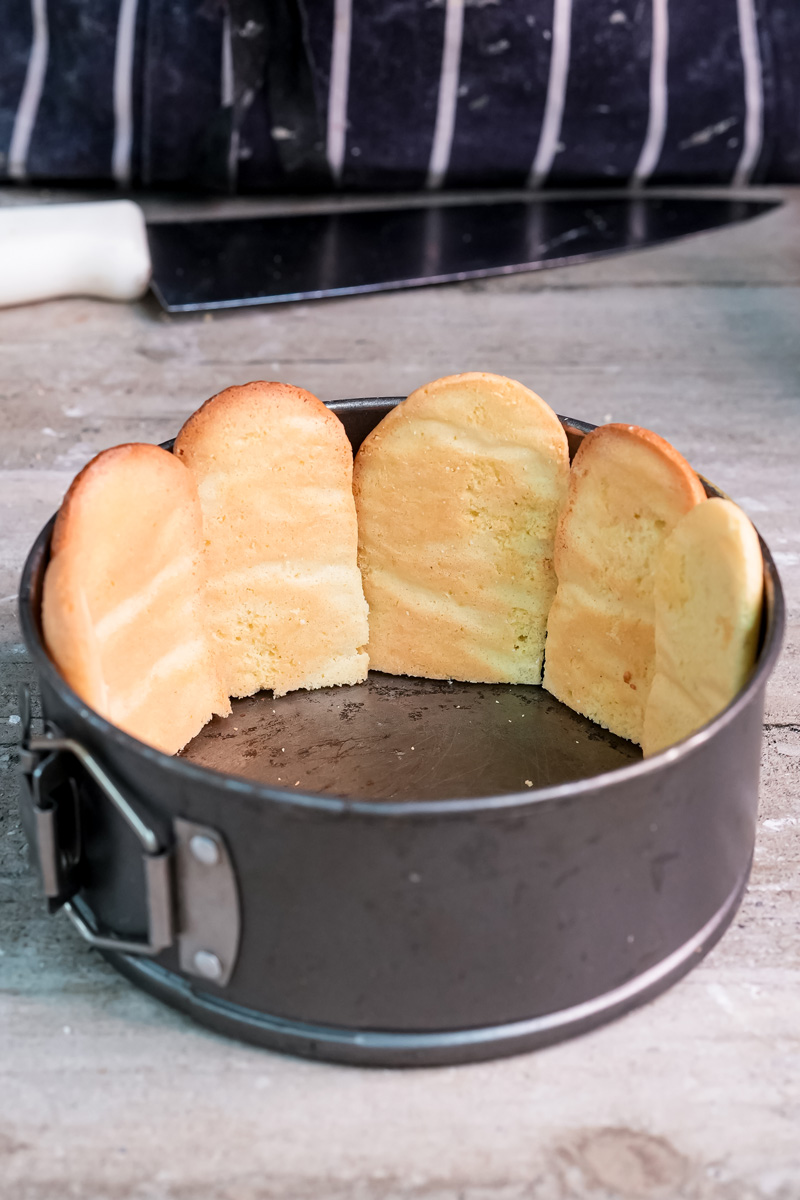
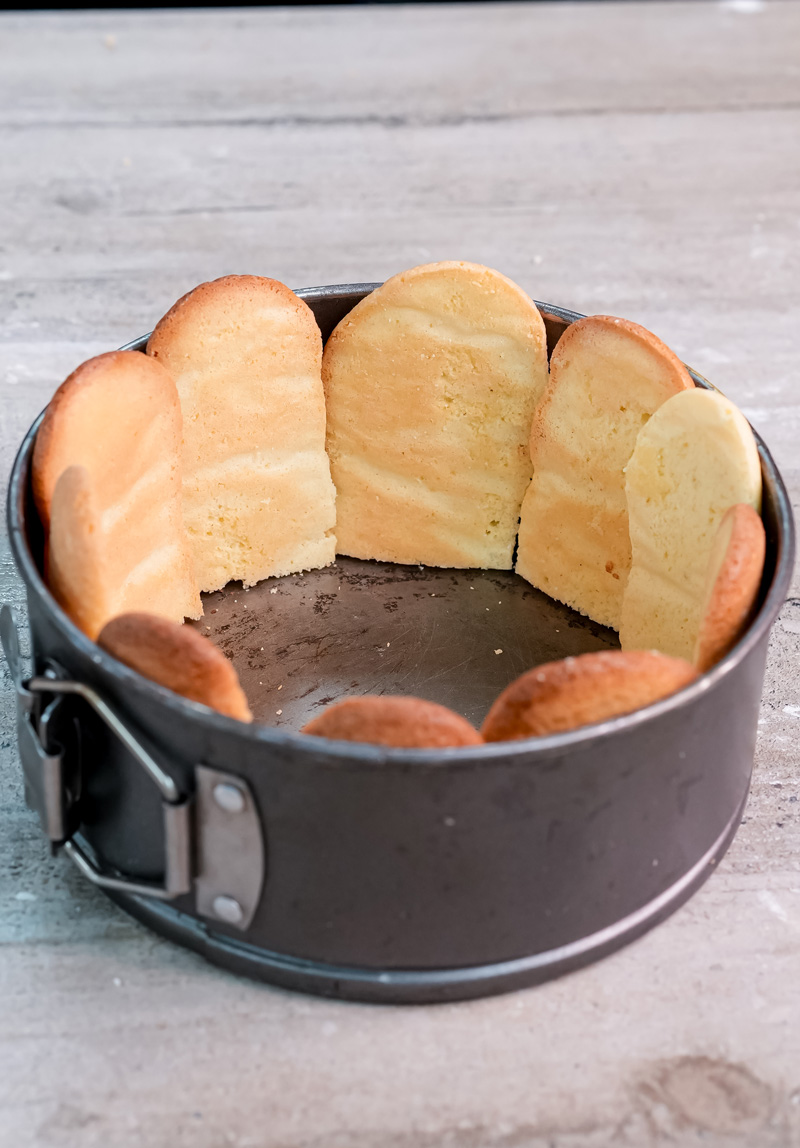
First, let’s prepare our mold. Take your 9-inch springform pan and line the side walls with a tall strip of parchment paper or, for an ultra-clean finish, a clear acetate sheet. Tape the seam to hold it securely. This little step is a professional trick that guarantees your cake will have beautifully smooth sides when you unveil it.
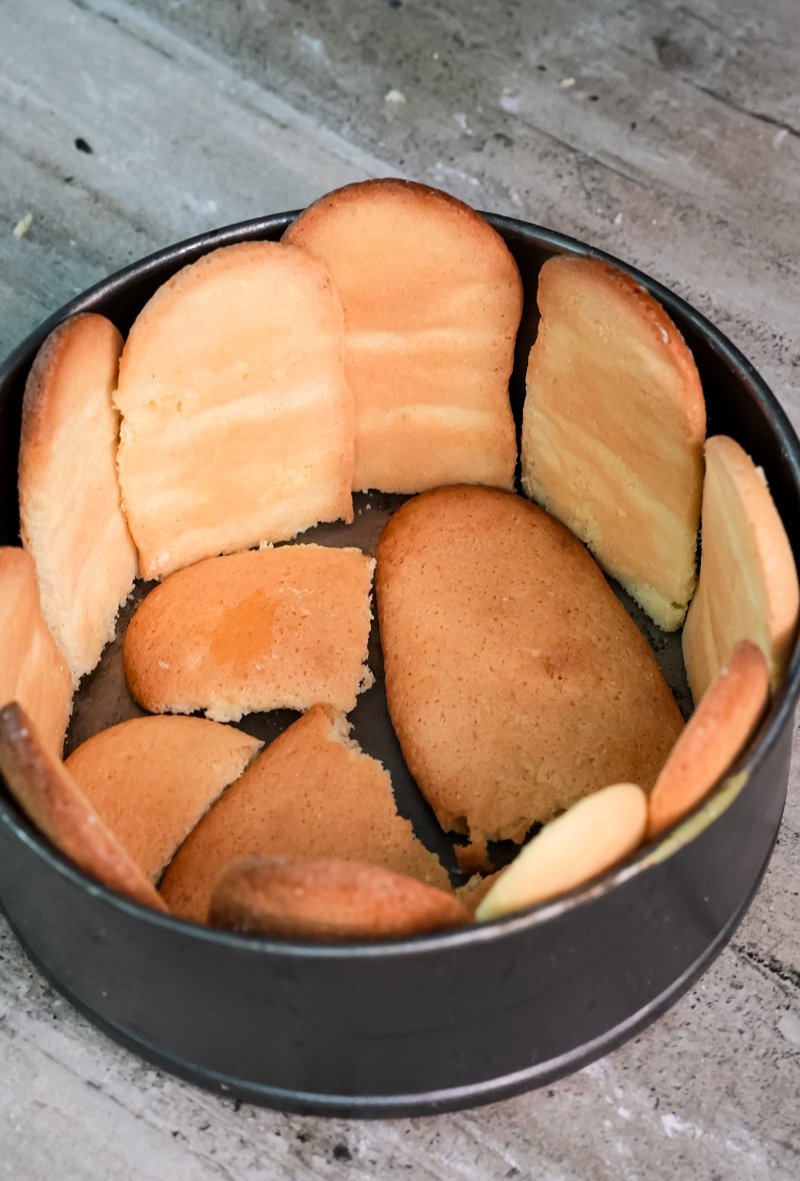
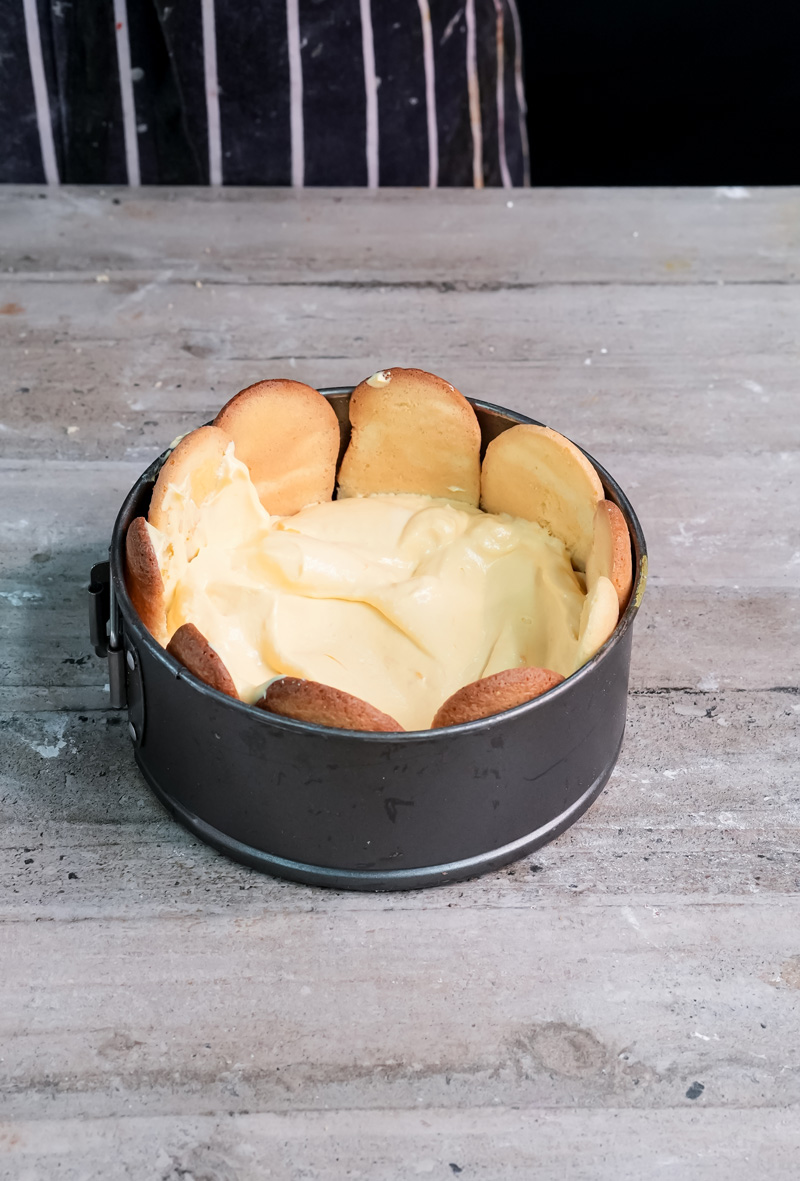
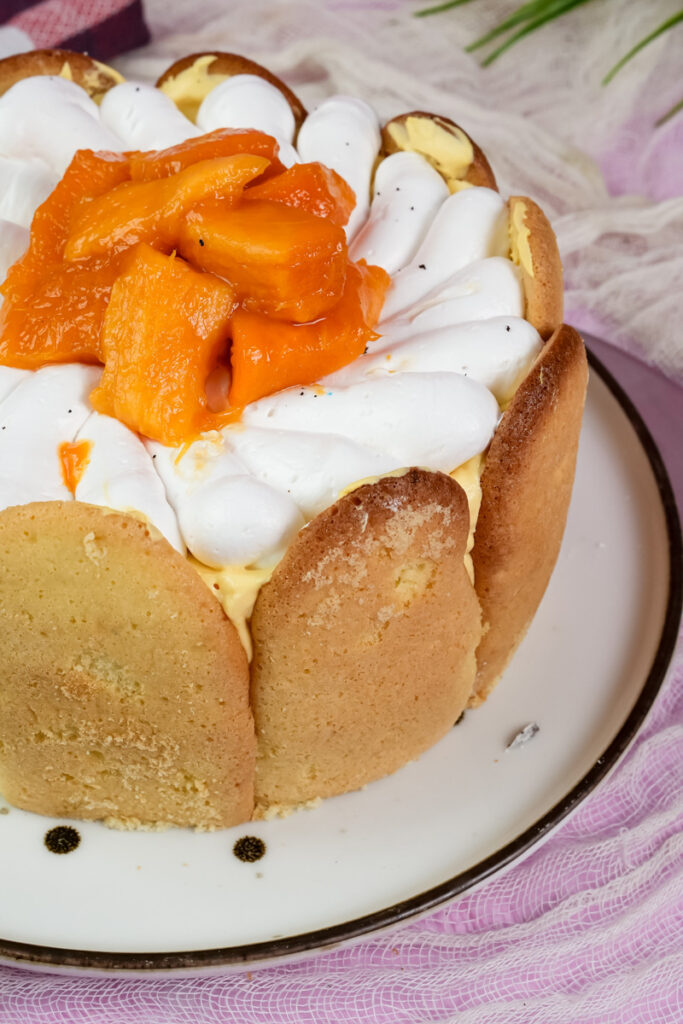
Next, prepare the ladyfingers. The biscuits that will form the wall of our charlotte need a flat bottom to stand steadily. Trim about a quarter-inch off one end of each one. Now, stand them up vertically around the inside edge of your prepared pan, with the pretty, sugared side facing outwards, pressing against the parchment. It should look like a little fortress! Arrange the remaining ladyfingers on the bottom of the pan to create a solid base, cutting them as needed to fit snugly. Set your beautiful creation aside.
Stage 2: Creating the Mousse
This is where the magic happens! Let’s start with the gelatin. In a small bowl, pour your 60g of cold water. Sprinkle the tablespoon of gelatin powder evenly over the top and don’t touch it! Just let it sit for about 5 minutes. You’ll see it “bloom”—it will absorb all the water and become a firm, jiggly disc. This is exactly what we want.
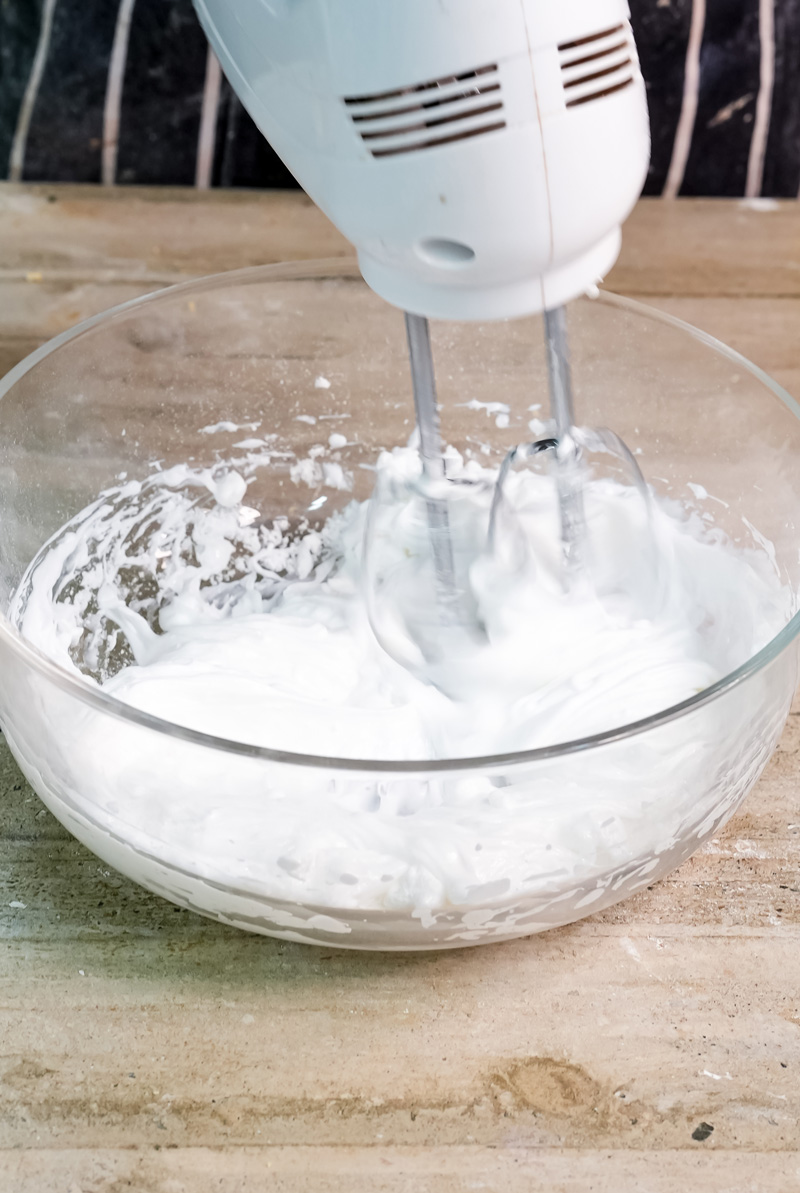
Now, for the cream. In a large, chilled mixing bowl, pour your cold whipping cream, powdered sugar, and vanilla. Using an electric mixer on medium speed, whip it until it forms firm peaks. What’s a firm peak? When you lift the beaters out of the cream, the peak that forms should hold its shape and not flop over. Set this glorious bowl of whipped cream aside.
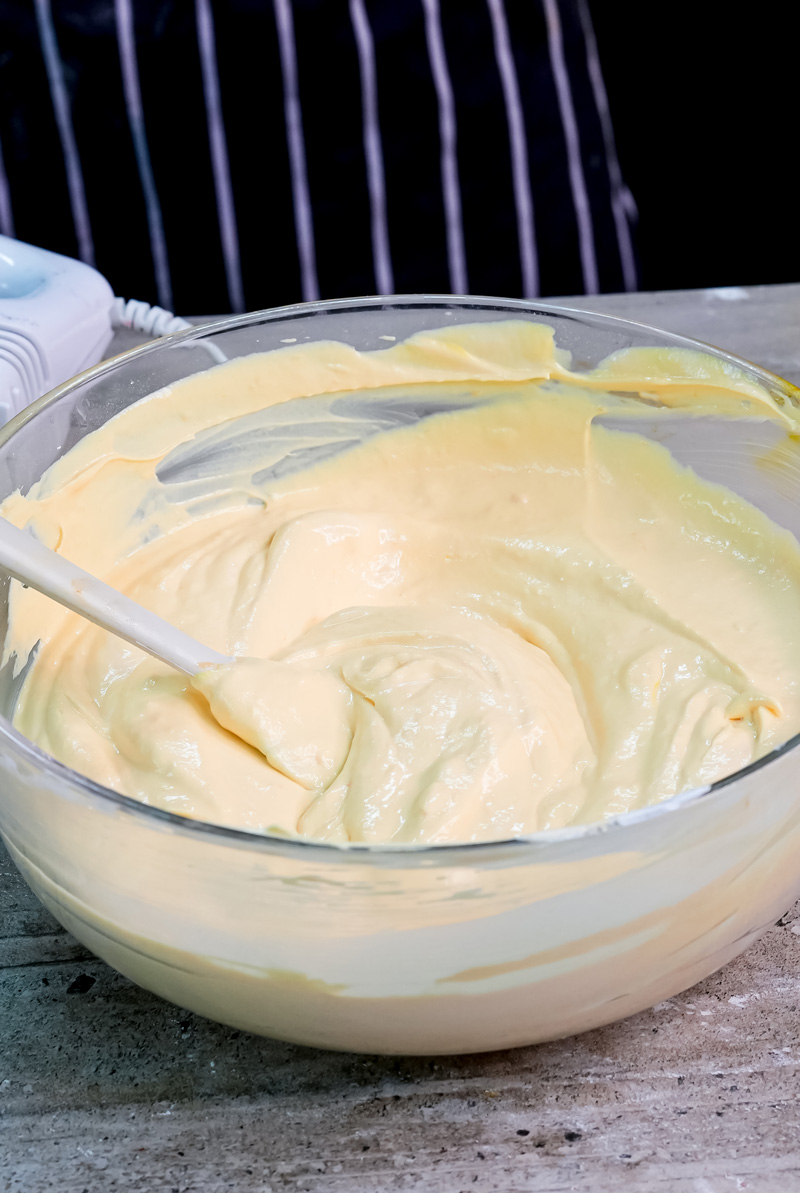
Next, the mango puree. Add your 400g of mango chunks to a blender. Pop the bowl of bloomed gelatin into the microwave for about 15 seconds. It will melt into a clear, golden liquid. Working quickly, pour this liquid gelatin into the blender with the mangoes and blend until everything is completely smooth and silky.
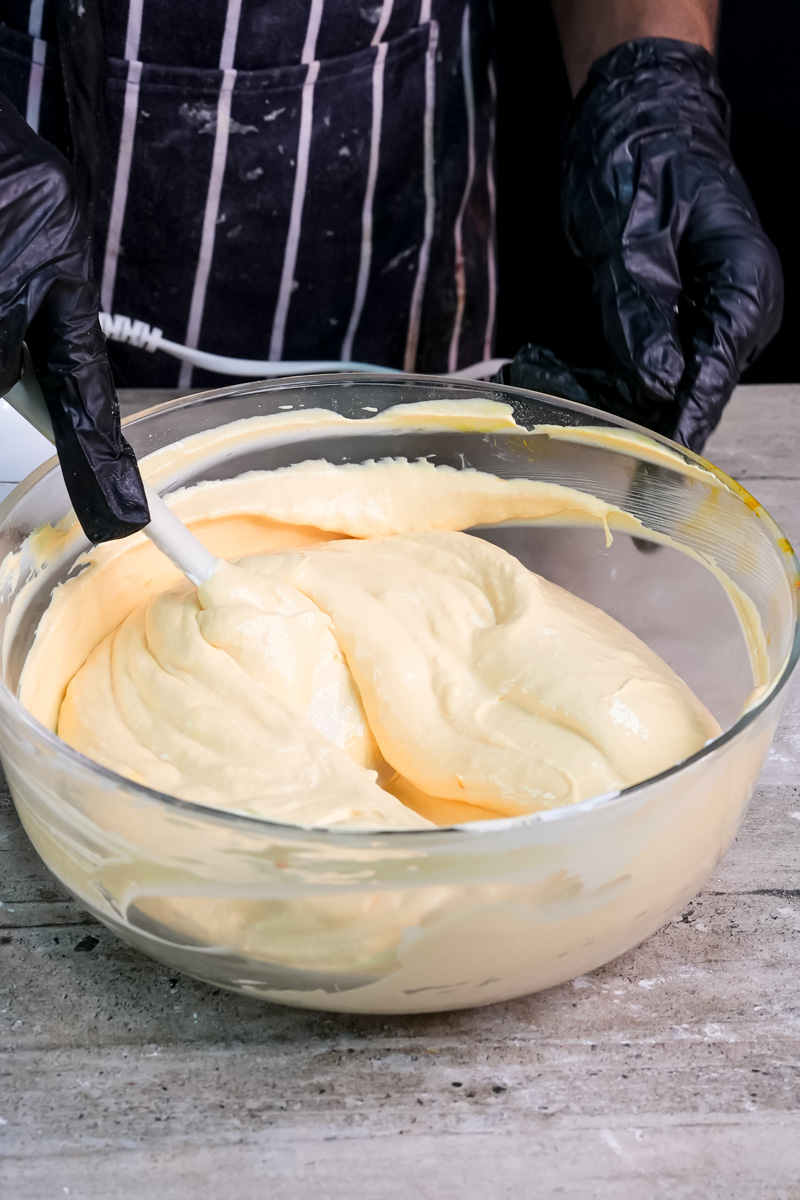
Here comes the most crucial step: folding. Immediately pour the warm mango puree into your bowl of whipped cream. Using a large spatula, gently fold the two together. Scrape down from the bottom and fold it over the top, rotating the bowl as you go. Continue just until no white streaks of cream remain. Be gentle here! You want to keep all that lovely air you whipped into the cream.
Stage 3: Assembling and Chilling Your Masterpiece
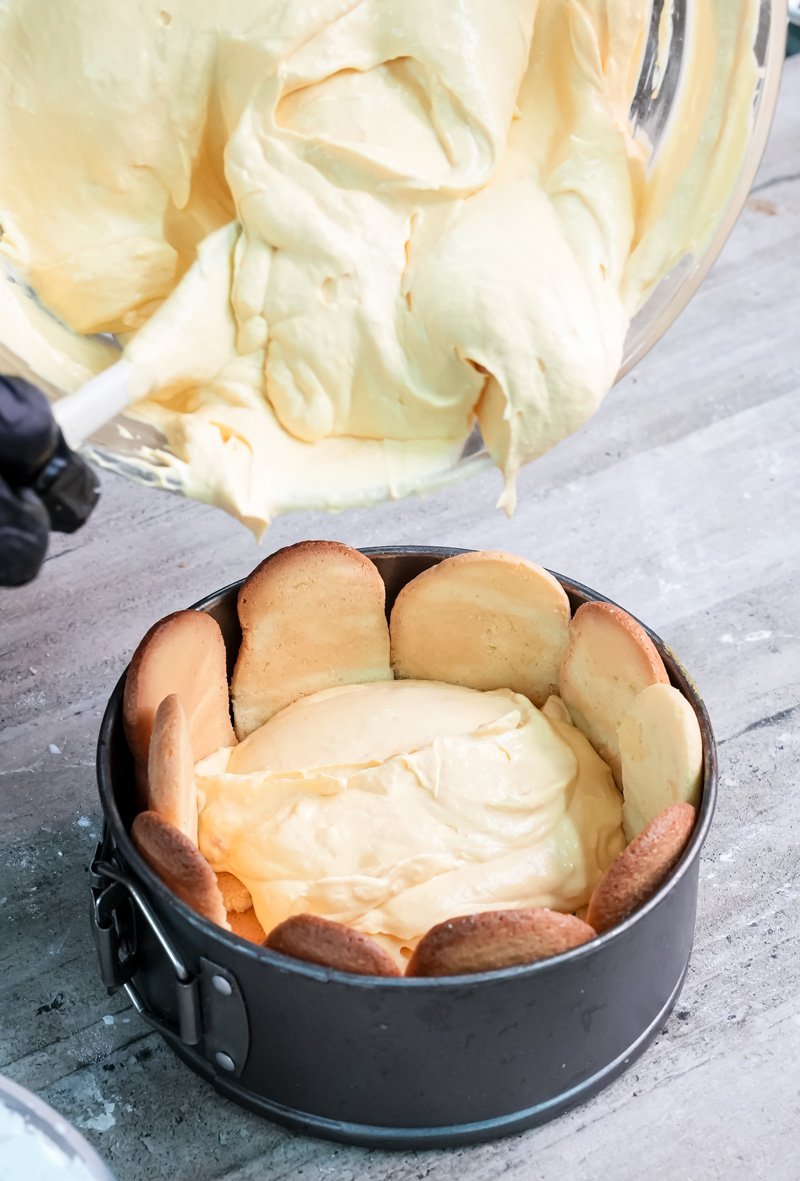
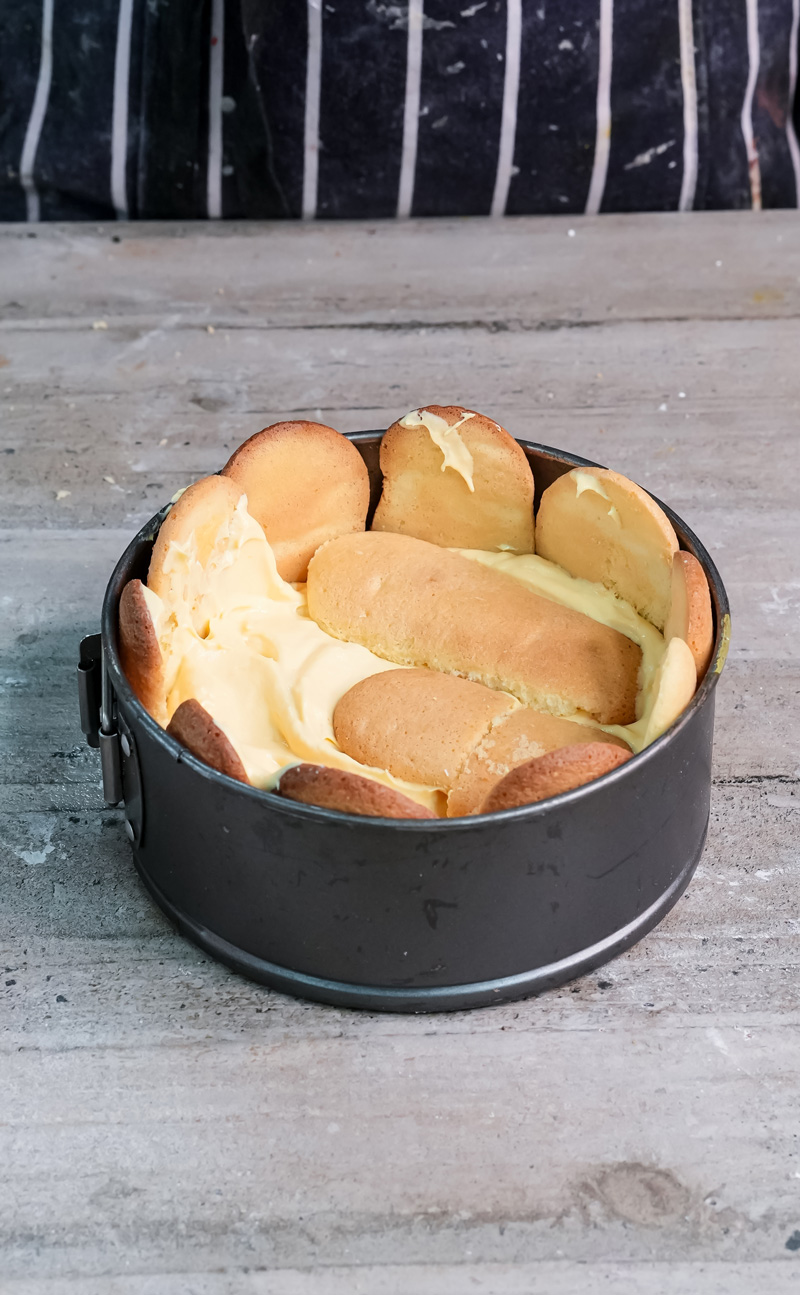
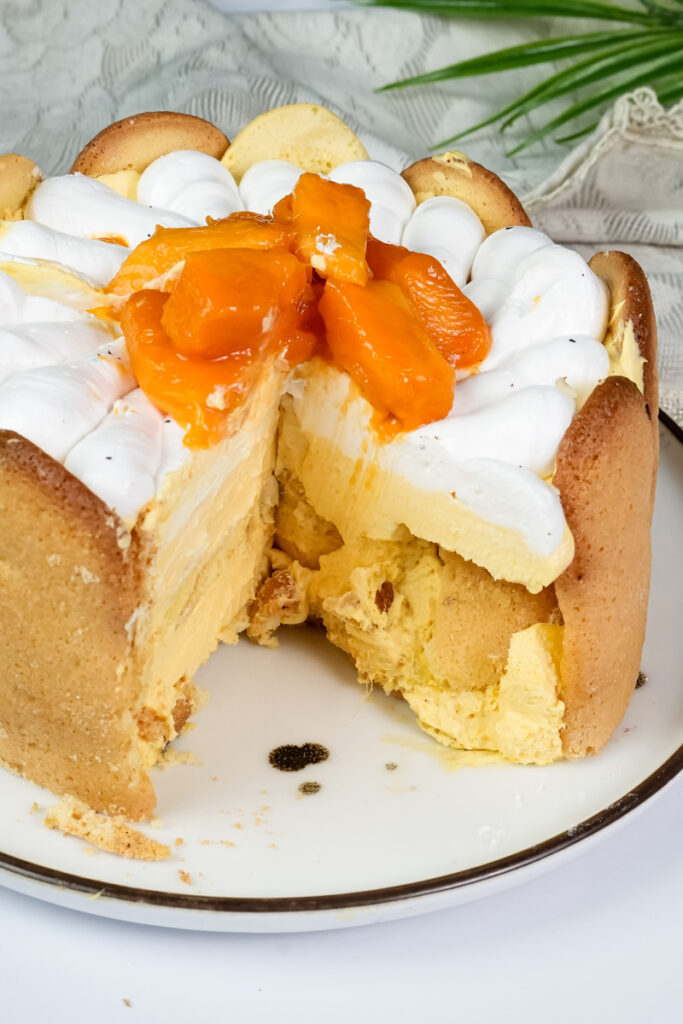
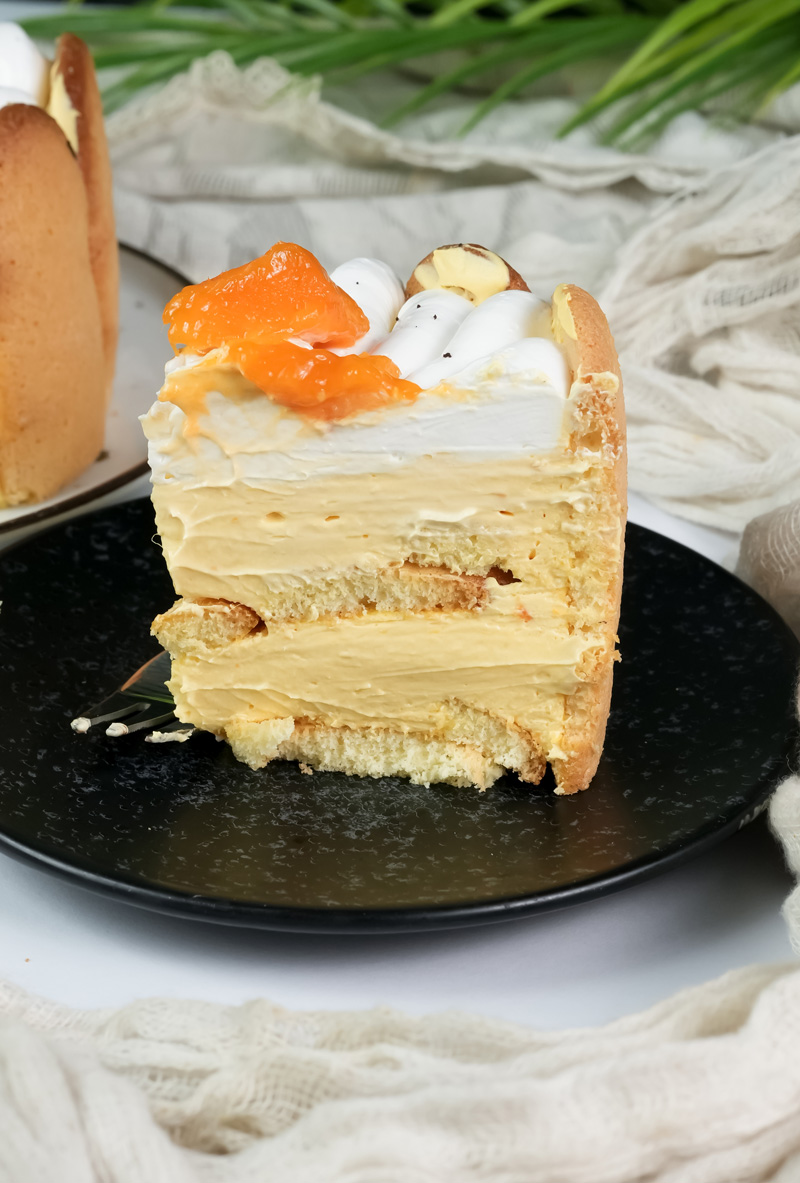
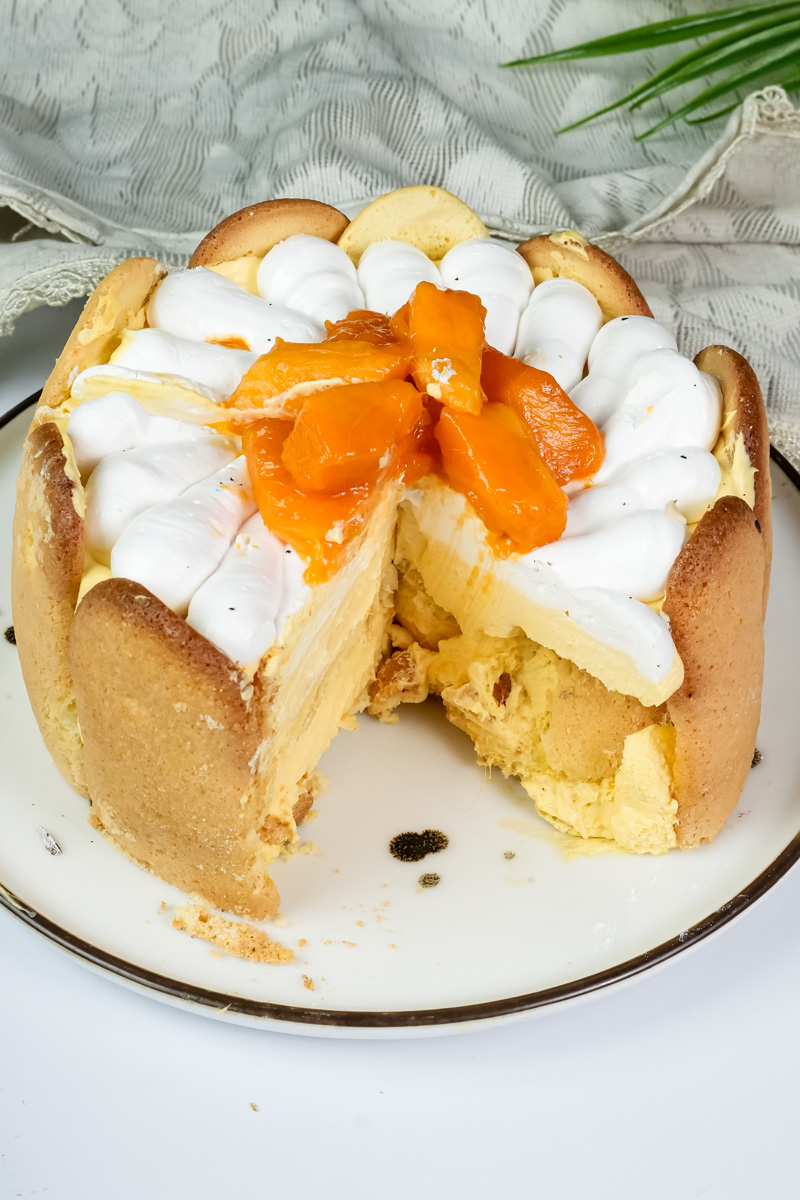
Grab your ladyfinger-lined pan. Pour half of the beautiful mango mousse into it, spreading it evenly over the bottom layer of biscuits. Create a middle layer by arranging more ladyfingers on top of the mousse. Pour the remaining mousse over this second layer and smooth the top with your spatula.
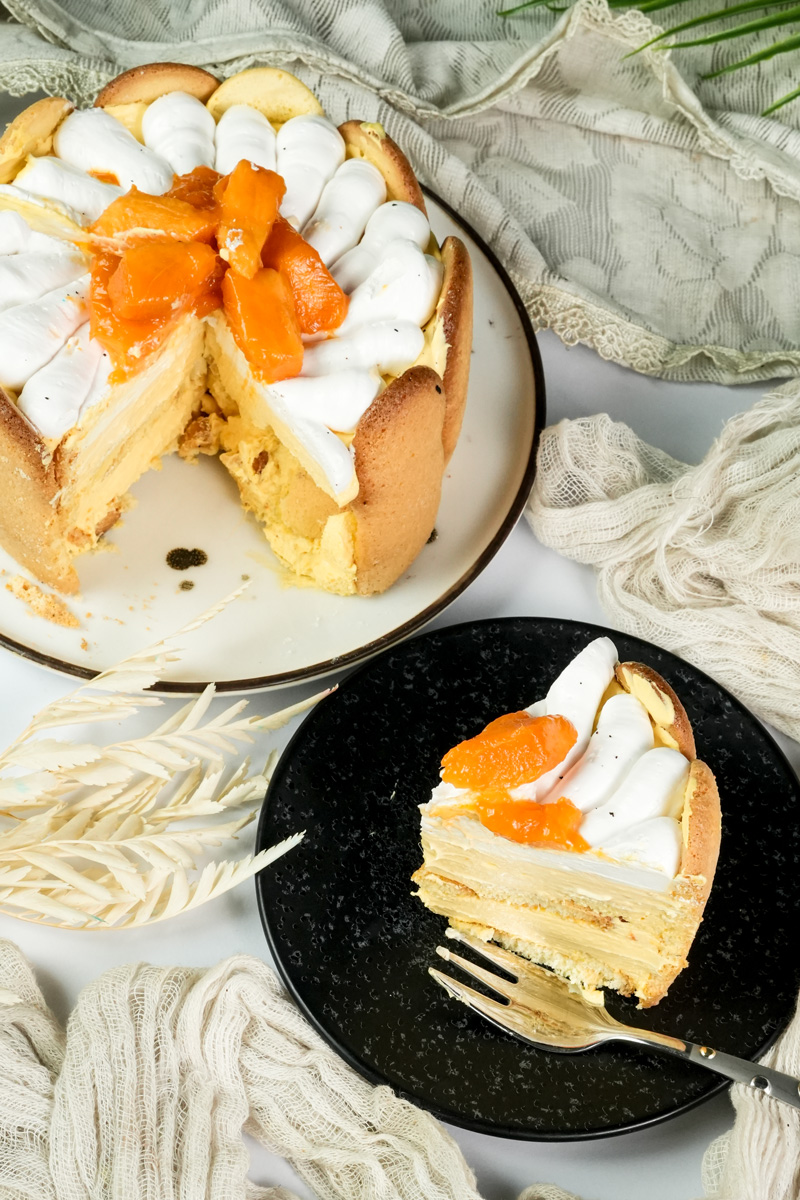
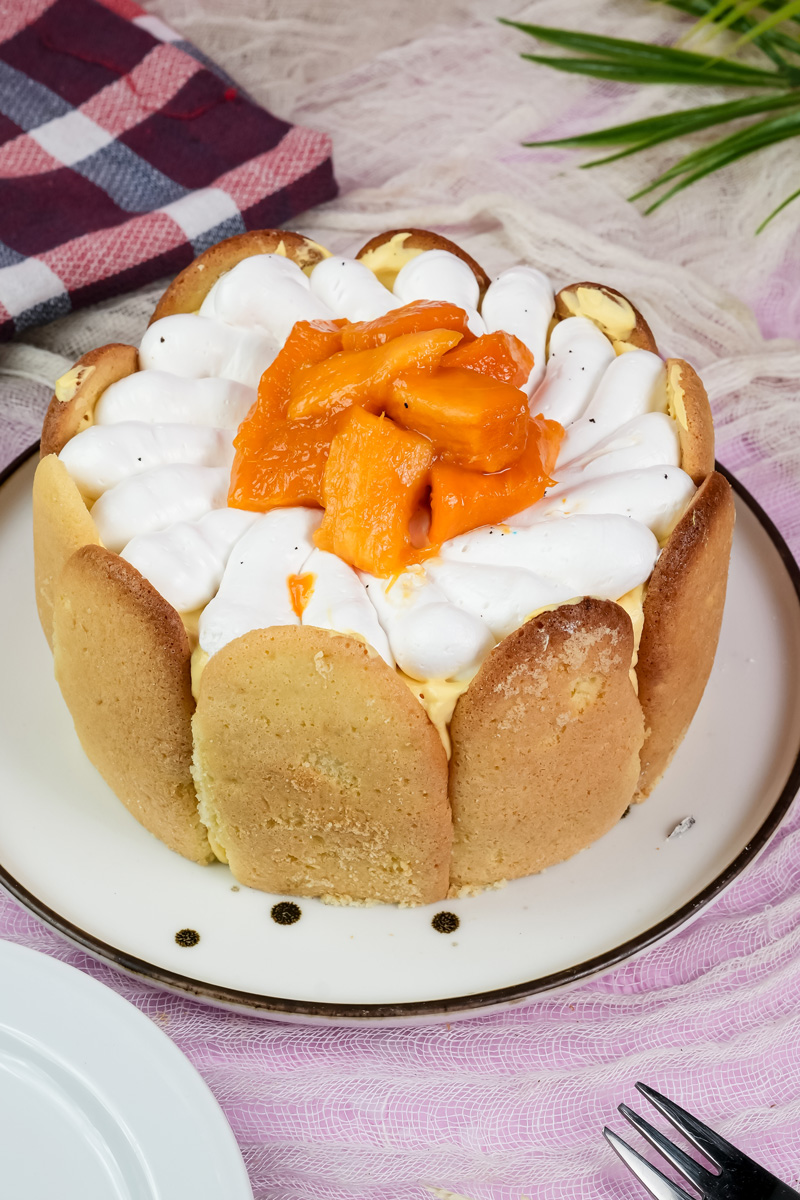
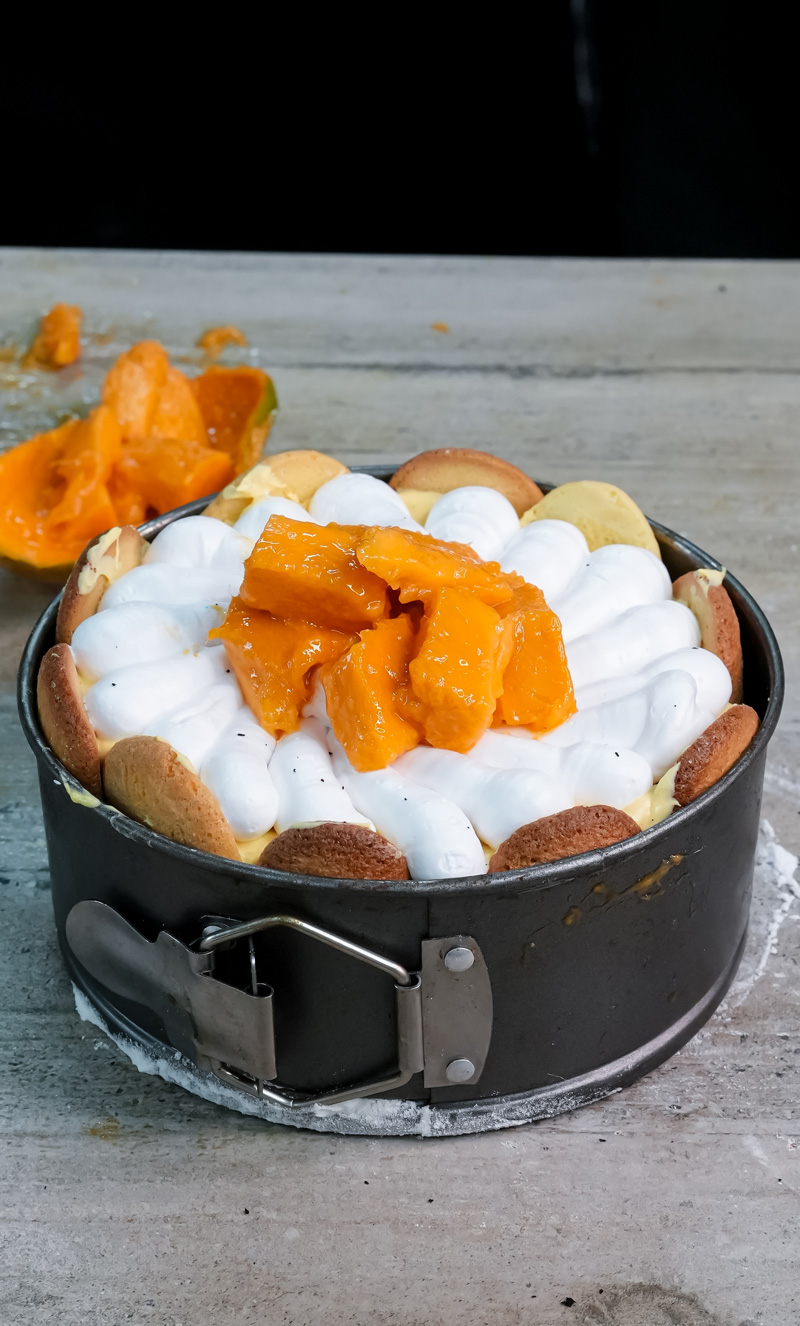
Now for the hardest part: waiting! Place the cake in the fridge to chill while you prepare the topping. For the topping, simply whip the remaining 300g of cream with powdered sugar and vanilla until firm peaks form. You can either transfer this to a piping bag to create beautiful swirls on top of the set mousse or simply spread it on with a spoon for a more rustic look. Decorate with your reserved fresh mango chunks.
Cover the cake and let it chill in the fridge for at least 4 hours, but overnight is even better. This time allows the mousse to set completely.
Variations and Customization
This mango charlotte cake recipe is a fantastic template for your creativity.
- Dietary Modifications: For a gluten-free version, simply source certified gluten-free ladyfingers. A vegetarian version is possible by substituting gelatin with agar-agar powder. However, the ratio is different (you’ll need less agar-agar) and it sets much faster, so you’ll need to work quickly. Research specific conversion rates for the brand you use.
- Flavor Twists: Add the zest of one lime to the mango puree for a zesty kick. A pinch of cardamom in the whipped cream would add a lovely spiced note. You could also fold in some toasted coconut flakes for texture.
- Seasonal Adaptations: This method works beautifully with other fruits! Try a strawberry or raspberry version in the spring, a peach charlotte in the heart of summer, or even a spiced apple or pumpkin mousse for an autumnal twist.
- Fancy vs. Everyday: For an extra “wow” factor, you can pour a thin layer of mango gelée (mango puree set with a little gelatin) on top of the mousse before adding the whipped cream. For an everyday version, skip the piping and just spoon the topping on.
Serving and Storing Your Creation
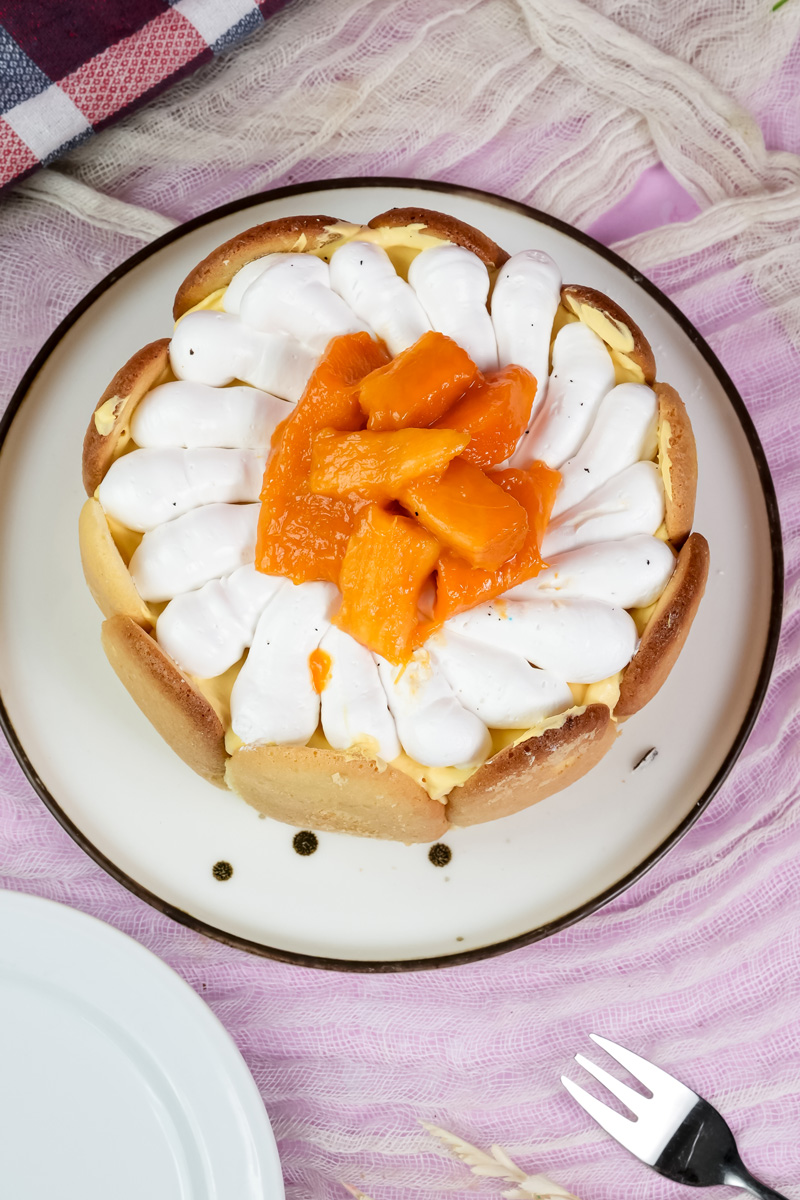
The grand reveal is the best part! To serve, carefully release the springform pan’s clasp. Gently peel away the parchment or acetate liner. For the cleanest slices, use a long, sharp knife dipped in hot water and wiped dry between each cut. A classic touch is to tie a beautiful ribbon around the cake just before presenting it.
This cake is a star all on its own and doesn’t need any side dishes. Store any leftovers covered tightly in the refrigerator for up to 3 days. The ladyfingers will continue to soften over time, becoming more cake-like, which is absolutely delicious. Due to the fresh fruit and dairy, this cake is best enjoyed cold and should not be reheated. While you can freeze it for up to a month, be aware that the texture of the mango and cream may change slightly upon thawing. Thaw it overnight in the refrigerator before serving.
Enjoy every single bite of your homemade masterpiece!
PrintMango Charlotte Cake

A show-stopping dessert that’s surprisingly simple! This elegant cake features a delicate wall of ladyfinger biscuits embracing a light, airy mango mousse. It’s the ultimate no-bake tropical treat, perfect for impressing guests without turning on the oven.
- Prep Time: 1 hour
- Cook Time: None
- Total Time: 5 hours (Included Chill Time)
- Yield: 10–12 slices 1x
- Category: Dessert
- Cuisine: French-inspired, No-Bake
Ingredients
For the Cake & Mango Mousse:
- 60g Cold Water
- 1 tbsp Gelatin Powder
- ~40 Ladyfinger Biscuits
- 350g Whipping Cream, cold
- 30g Powdered Sugar
- 1 tsp Vanilla Extract
- 400g Mango Chunks (from ~3 ripe mangoes)
For the Whipped Cream Topping:
- 300g Whipping Cream, cold
- 30g Powdered Sugar
- 1 tsp Vanilla Extract
- 200g Mango Chunks (from ~1 ripe mango)
Instructions
- Bloom Gelatin: In a small bowl, sprinkle the gelatin powder over the cold water. Let it sit for 5 minutes to bloom.
- Prep the Pan: Line the sides of a 9″ springform pan with parchment paper. Trim a flat bottom on your ladyfingers and arrange them snugly around the sides (sugar-side out) and across the bottom to form a crust.
- Whip the Cream: In a large bowl, whip the 350g of cream, 30g powdered sugar, and 1 tsp vanilla until firm peaks form.
- Make the Mango Base: Blend the 400g of mango chunks until smooth. Briefly microwave the bloomed gelatin (about 15 seconds) until it becomes liquid, then immediately pour it into the blender and pulse to combine with the puree.
- Fold the Mousse: Gently fold the warm mango puree into the whipped cream with a spatula until no streaks remain. Be careful not to deflate the cream.
- Assemble: Pour half of the mango mousse into the prepared pan. Add another layer of ladyfingers, then top with the remaining mousse and smooth the surface.
- Top & Decorate: Whip the remaining 300g cream, 30g powdered sugar, and 1 tsp vanilla to firm peaks. Pipe or spread this over the chilled mousse, then decorate with fresh mango chunks.
- Chill to Set: Refrigerate the cake for at least 4 hours (or preferably overnight) until the mousse is fully firm and set.
Notes
- Tips & Tricks: For the smoothest mousse, use ripe, low-fiber mangoes like Ataulfo or Honey mangoes. For bakery-style clean slices, freeze the cake for 30 minutes before serving and use a sharp knife dipped in hot water.
- Serving Suggestion: Present this beautiful cake on a stand and tie a ribbon around it for a classic, elegant touch.
- Storage: Keep leftovers tightly covered in the fridge for up to 3 days. The ladyfingers will soften into a delicious, cake-like texture. This dessert is not suitable for reheating.