Hey dessert fans!
Today, I want to share a recipe that’s a huge family favorite over here – my go-to Oreo Delight. Seriously, if you need something that everyone will absolutely love and you don’t want to turn on the oven? This is it. Trust me.
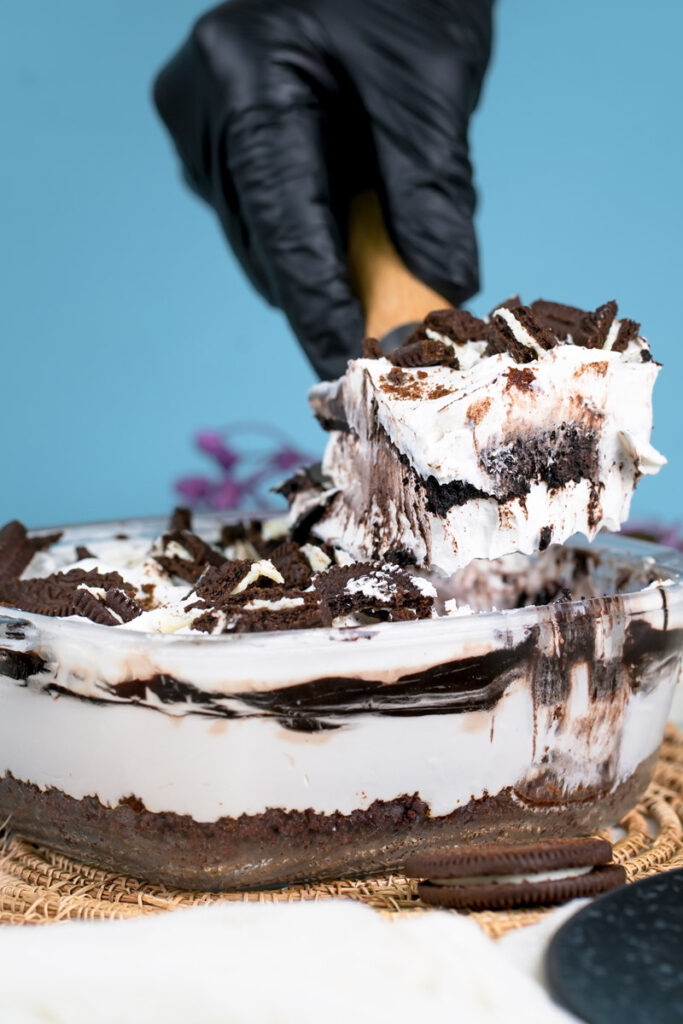
This No Bake Oreo Dessert is basically layers of pure yum:
- A crunchy Oreo cookie crust
- A dreamy, creamy cheese filling
- A smooth chocolate pudding layer
- A light, fluffy Cool Whip topping
- And, of course, more Oreos sprinkled on top!
Where did this type of dessert come from? Honestly, nobody knows exactly. But these layered “icebox” cakes got super popular, especially for potlucks and family get-togethers. Why? Because they’re so easy to make ahead of time and taste amazing.
This specific recipe? It’s the one I swear by. I think it has the perfect mix of crunchy, creamy, smooth, and fluffy. It’s simple enough that you could whip it up on a Tuesday night, but it feels special enough for a party. Ready to make some Easy Oreo Delight? Let’s do it!
Quick Look: What to Expect
Before we jump in, here’s the lowdown:
| Feature | Detail |
|---|---|
| Prep Time | About 20 minutes |
| Chill Time | At least 4 hours |
| Total Time | ~4 hours 20 mins (mostly hands-off!) |
| Servings | 12 to 16 people |
| Difficulty | Super Easy |
| Baking? | Nope! 100% No-Bake |
- How Long? You’ll spend maybe 20 minutes actually putting it together. The real waiting game is the chilling – it needs at least 4 hours in the fridge. This lets everything set up just right. Remember, your oven gets the day off for this No-Bake Oreo Delight!
- How Much Does it Make? This recipe makes enough for 12 to 16 servings, perfect for sharing.
- Want Less? Totally doable. Cut all the ingredients in half and use a smaller square pan, like an 8×8 inch. Easy peasy.
- Need More? Feeding a crowd? You can double everything and use a giant lasagna pan, or just make two regular 9×13 inch pans.
- How Hard Is It? Honestly? It’s Easy. Can you crush cookies? Mix stuff in a bowl? Spread it out? Then you can totally make this. It’s a great recipe to make with kids, too!
- What Stuff Do I Need? You don’t need any fancy gadgets:
- A 9×13 inch baking dish. Glass looks nice so you can see the layers! (The original notes mentioned an 8×4 inch pan, but trust me, you need a 9×13 for this amount of ingredients unless you want really thick layers). Use what you have, but the layers might look different.
- Mixing Bowls: Grab 2 or 3.
- Electric Mixer or Whisk: An electric mixer makes the cream cheese layer super smooth. But a good whisk and a little arm power works fine too!
- Spatula: For folding and spreading.
- Measuring Cups and Spoons.
- Something to Crush Oreos: A food processor is fastest. But, putting the cookies in a zip-top bag and whacking them with a rolling pin (or even a can of soup!) works great. Plus, it’s kinda fun!
- Can I Make It Ahead? Yes! In fact, you have to because of the chilling time. You can easily make this the day before you need it. Talk about making party day easier!
The Yummy Ingredients
Okay, let’s gather everything we need for dessert heaven.
For the Buttery Oreo Crust:
This is our crunchy base.
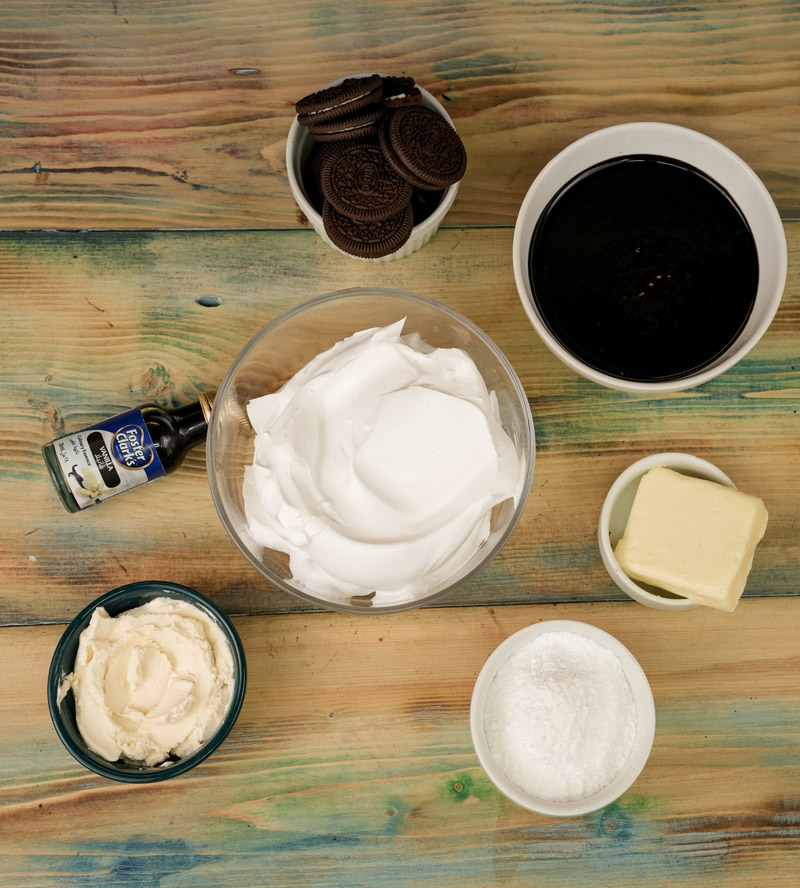
- 40-45 Regular Oreo cookies: We’ll crush these up pretty fine.
- 10 tablespoons Salted Butter: Melt this completely. Using salted butter helps balance all the sweetness. If you only have unsalted, that’s okay – maybe just add a tiny pinch of salt to the cookie crumbs.
For the Dreamy Cream Cheese Layer:
Think creamy, tangy, and sweet.
- 1/2 cup (4 oz) Cream Cheese: Make sure this is softened to room temperature. Seriously. If it’s cold, you’ll get lumps. No fun.
- 1/2 cup Powdered Sugar: Also called confectioners’ sugar.
- 1 cup Cool Whip: Make sure it’s thawed!
- 1 teaspoon Vanilla Extract: For that warm flavor.
- 2-3 Oreo cookies: Crushed up fine.
For the Smooth Pudding Layer:
Cool, chocolatey goodness coming up.
- 1 cup Half-and-Half or Whole Milk: Using milk with more fat makes the pudding richer.
- 1/2 cup Instant Chocolate Pudding Mix: (That’s about one small 3.9 oz box – check your package). Make sure it says “Instant” pudding, not the cook-and-serve kind!
- 6 Oreo cookies: Crushed up fine.
For the Fluffy Topping:
The final touch!
- 8 ounces (1 tub) Cool Whip: Thawed completely.
- 12 more Oreo cookies: Crushed up fine, for sprinkling on top.
A Few Notes on Ingredients:
- Oreos: Classic Oreos are great. But feel free to play around! Double Stuf makes the crust richer. Mint Oreos? Peanut Butter Oreos? Go for it! (Maybe switch the pudding flavor to match). Need it gluten-free? Just use Gluten-Free Oreos!
- Cool Whip: Cool Whip is awesome because it stays stable, especially when you make it ahead. You can use real homemade whipped cream instead (whip about 1.5 cups heavy cream + 1/4 cup powdered sugar + 1/2 tsp vanilla for each 8oz Cool Whip tub). Just know it might not hold its shape quite as well, especially in that cream cheese layer.
- Pudding: Chocolate is classic! But vanilla, cheesecake, or white chocolate instant pudding would taste great too.
- Cream Cheese: Use the full-fat kind for the best taste and texture. And I’ll say it again: soften it first!
Let’s Build This Thing: Step-by-Step
Okay, time to get layering! This No Bake Oreo Dessert comes together pretty fast.
1. Make the Crust:
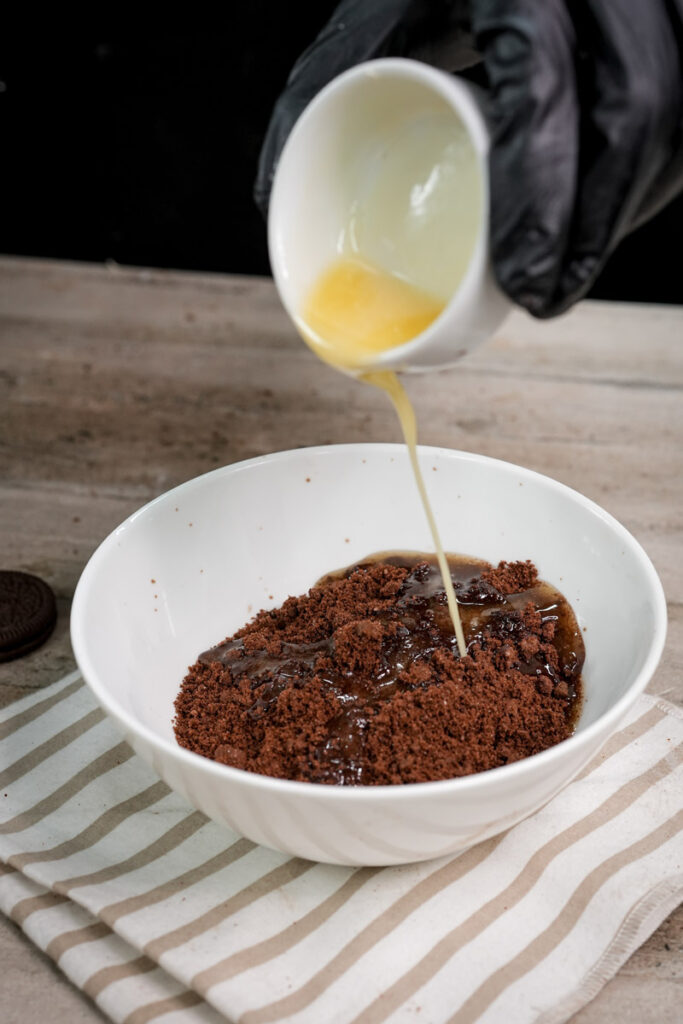
First up: Oreo crumbs! Grab those 40-45 Oreos. Use a food processor if you have one – pulse ’em till they’re fine crumbs. No processor? Put the cookies in a sturdy plastic zip-top bag, seal it (get most of the air out!), and smash away with a rolling pin or the bottom of a heavy can. Pour the crumbs into a bowl. Melt your 10 tablespoons of salted butter.
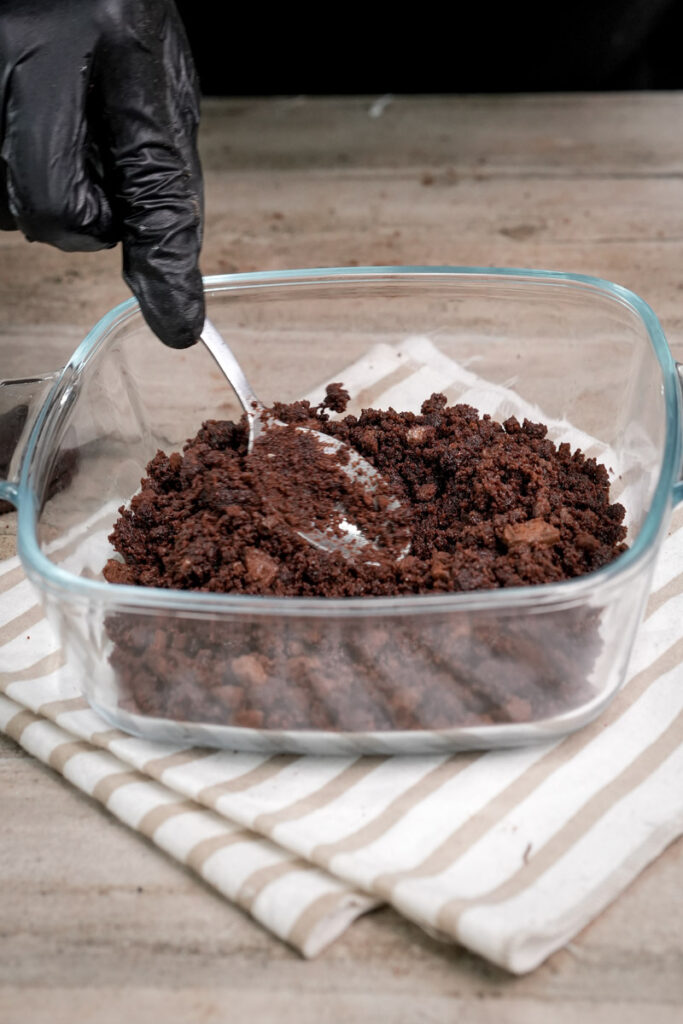
Pour the melted butter over the crumbs and mix it all up until it looks like wet sand. Dump this into your 9×13 inch dish. Press it down firmly all over the bottom. Use the bottom of a glass or a measuring cup to pack it tight. Stick the dish in the fridge to chill while you make the next layer. This helps the crust set up.
2. Mix the Cream Cheese Dream:
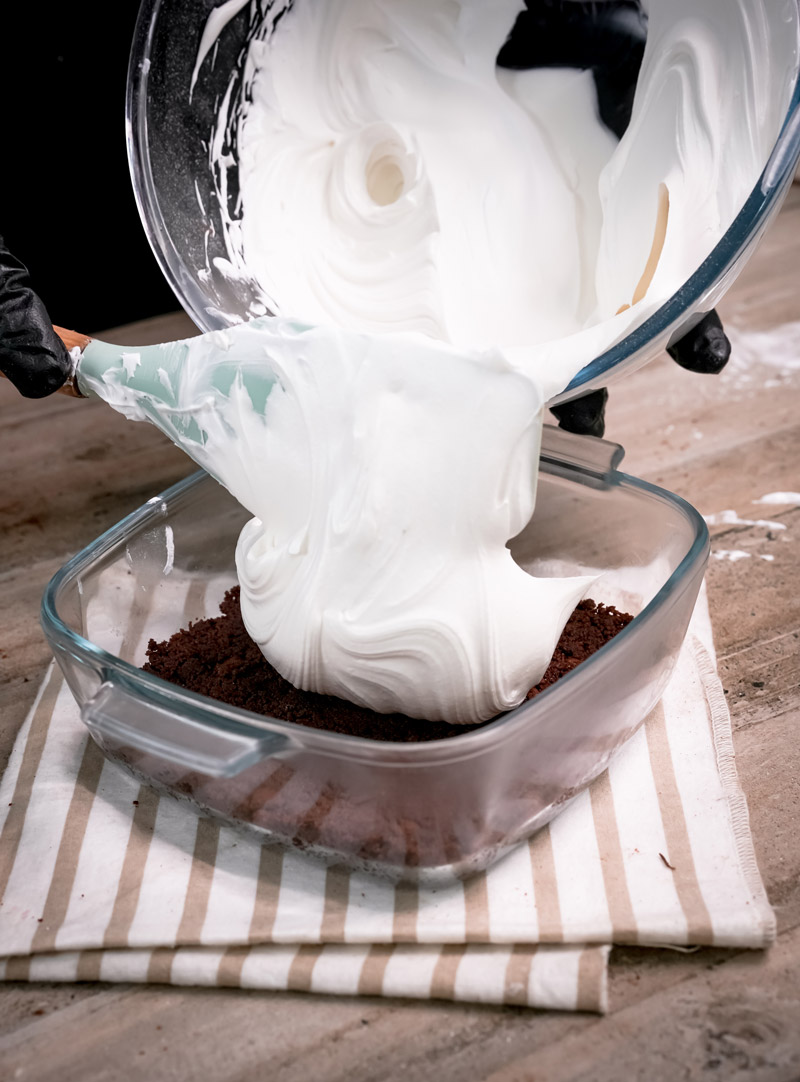
In a big bowl, put your room temperature 1/2 cup cream cheese and the 1/2 cup powdered sugar. Use an electric mixer (or a whisk and some muscle!) to beat them together until it’s totally smooth, light, and fluffy. Scrape the sides of the bowl so you get everything mixed in. No lumps allowed! Add the 1 teaspoon vanilla and mix quickly. Now, gently fold in the 1 cup of thawed Cool Whip with a spatula.
Don’t stir too much – keep it light and airy. Lastly, fold in those 2-3 crushed Oreos. Get your dish with the chilled crust out of the fridge. Spread the cream cheese mix evenly over the crust. Tip: Sometimes I drop spoonfuls all over the crust first, then gently spread to connect the dots. It helps keep the crust from getting messed up. Back into the fridge it goes!

3. Whip Up the Pudding Layer:
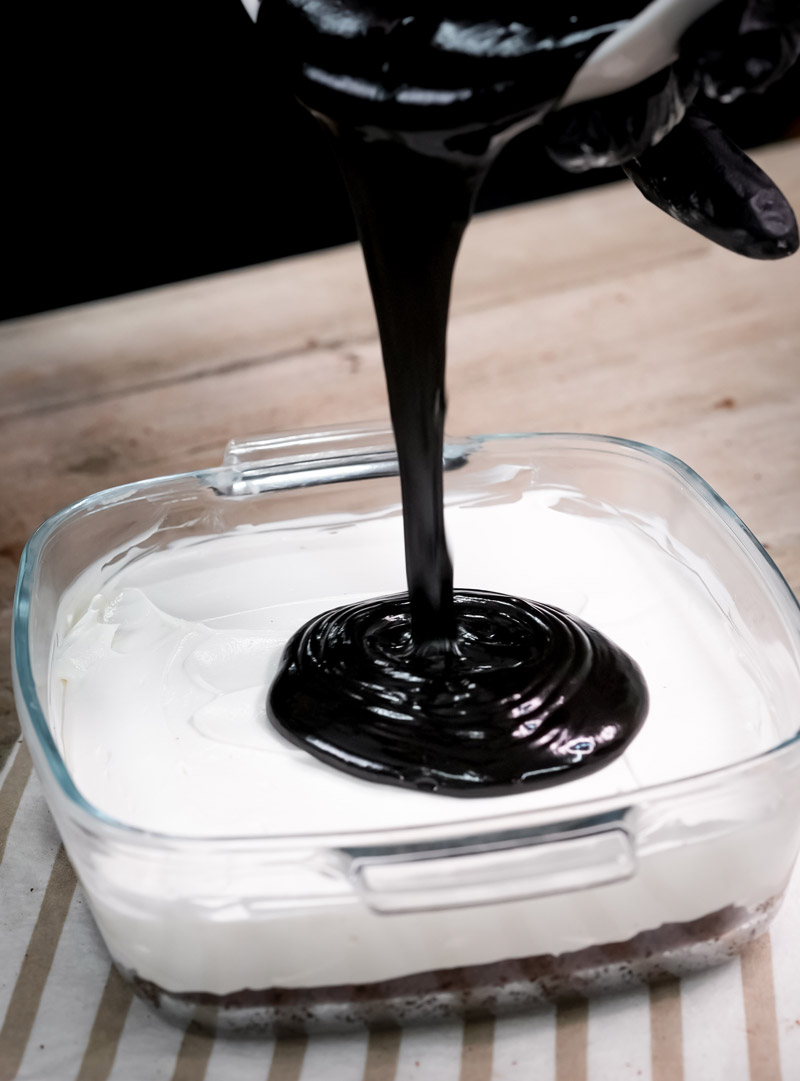
In another bowl, pour the 1 cup of half-and-half or milk. Add the 1/2 cup of instant chocolate pudding mix. Whisk these together really well for about 2-3 minutes. You’ll feel it start to get thick and smooth. Once it’s thick, stir in the 6 crushed Oreos.
Grab the dish from the fridge again. Gently spread the chocolate pudding over the cream cheese layer. Smooth it out. Let’s pop this back in the fridge for just 5-10 minutes. This helps the pudding firm up a little before we add the final topping.
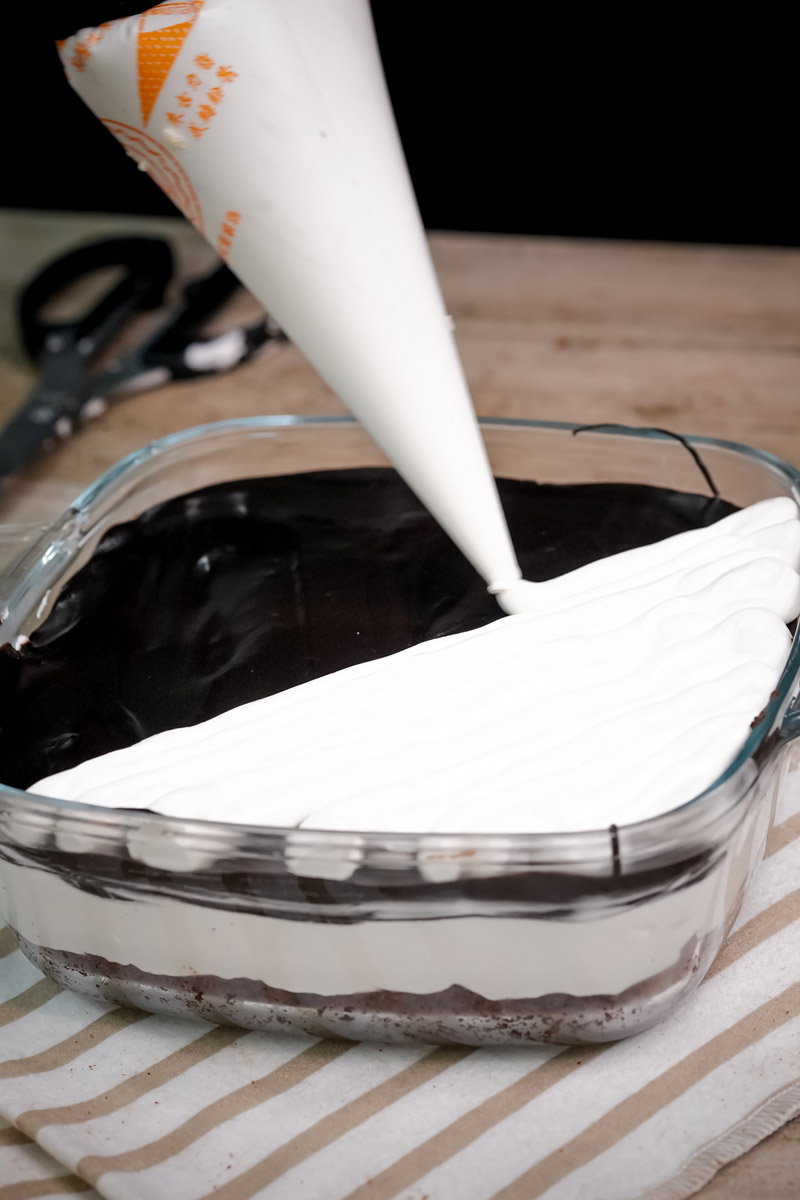
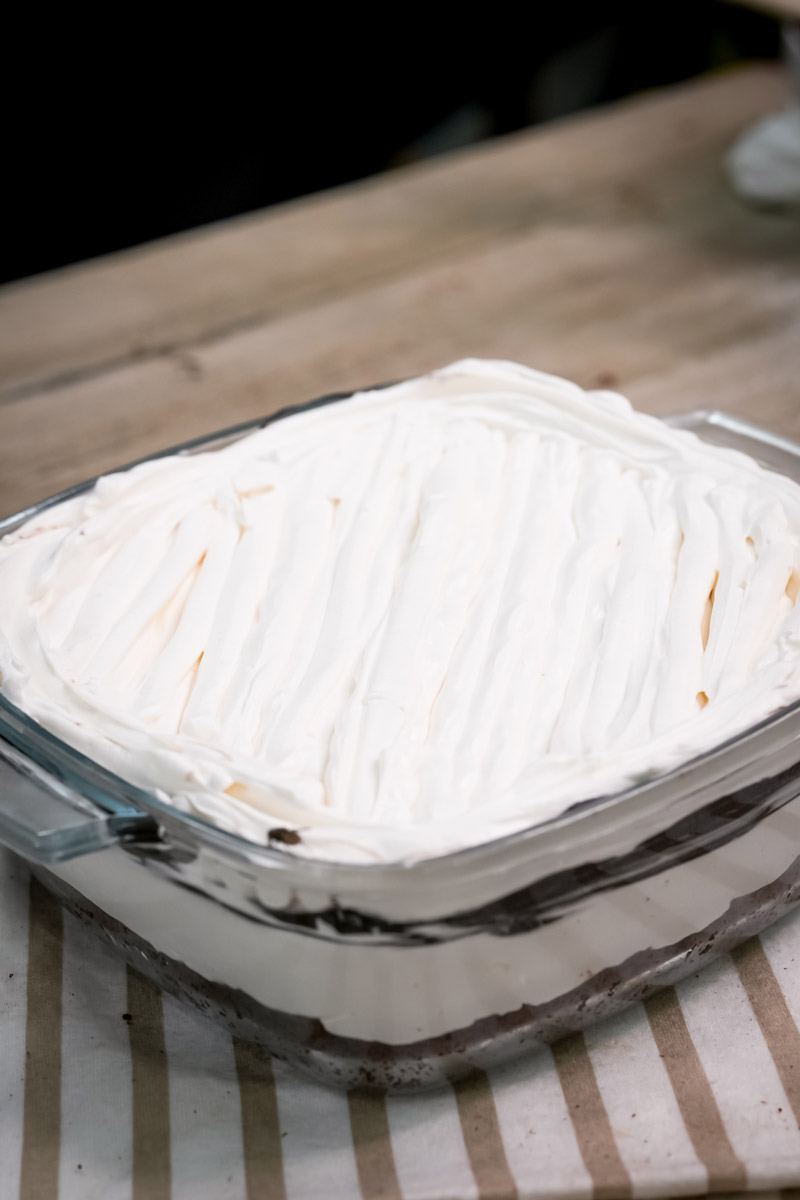
4. Add the Fluffy Topping:
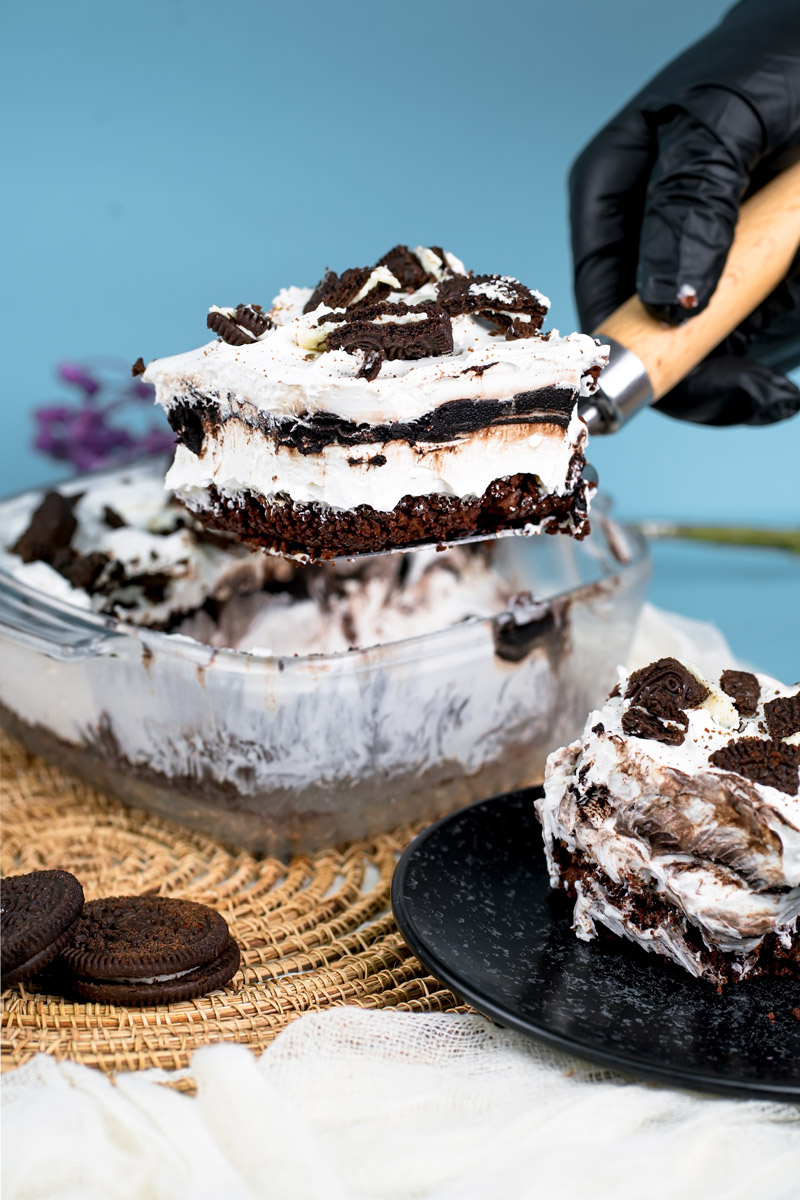
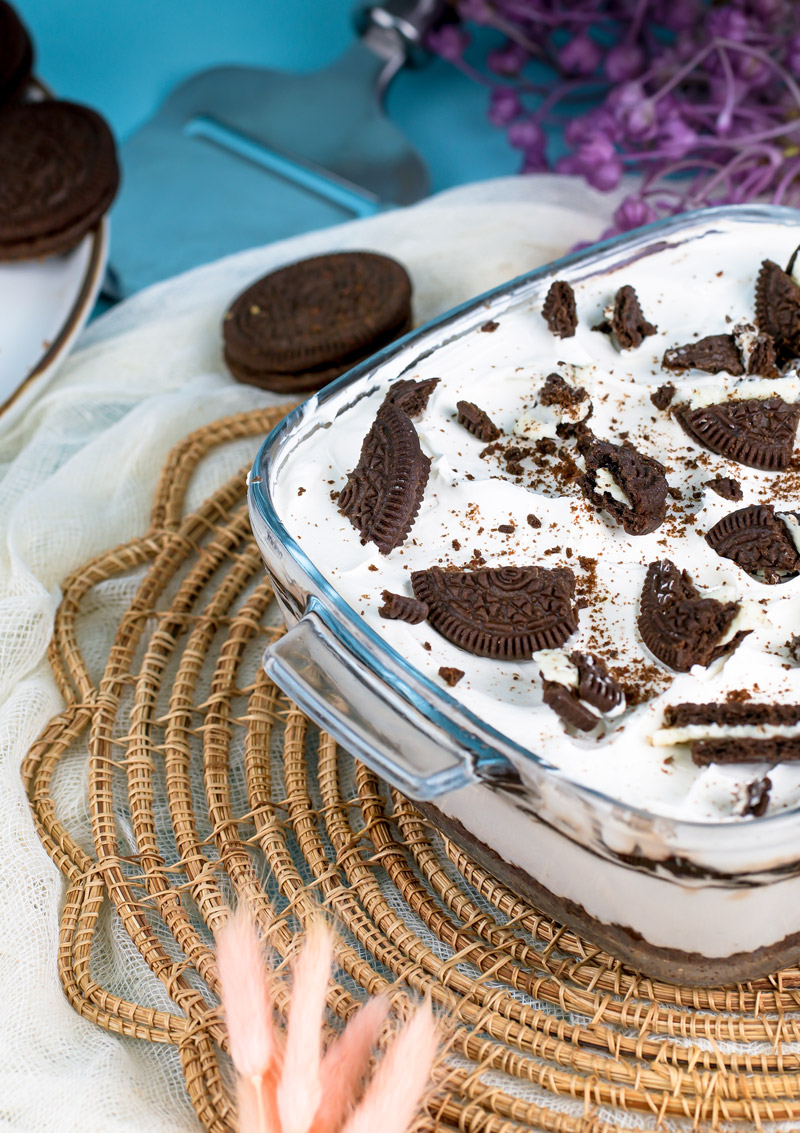
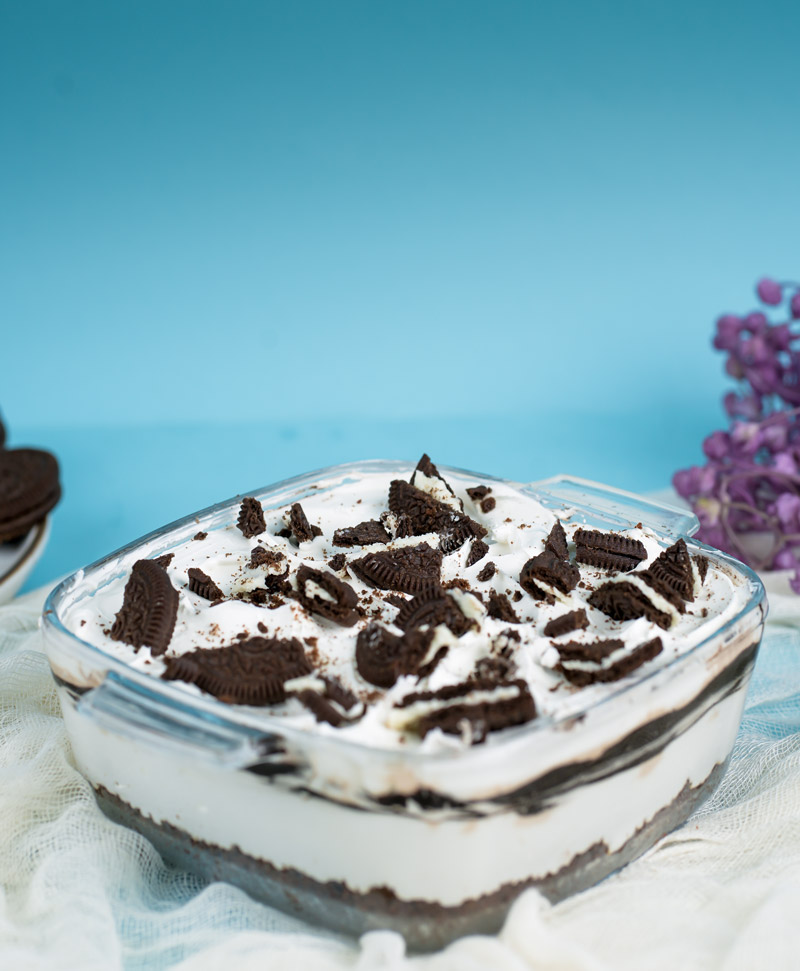
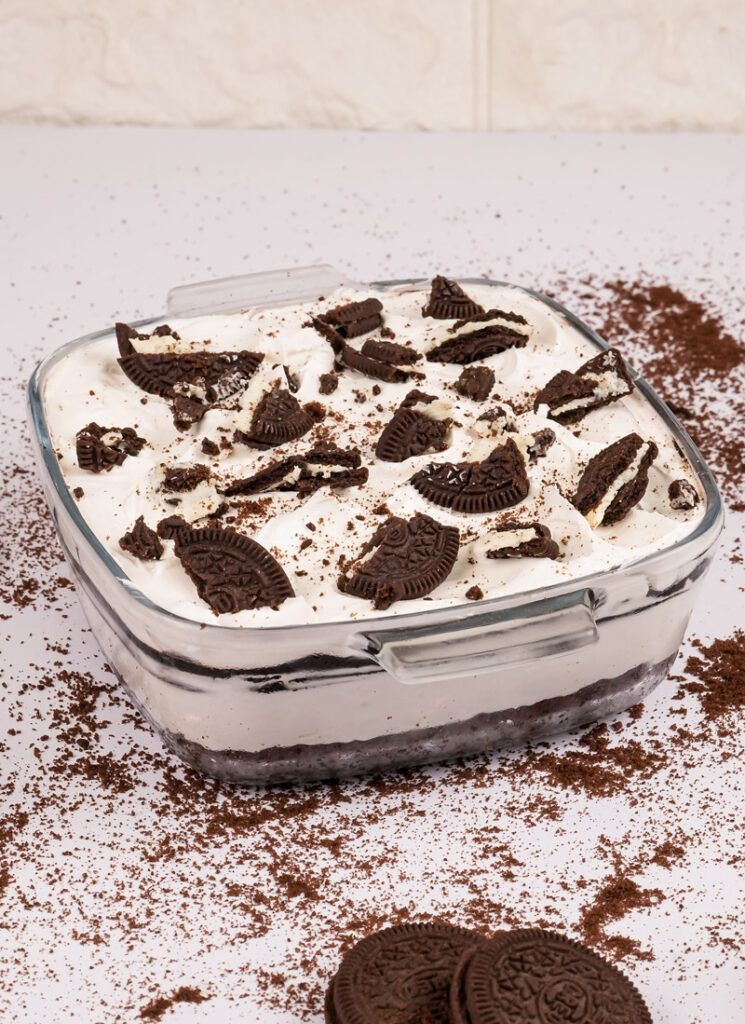
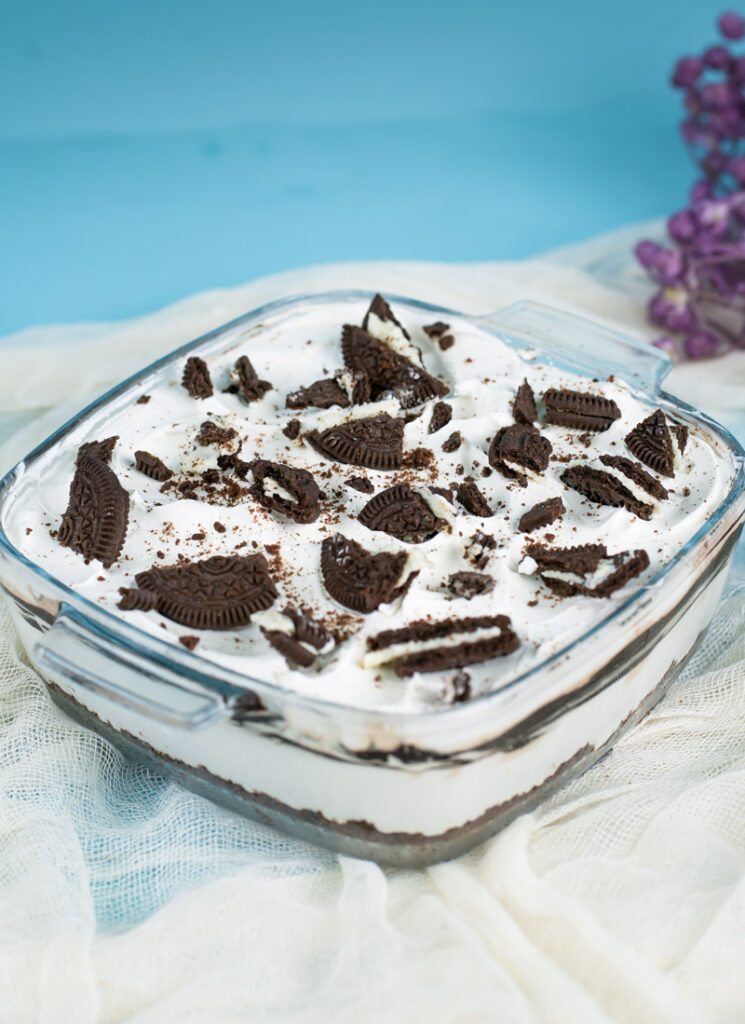
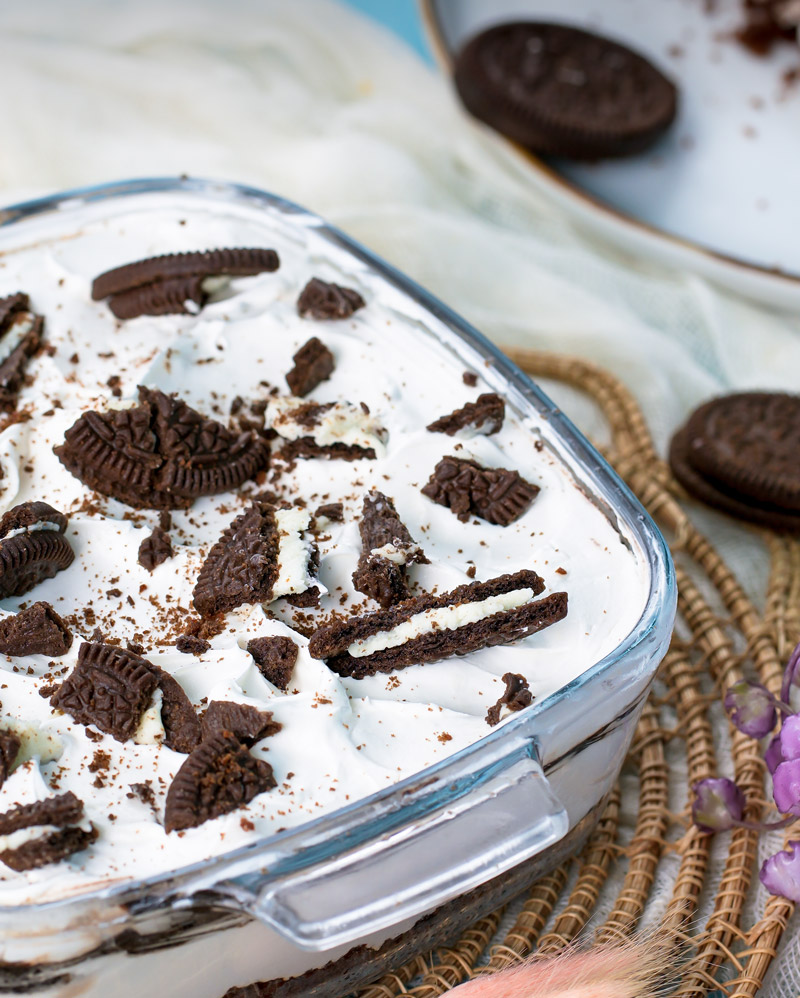
Almost done! Get your 8 oz tub of thawed Cool Whip. Spread it gently over the pudding layer. Make it look nice and fluffy! Now, take the last 12 crushed Oreos and sprinkle them all over the top. Don’t be shy!
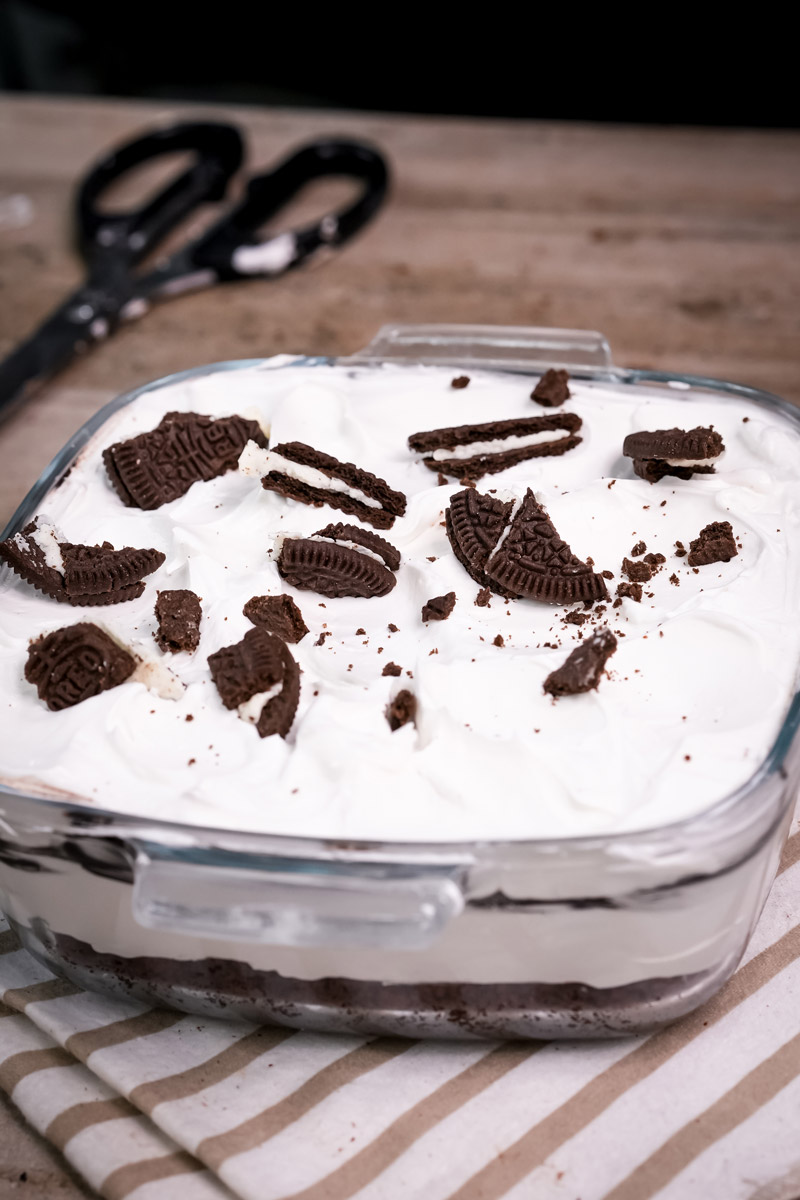
5. Chill Out (This is KEY!):
Okay, the most important part: Cover the dish tightly with plastic wrap or a lid. Put the whole thing in the refrigerator to chill for at least 4 hours. Honestly? Longer is better. Overnight is perfect if you can wait! This time lets all the layers set properly and the flavors blend together. It makes it way easier to slice and serve. Really, don’t rush the chill time!
Fun Ways to Change It Up

One reason I love this Easy Oreo Delight? It’s so easy to tweak! Here are some ideas I’ve tried or thought about:
- Special Diets: Like I mentioned, use certified Gluten-Free Oreos for a GF version. Going dairy-free or vegan is tougher because of the cream cheese, Cool Whip, and milk. You could try dairy-free cream cheese, coconut whipped topping, and plant milk for the pudding, but I haven’t tested how well the pudding sets with those. Let me know if you try it!
- Flavor Twists:
- Try vanilla, cheesecake, or white chocolate instant pudding instead of chocolate.
- Use different Oreo flavors! Mint Oreos + chocolate pudding? Golden Oreos + vanilla pudding? Peanut Butter Oreos + chocolate pudding? Sounds good to me!
- Mix mini chocolate chips into the cream cheese layer or sprinkle them on top. Yum.
- Drizzle chocolate syrup, caramel, or even melted peanut butter over the top right before serving.
- Fancy Look: Instead of a big dish, layer everything into individual cups or small jars. Looks super cute for parties!
- Seasonal Fun: In the summer, maybe add a layer of sliced strawberries between the cream cheese and pudding? For fall, a drizzle of caramel and some chopped pecans on top would be delicious.
Serving and Storing Your Awesome Dessert
Okay, your No-Bake Oreo Delight has chilled and it’s ready to wow everyone!
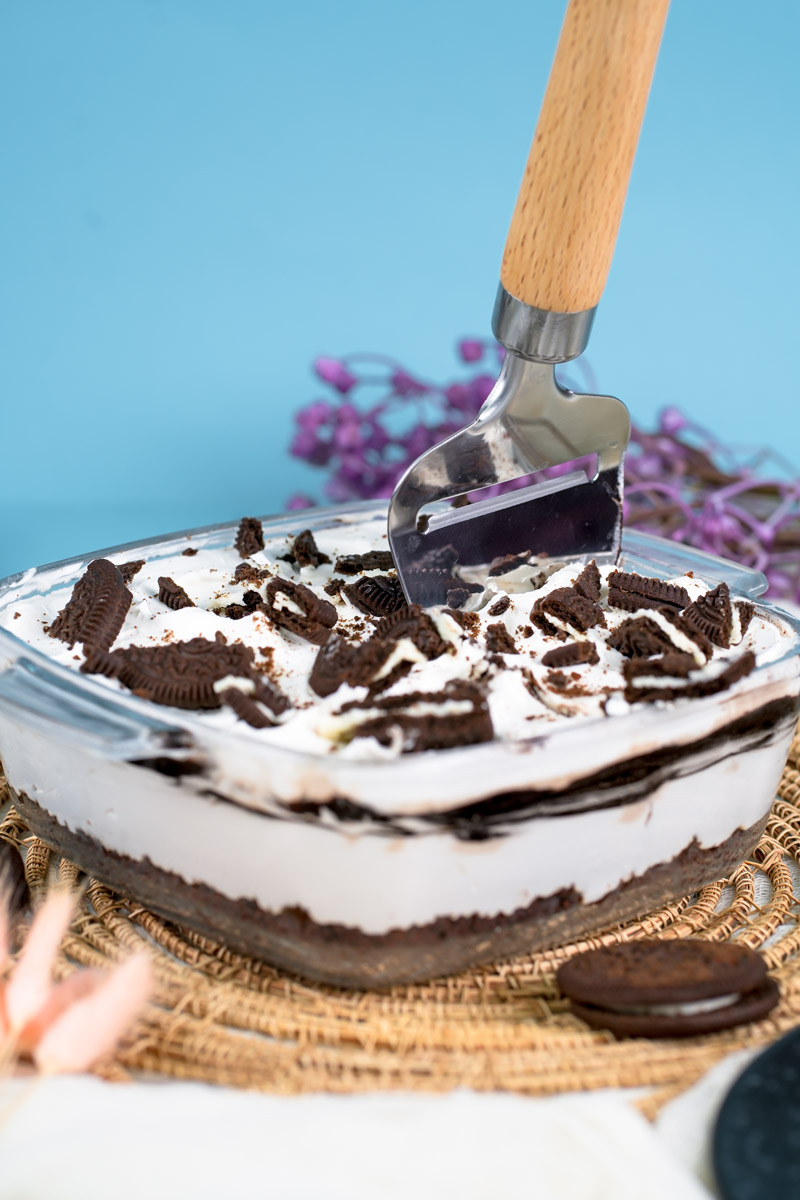
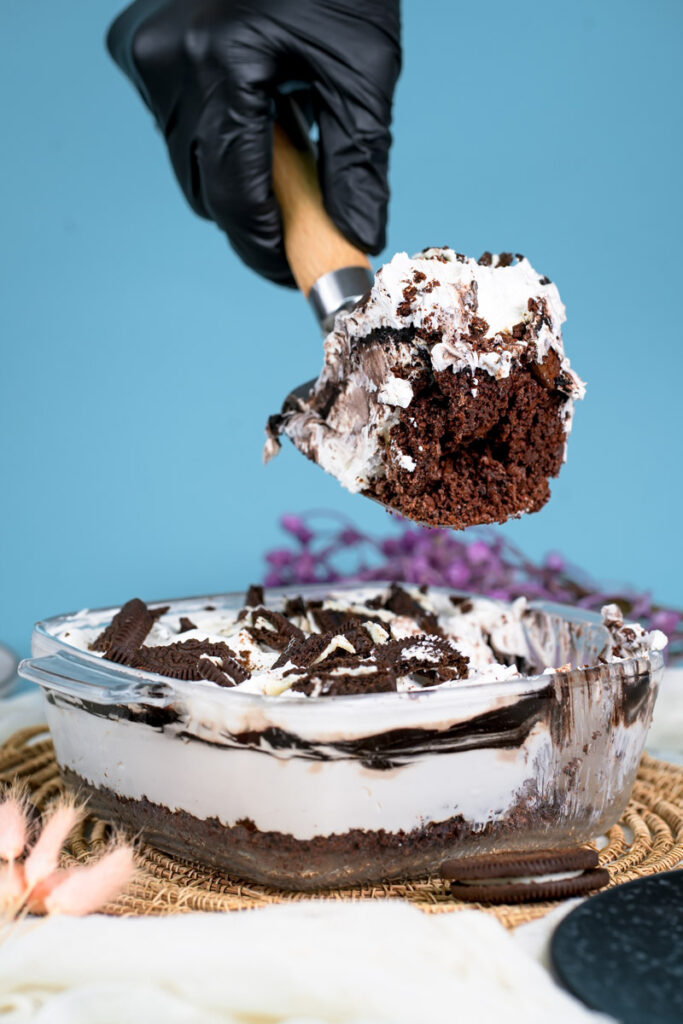
- How to Serve: Cut into squares with a sharp knife. Wiping the knife clean between cuts helps make the slices look neater! Serve it cold, right out of the fridge. It’s great as-is, but an extra blob of whipped cream or a few berries on the side never hurt anyone!
- Storing Leftovers: Got leftovers? (Sometimes we do, sometimes we don’t!) Cover the dish tightly with plastic wrap, or move the leftovers to an airtight container. Keep it in the fridge. It should stay tasty for 3-5 days.
- Can You Freeze It? Yep! Wrap it up really well (plastic wrap then foil is a good bet) so it doesn’t get freezer burn. It’ll keep in the freezer for up to 3 months. When you want to eat it, let it thaw in the fridge overnight. Just a heads-up: sometimes the Cool Whip texture changes a tiny bit after freezing (it can get a little watery), but it still tastes great. Definitely don’t try to heat this dessert up – it’s meant to be cold!
And there you go! Everything you need to know to make this super easy, super yummy no-bake Oreo dessert. I really hope you enjoy making it (and eating it!) as much as I do. Happy dessert making!
PrintOreo Delight

This dessert is pure layered goodness! Think crunchy Oreos, creamy cheesecake filling, smooth chocolate pudding, and fluffy topping. It’s super easy, requires absolutely no baking, and everyone always asks for seconds. Trust me, it’s a keeper!
- Prep Time: 20 minutes
- Cook Time: None
- Total Time: 4 hours 20 minutes (Included Chilling Time)
- Yield: 12–16 servings 1x
- Category: Dessert
- Cuisine: American
Ingredients
For the Crust:
- 40–45 regular Oreo cookies
- 10 tbsp Salted Butter, melted
For the Cream Cheese Layer:
- 1/2 cup (4 oz) Cream Cheese, softened to room temp
- 1/2 cup Powdered Sugar
- 1 cup Cool Whip, thawed
- 1 tsp Vanilla Extract
- 2–3 Oreo cookies, finely crushed
For the Pudding Layer:
- 1 cup Half-and-Half (or Whole Milk)
- 1/2 cup Instant Chocolate Pudding Mix (one ~3.9 oz box)
- 6 Oreo cookies, finely crushed
For the Topping:
- 8 oz (1 tub) Cool Whip, thawed
- 12 Oreo cookies, finely crushed
Instructions
- Make the Crust: Crush the 40-45 Oreos into fine crumbs (use a food processor or a bag and rolling pin). Mix crumbs with the melted butter. Press firmly into the bottom of a 9×13 inch dish. Chill while you make the next layer.
- Mix Cream Cheese Layer: Beat the room temperature cream cheese and powdered sugar until smooth and fluffy. Stir in the vanilla. Gently fold in 1 cup of thawed Cool Whip, then fold in the 2-3 crushed Oreos. Spread carefully over the chilled crust. Put it back in the fridge.
- Mix Pudding Layer: Whisk the half-and-half (or milk) and instant pudding mix for about 2 minutes, until it starts to thicken. Stir in the 6 crushed Oreos. Spread gently over the cream cheese layer. Chill for 5-10 minutes to set slightly.
- Add Topping: Spread the remaining 8 oz tub of thawed Cool Whip over the pudding layer. Sprinkle the last 12 crushed Oreos evenly over the top.
- Chill Thoroughly: Cover the dish tightly. Refrigerate for at least 4 hours, or preferably overnight. This step is crucial for the layers to set!
Notes
- Serving: Slice into squares and serve cold, straight from the fridge!
- Tips & Tricks:
- Use room temperature cream cheese for a smooth filling – no lumps!
- Make sure you grab Instant pudding mix, not cook-and-serve.
- Crush Oreos finely for the best texture in the layers.
- Don’t skip the chilling time! It really needs it to set up properly.
- Want smaller servings? Layer it in individual parfait glasses!
- Storage: Keep leftovers covered in the fridge for 3-5 days. You can also freeze it (wrapped well) for up to 3 months; thaw overnight in the fridge before serving (texture might change slightly). Enjoy cold!