Hey friends, so glad you could stop by my kitchen.
Today, we’re going to do something that feels a little bit rebellious in the best way possible. We’re taking America’s favorite cookie and putting it where it was always destined to be: in a big, warm stack of fluffy pancakes.
That’s right. We’re making Oreo pancakes.
I honestly don’t know who first had the genius idea to mix Oreos and pancakes. It was probably some creative soul looking for a late-night snack. But whoever they are, they deserve a medal.
This recipe is the one I come back to again and again. Why? Because it’s perfectly balanced. The batter is unbelievably fluffy—we have buttermilk to thank for that—and it has just the right amount of cookie crunch.
I first made these on a rainy Saturday morning when my kids were complaining about being bored. Let’s just say no one was bored after a stack of these hit the table. Now, it’s our official “special occasion” breakfast.
So, grab an apron. Let’s make some magic. I’ll be here to walk you through every step, sharing my little tips to make sure your pancakes turn out perfectly.

A Quick Look at What’s Ahead
This recipe is all about getting amazing results without the stress.
You’ll need about 10 minutes to get everything ready and another 16 minutes to cook. All in all, you’re looking at about 26 minutes from start to finish. A pretty quick trip to breakfast paradise!
This recipe makes about 8 pretty big pancakes, which is perfect for my family of four. Cooking for more people? Or maybe you just want leftovers? Trust me, you’ll want leftovers. It’s super easy to scale the recipe up or down.
Pancake Scaling Guide
| Servings | All-Purpose Flour | Granulated Sugar | Baking Powder | Baking Soda | Salt | Buttermilk | Large Eggs | Vanilla Extract | Unsalted Butter (melted) | Oreo Cookies |
| 4 Pancakes | 1 cup | 2 tbsp | 1 ¼ tsp | ¼ tsp | ¼ tsp | ⅞ cup | 1 | 1 tsp | 1 ½ tbsp | 5 |
| 8 Pancakes | 2 cups | ¼ cup | 2 ½ tsp | ½ tsp | ½ tsp | 1 ¾ cups | 2 | 2 tsp | 3 tbsp | 10 |
| 12 Pancakes | 3 cups | 6 tbsp | 3 ¾ tsp | ¾ tsp | ¾ tsp | 2 ⅝ cups | 3 | 1 tbsp | 4 ½ tbsp | 15 |
How hard is it? Super easy. If you’ve ever made pancakes from a box, you can definitely make these. And if you haven’t? This is the perfect place to start.
What gear will you need? Probably nothing you don’t already have.
- A couple of mixing bowls (one big, one medium)
- A whisk and a spatula
- A big non-stick pan or griddle
- Measuring cups and spoons
Can I make it ahead of time? Absolutely! I do this all the time to make mornings less crazy. You can mix all the dry ingredients and keep them in a sealed container for weeks. Or, make the entire batter the night before and pop it in the fridge. Breakfast just got way easier.
What You’ll Need (The Ingredients)
Great pancakes start with good ingredients. Here’s a rundown of what we’re using.

For the dry stuff, you’ll need 2 cups of all-purpose flour, ¼ cup of granulated sugar for a little sweetness, and ½ teaspoon of salt to make all the other flavors pop.
The real magic comes from our leavening agents: 2 ½ teaspoons of baking powder and ½ teaspoon of baking soda. The baking powder gives the pancakes their initial lift, but the baking soda has a special job. It reacts with our secret weapon…
Buttermilk! You’ll need 1 ¾ cups of buttermilk. This is the key to getting that soft, tender texture and a little bit of tang. Please don’t skip this part! If you don’t have any, it’s no problem. Just pour 1 ¾ tablespoons of lemon juice or white vinegar into a measuring cup, then fill the rest with regular milk. Let it sit for five minutes, and you’ve got homemade buttermilk.
For the rest of the wet ingredients, we’ll use 2 large eggs (let them sit on the counter for a bit to come to room temp), 2 teaspoons of pure vanilla extract, and 3 tablespoons of melted unsalted butter.
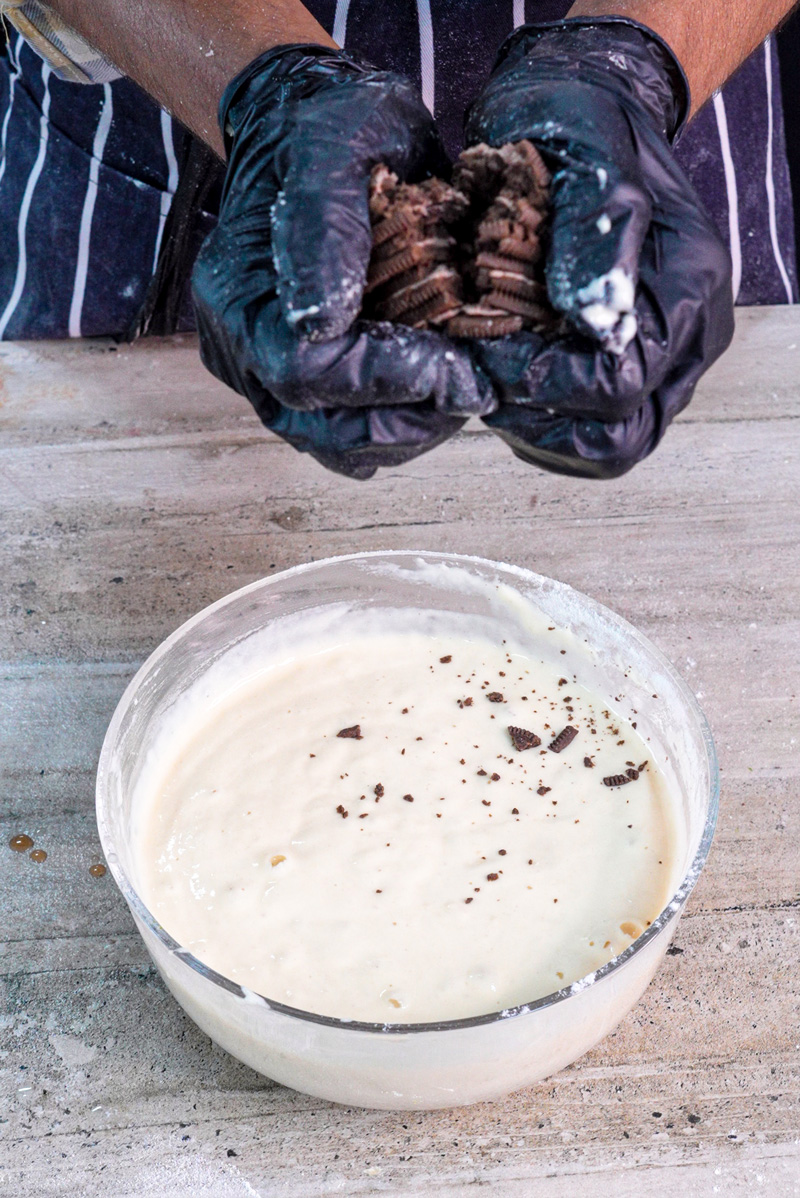
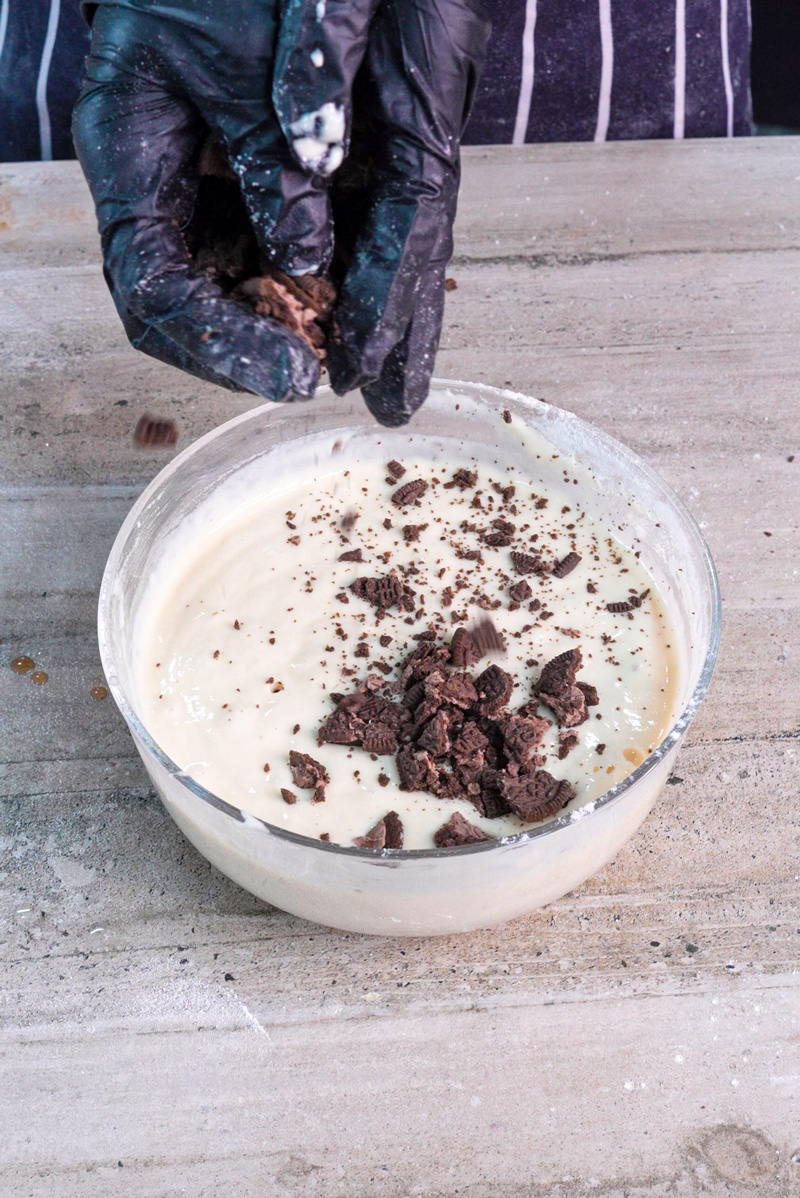
And of course, the star of the show: 10 Oreo cookies, chopped up. I like to leave some bigger chunks for a better bite.
Finally, just a splash of vegetable oil for the pan to keep things from sticking.
Let’s Get Cooking! A Step-by-Step Guide
Okay, let’s do this. Follow along and you’ll have a perfect stack in no time.
Step 1: Get Your Dry Ingredients Ready
First, melt your butter and just set it aside to cool down. You don’t want to cook the eggs with hot butter. Now, grab a big bowl. Dump in the flour, sugar, baking powder, baking soda, and salt. Whisk it all together for about 30 seconds. This is basically like sifting—it gets rid of lumps and makes sure everything is mixed up perfectly.
Step 2: Mix the Wet Ingredients
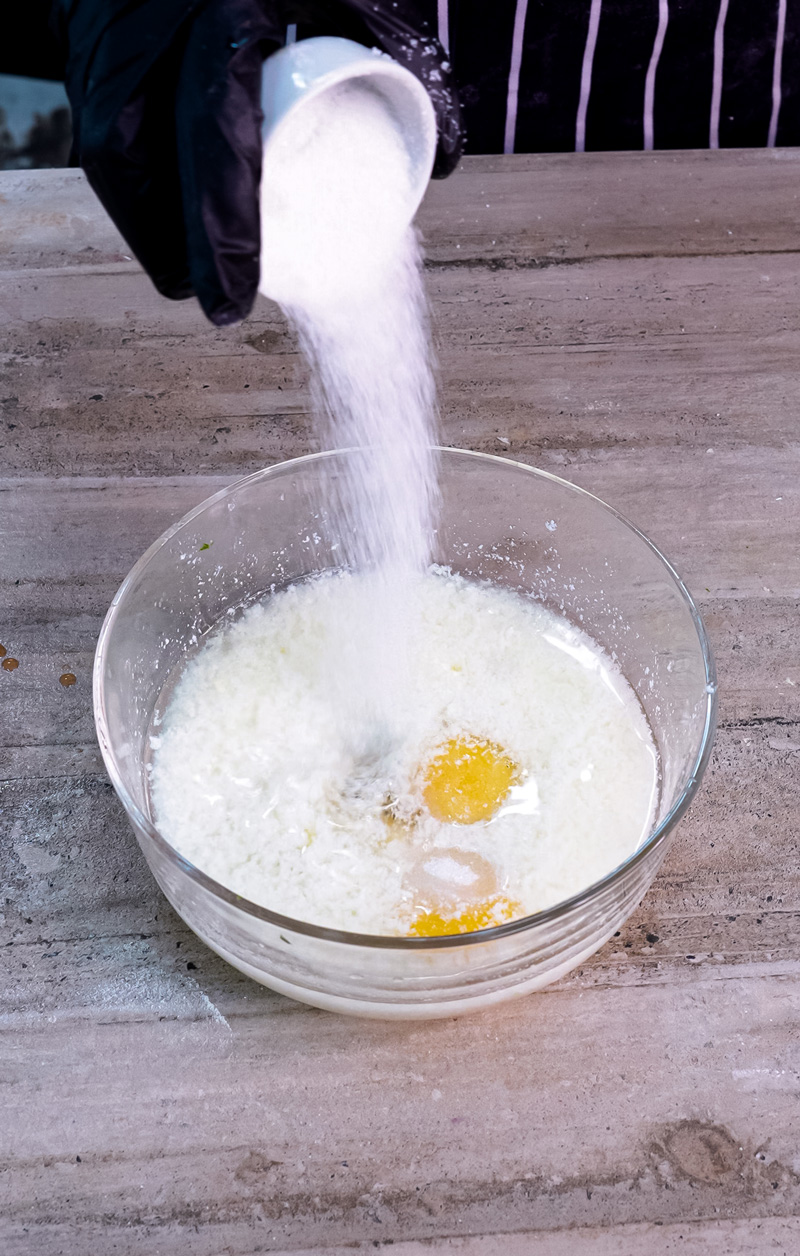
In another bowl, crack in your eggs and add the buttermilk and vanilla. Whisk it just until the eggs are broken up and it looks like a pale yellow liquid.
Step 3: The Most Important Step
Okay, pay attention, because this is the #1 secret to fluffy pancakes. Pour the wet ingredients into the dry ingredients. Now… mix it just a little bit. Use a spatula and stop as soon as the flour is mostly wet.
Your batter should be lumpy. Lumps are your friend. If you mix until it’s smooth, you’ll get tough, rubbery pancakes. And nobody wants that.
Step 4: Fold in the Good Stuff
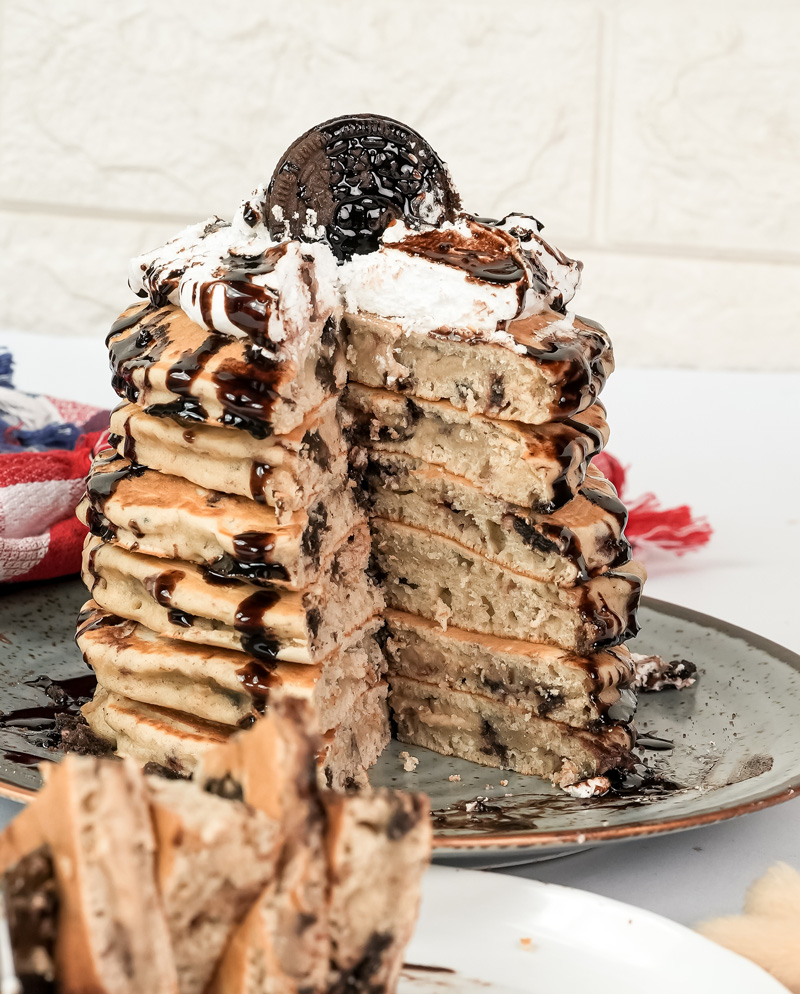
Gently fold in your chopped Oreos. Then, drizzle in that cooled melted butter and fold a few more times. The batter should be thick and lumpy, with chunks of Oreo everywhere. Perfect.
Step 5: Time to Cook!
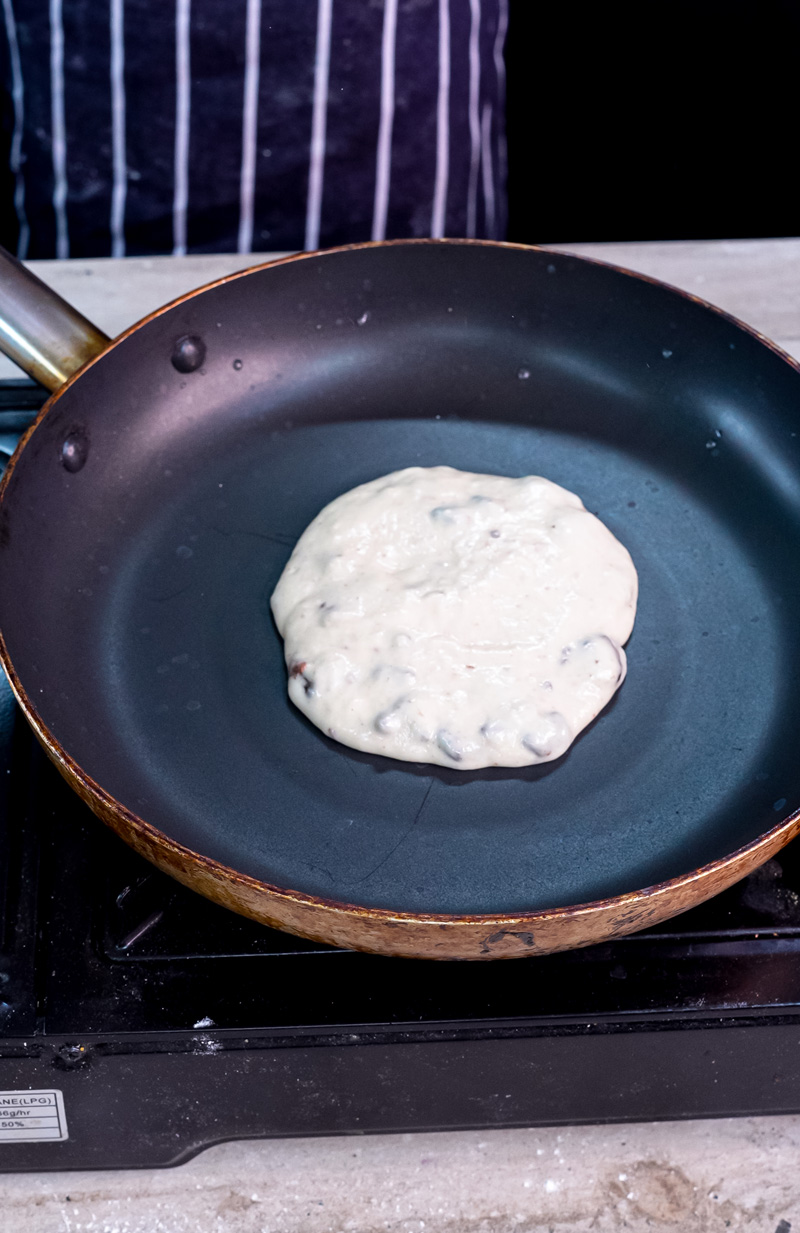
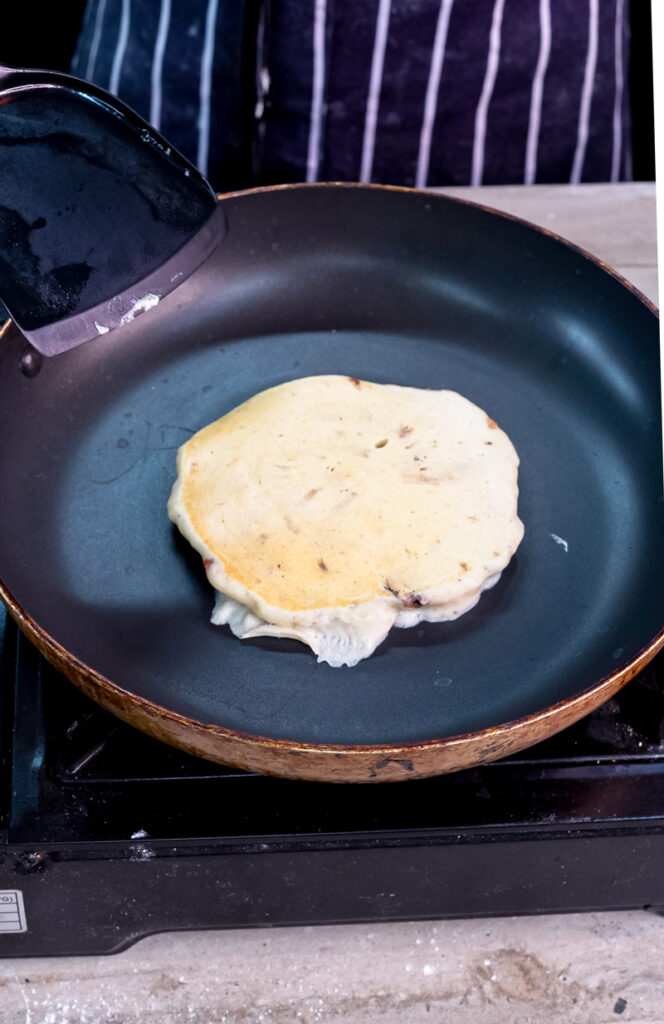
Get your skillet or griddle hot over medium heat. Not sure if it’s ready? Flick a few drops of water on it. If they sizzle and dance, you’re good to go.
Add a little bit of oil. Drop about two big spoonfuls of batter for each pancake. You can use the back of the spoon to nudge it into a circle.
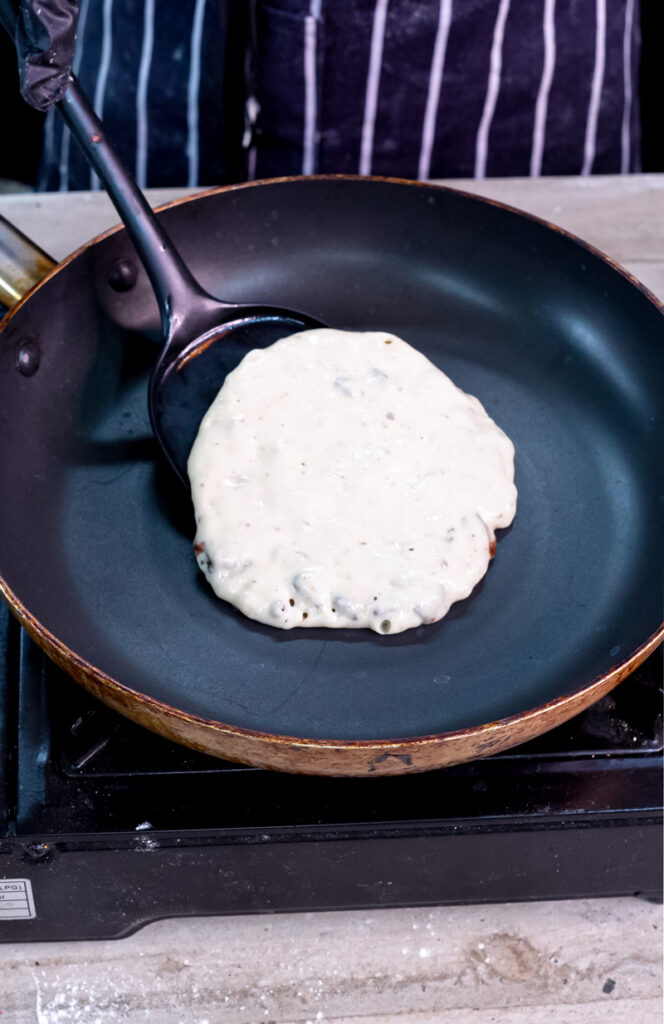
Now, wait. After a minute or so, you’ll see little bubbles form on the surface and then pop. That’s the pancake telling you, “I’m ready!” Give it a confident flip and cook for another minute until it’s golden brown.
Step 6: Keep ’em Warm and Serve ’em Up
As you finish each pancake, you can keep them on a baking sheet in a warm oven (around 200°F) so everyone can eat together. Once they’re all done, stack ’em high!
Want to Mix It Up?
One of the best things about pancakes is making them your own. Here are a few ideas:
- Gluten-Free? Easy. Use a good 1-to-1 gluten-free flour blend and gluten-free Oreos.
- Vegan? Use plant-based buttermilk (like almond milk with a splash of lemon juice), a vegan egg substitute, and vegan butter. Most Oreos are vegan, but check the package just in case!
- More Chocolate? For all my fellow chocoholics, add ¼ cup of unsweetened cocoa powder to the dry ingredients.
- Peanut Butter Lover? Swirl a spoonful of peanut butter into the batter right before you flip the pancake.
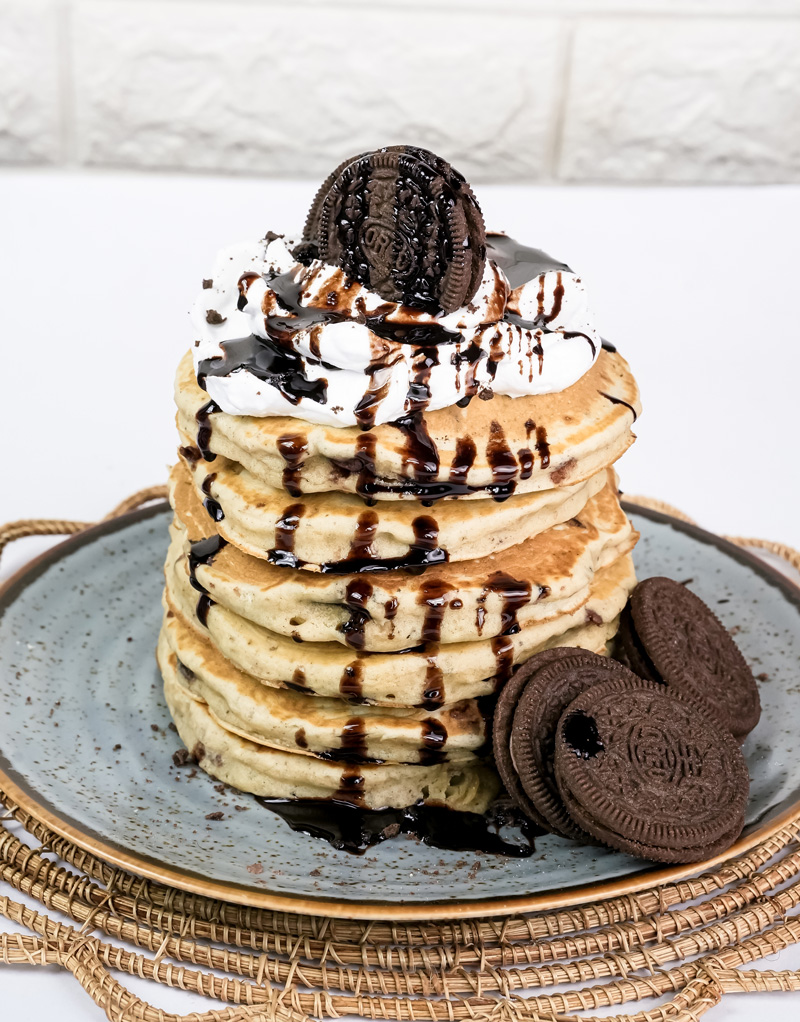
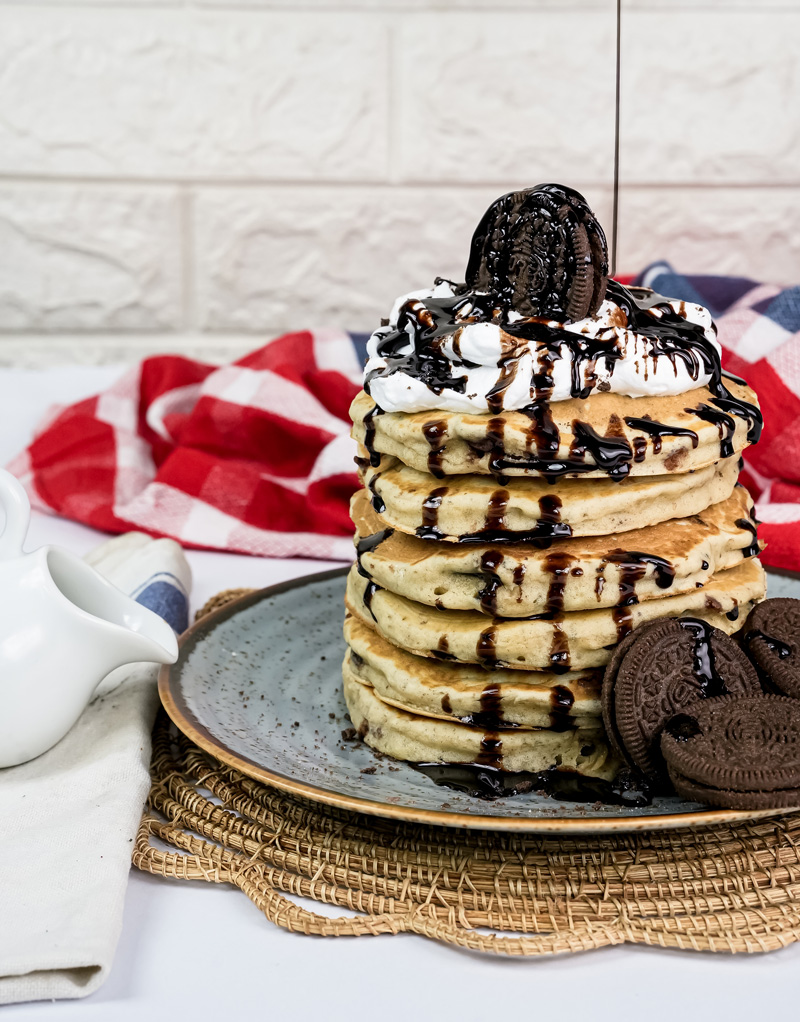
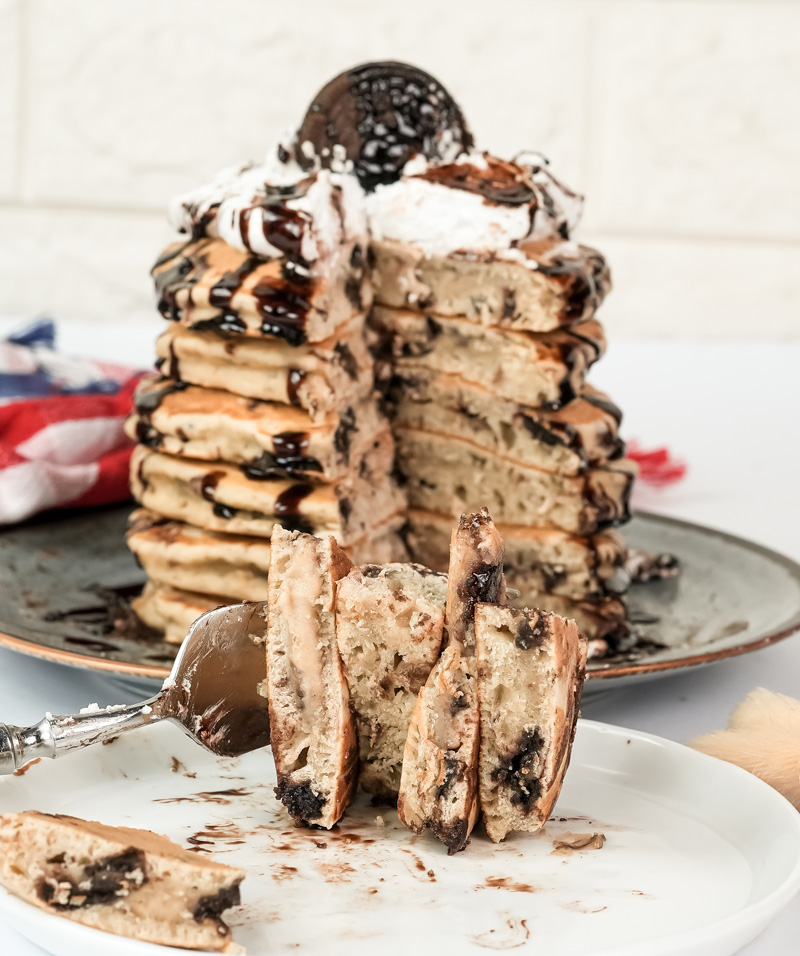
- Feeling Fancy? Go all out. Create a tall stack with layers of cream cheese frosting in between. Top it with hot fudge, more crushed Oreos, and a scoop of ice cream. It’s basically breakfast-dessert, and you deserve it.

How to Serve & Save Your Pancakes
You’ve made these amazing pancakes. Now what?
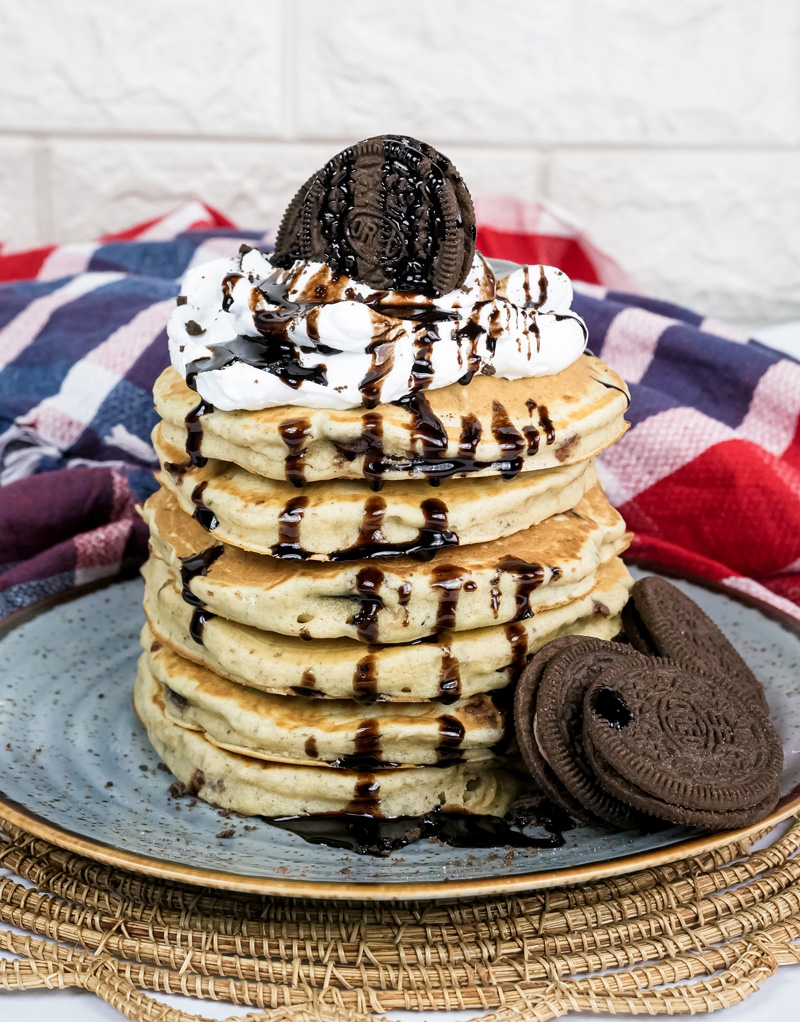
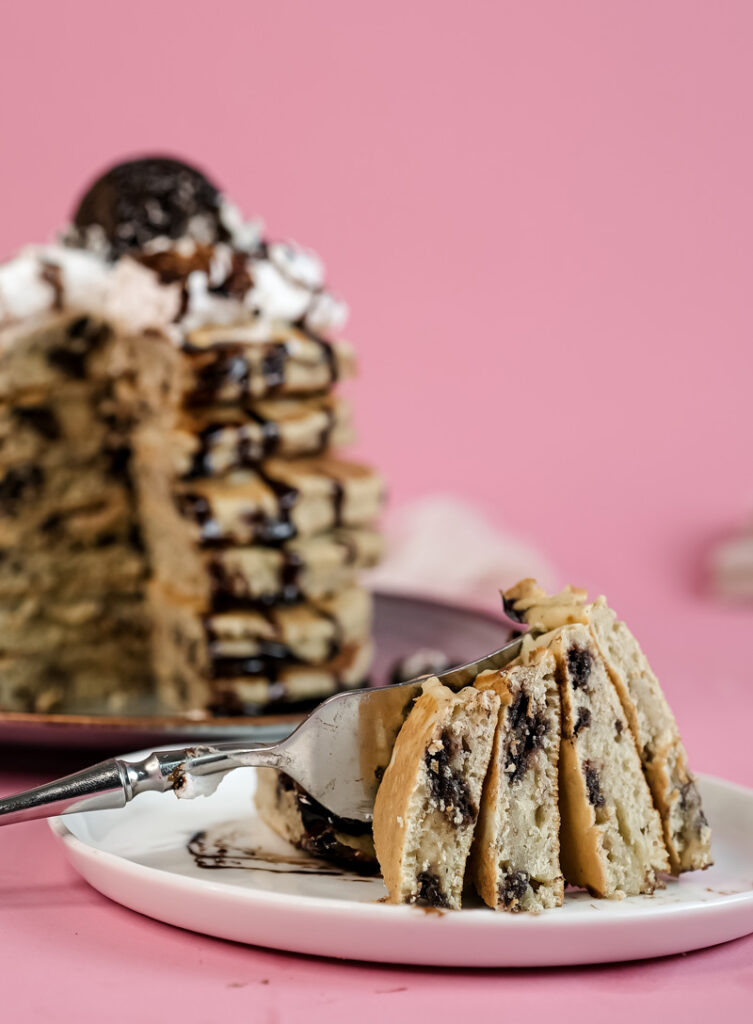
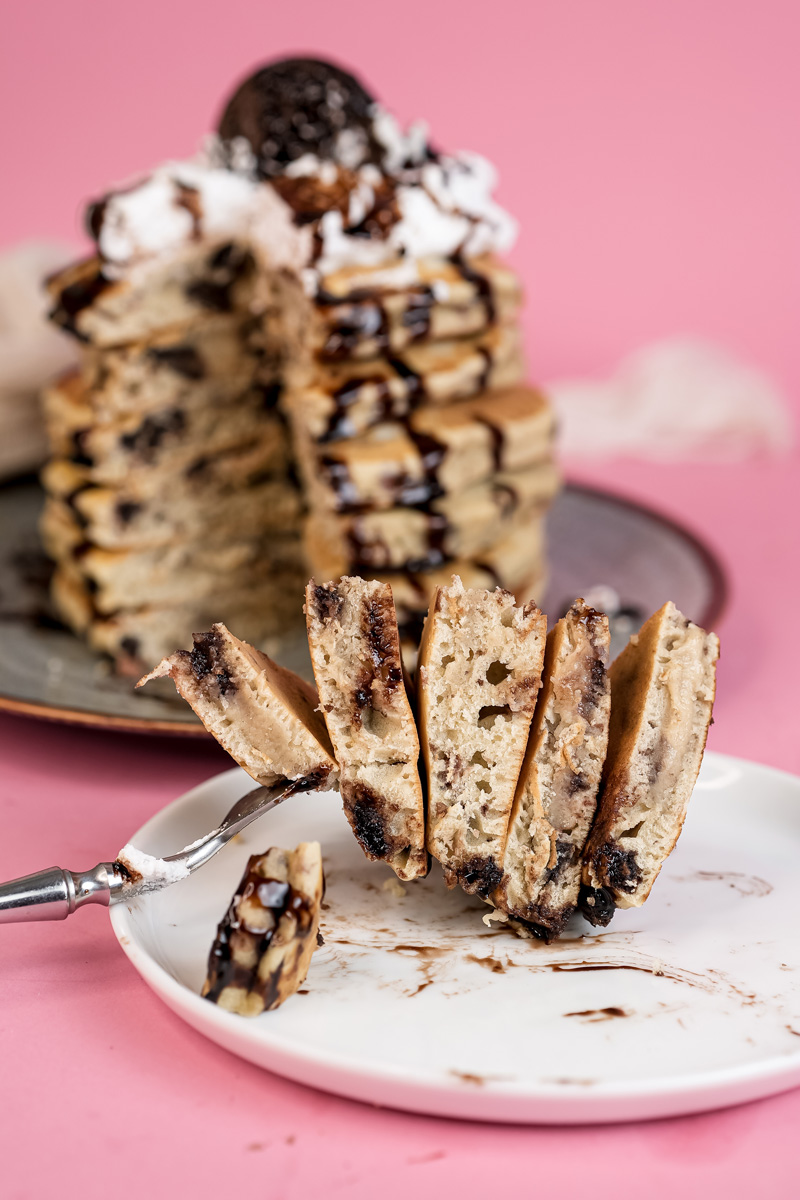
I love serving them in a tall stack to show off all those cookie bits. A dollop of whipped cream, a drizzle of chocolate sauce, and some more Oreo crumbles on top looks great.
For sides, you can’t go wrong with crispy bacon or sausage to get that sweet and salty combo. A fresh fruit salad is also nice to cut through the richness.
What about leftovers? If you have any, here’s what I do:
- Fridge: They’ll keep in an airtight container for up to 3 days.
- Freezer: These freeze beautifully! Lay them on a baking sheet in the freezer until they’re solid, then toss them in a freezer bag. They’re good for up to 2 months.
- Reheating: The toaster is your best friend here. It makes them warm and gets the edges a little crispy again. You can also use the microwave, which my kids love for a quick breakfast on school mornings.

I really hope you have fun making—and eating—these. Happy cooking!
PrintOreo Pancakes
Turn an ordinary breakfast into a fun celebration with these unbelievably fluffy Oreo pancakes! Packed with cookie chunks and made with a secret ingredient (buttermilk!), this easy recipe is a guaranteed hit with kids and adults alike. It’s the perfect special treat for a weekend brunch.
- Prep Time: 10 minutes
- Cook Time: 16 minutes
- Total Time: 26 minutes
- Yield: 8 pancakes 1x
- Category: Breakfast, Brunch
- Cuisine: American
Ingredients
Dry Ingredients:
- 2 cups all-purpose flour
- ¼ cup granulated sugar
- 2 ½ teaspoons baking powder
- ½ teaspoon baking soda
- ½ teaspoon salt
Wet Ingredients:
- 1 ¾ cups buttermilk
- 2 large eggs, room temperature
- 2 teaspoons pure vanilla extract
- 3 tablespoons unsalted butter, melted and cooled
Add-Ins & For Cooking:
- 10 Oreo cookies, roughly chopped
- Vegetable oil or butter, for the griddle
Instructions
- Mix Dry Ingredients: In a large bowl, whisk together the flour, sugar, baking powder, baking soda, and salt until well combined.
- Mix Wet Ingredients: In a separate medium bowl, lightly beat the buttermilk, eggs, and vanilla.
- Combine Batter: Pour the wet ingredients into the dry. Gently fold with a spatula until just combined. The batter should be very lumpy—this is the secret to fluffy pancakes!
- Add Oreos & Butter: Gently fold in the chopped Oreos, then drizzle in the cooled, melted butter. Fold a few more times until just incorporated. Do not overmix.
- Cook Pancakes: Heat a lightly oiled griddle or non-stick skillet over medium heat. Pour about ¼ cup of batter for each pancake. Cook for 1-2 minutes, until bubbles appear and pop on the surface. Flip confidently and cook for another minute until golden brown.
- Serve Warm: Transfer cooked pancakes to a plate in a warm oven (200°F / 93°C) to keep hot while you finish the batch.
Notes
- Tip for Fluffiness: The #1 rule is do not overmix the batter! Lumps are your friend and ensure a light, tender pancake.
- No Buttermilk? No problem! Make your own by adding 1 ¾ tablespoons of lemon juice or white vinegar to regular milk. Let it stand for 5 minutes before using.
- Serving Suggestions: We love to serve these stacked high with a dollop of whipped cream, a generous drizzle of chocolate sauce, and extra crushed Oreos on top. A side of crispy bacon or fresh berries cuts the sweetness perfectly.
- Storage & Reheating: Store leftovers in an airtight container in the fridge for up to 3 days. These pancakes also freeze beautifully for up to 2 months! For the best texture, reheat them in a toaster or toaster oven to keep the edges slightly crisp.