Hey everyone! Today, we’re going to tackle something really special: the Paris Brest. I still remember the first time I saw one in a little Parisian bakery window. It looked so impressive, like a golden crown studded with almonds. I was sure it was way too complicated for a home baker.
Turns out, I was wrong.
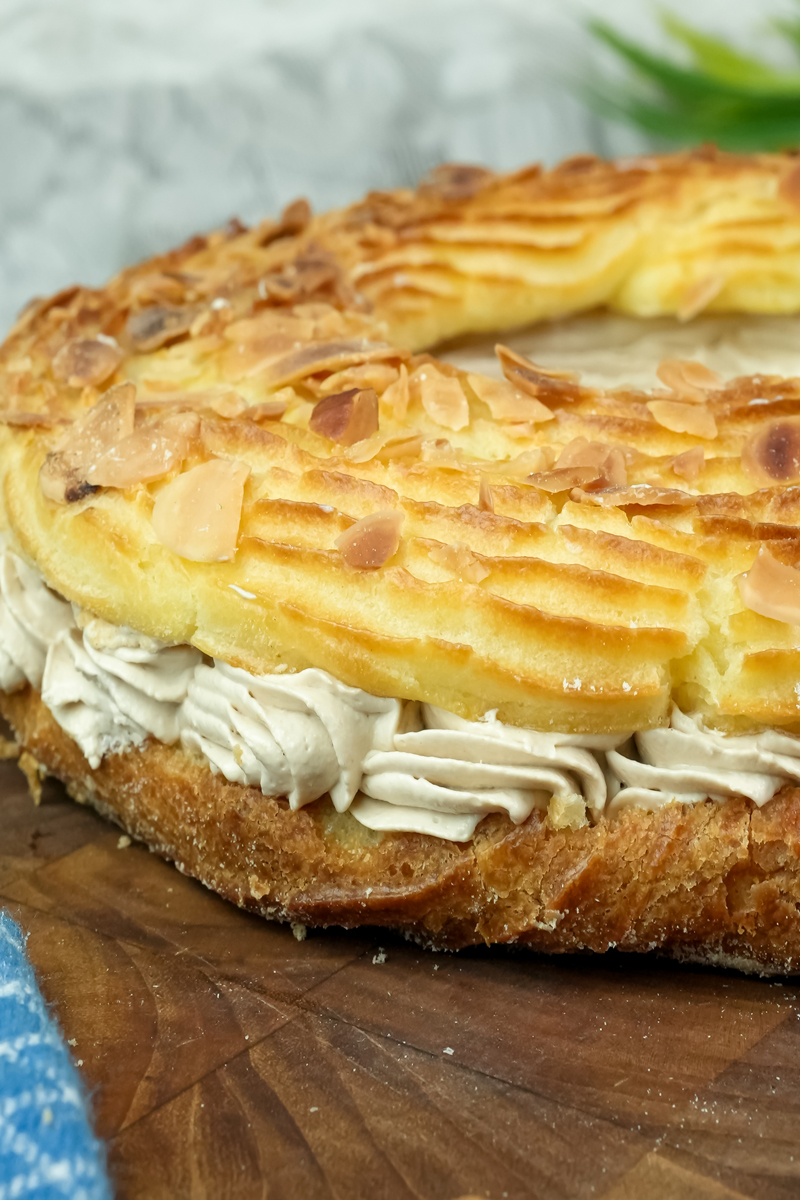
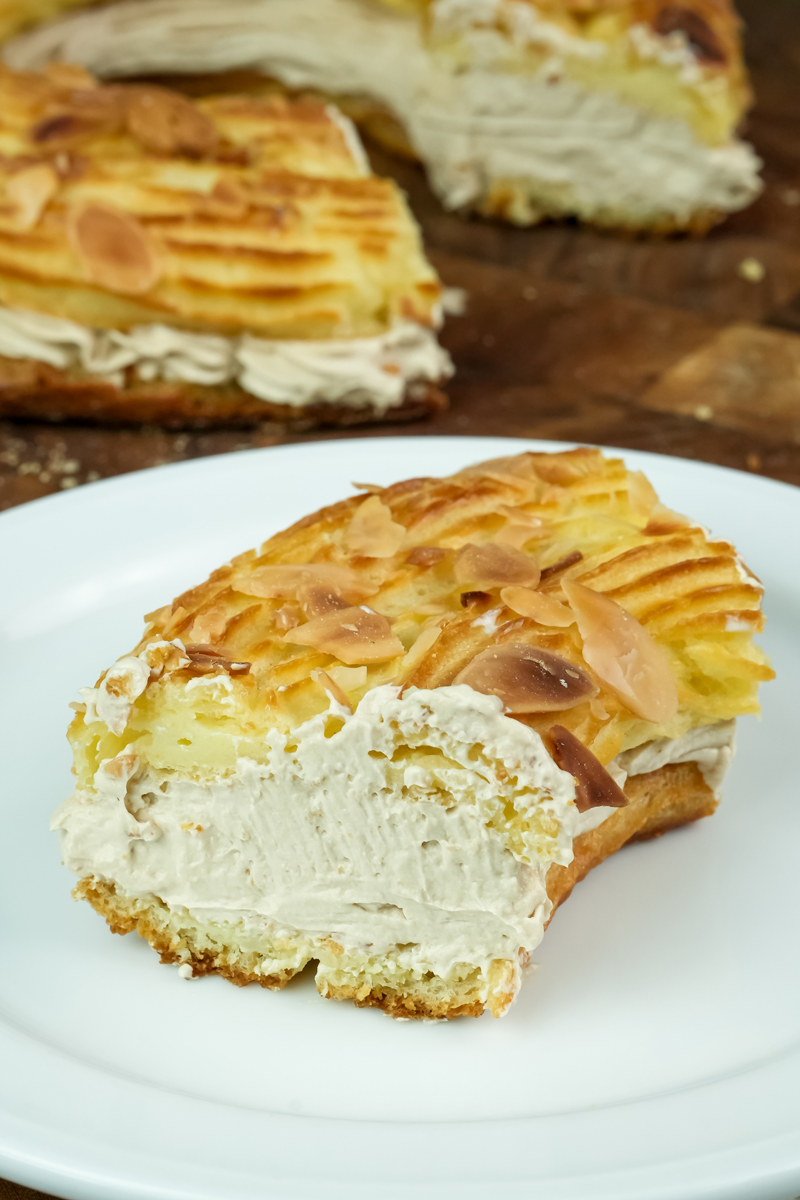
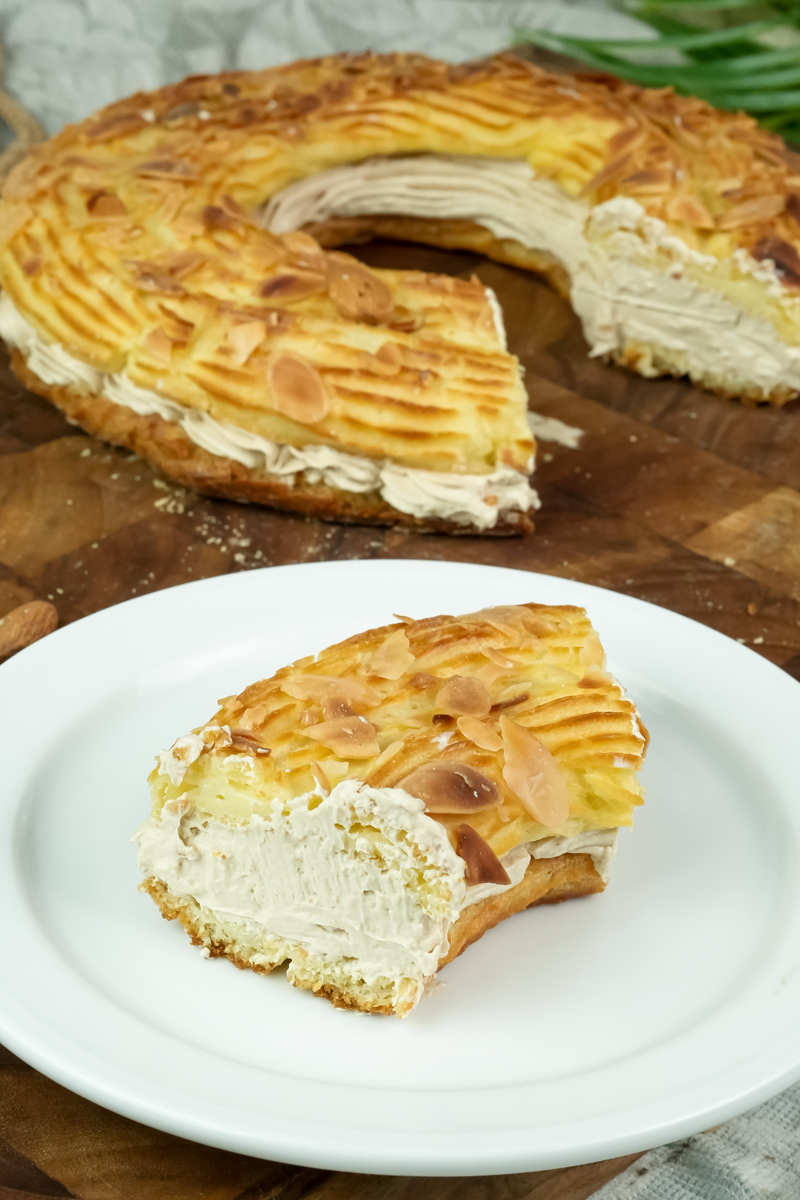
So, what is a Paris Brest? Picture this: a perfect circle of light, airy pastry, kind of like a fancy cream puff. It’s crispy on the outside, sprinkled with almonds, and sliced in half. Then, it’s filled with the most amazing, velvety hazelnut cream you’ve ever tasted. It’s got history, too. A pastry chef named Louis Durand invented it back in 1910 to celebrate the Paris-Brest-Paris bike race.1 The round shape? It’s meant to look like a bicycle wheel!
I know it looks intimidating, but I promise you can do this. I’ve broken down the whole process into easy-to-follow steps. We’ll go through everything together, from making the pastry (called choux) to whipping up that incredible cream.
Let’s get our aprons on and make something amazing.
Your Baking Game Plan
Before we start mixing, let’s get a quick overview. Making a Paris Brest isn’t one giant, scary recipe. Think of it as three smaller, totally manageable recipes that we’ll bring together at the end. Planning is everything.
- How long will this take? Set aside a bit of time for this one. It’s a project, but a fun one! You’ll need about 2 hours and 40 minutes total. That breaks down into about 1 hour of hands-on prep, 40 minutes of baking, and an hour for things to cool and chill.
- How many does it make? This recipe makes three big 7.5-inch rings. It’s perfect for a party or a special family dessert. If that’s too much, you can easily cut the recipe in half. I’ve made a little chart below to help you out.
- How hard is it? I’d call it intermediate. You need to pay attention to the details, especially with the pastry. But don’t let that scare you. Just follow the steps, and you’ll nail it. I’m serious, even if you’re a determined beginner, you’ve got this!
The Tools for the Job
Having the right equipment makes life so much easier. You don’t need a professional kitchen, but these things really help:
- A stand mixer. A hand mixer works too, but your arm will get a serious workout.
- A good, heavy saucepan for making the pastry dough.
- A digital kitchen scale. For pastry, measuring by weight is a must. It’s way more accurate than cups and makes a huge difference.
- Piping bags and a couple of tips. You’ll want a French star tip for piping the pastry rings and another star tip for the cream.
- A perforated baking mat is awesome for getting the bottoms super crisp, but regular parchment paper works just fine!
The best part? You don’t have to do it all in one day. You can totally prep ahead.
- Praline Paste: Make this weeks ahead of time.
- Pastry Cream: You can make this part of the filling up to 2 days in advance.
- The Pastry Shells: You can bake the rings, let them cool, and freeze them for up to a month. When you’re ready, just pop them in the oven for 5-7 minutes to crisp them back up. Easy peasy.
Scaling Your Recipe Down
| Ingredient | Full Recipe (3 Rings) | Half Recipe (1-2 Rings) |
| Water | 120 g | 60 g |
| Milk | 120 g | 60 g |
| Bread Flour | 140 g | 70 g |
| Eggs (approx.) | 220 g (~4 large) | 110 g (~2 large) |
| Butter (for Choux) | 120 g | 60 g |
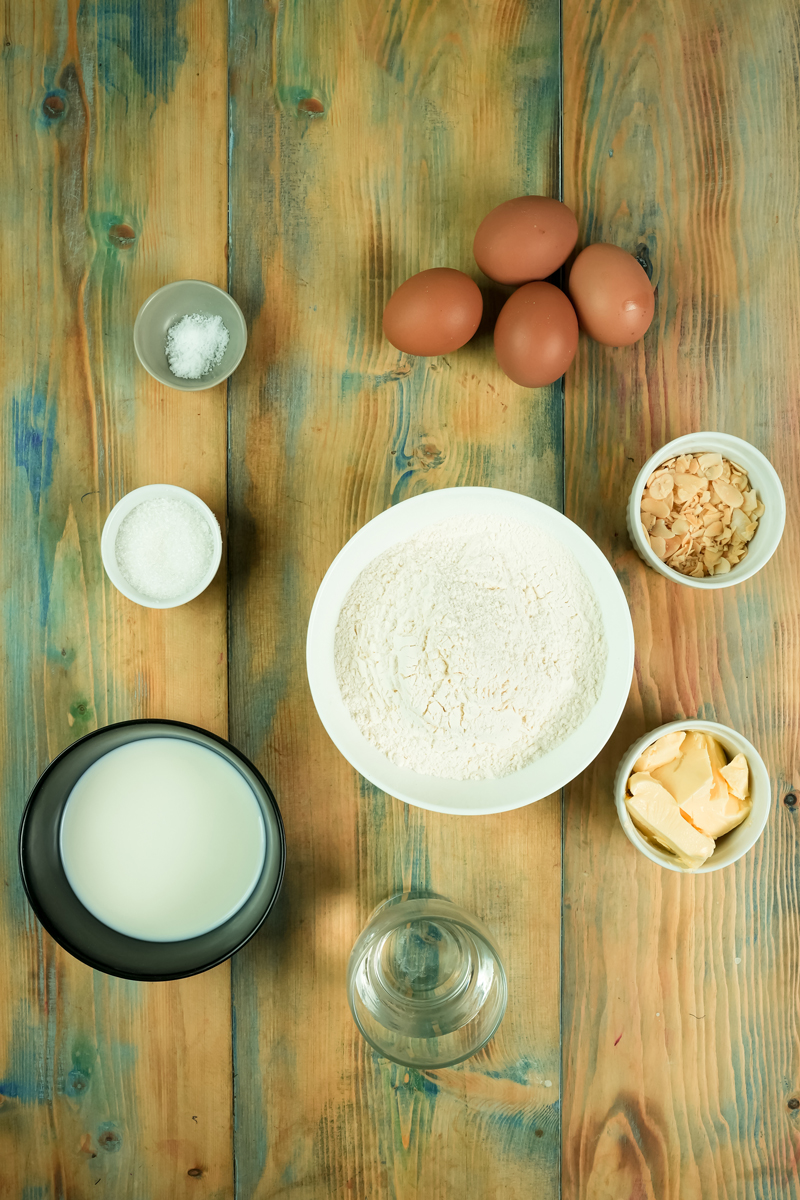
Let’s Talk Ingredients
Great baking starts with good ingredients. Here’s what we’re using and why it matters.
For the choux pastry, we use both water and whole milk. Water helps make it crisp, and milk makes it tender and rich. The recipe calls for bread flour, and this is a huge tip. Bread flour has more protein, which gives the pastry a strong backbone so it puffs up beautifully and doesn’t collapse. We’re also using a good European-style butter. It has less water, which means more flavor. Finally, the eggs. They’re the magic that makes the pastry rise. Just make sure they’re at room temperature.
The real star here is the Praline Crème Mousseline. Mousseline just means we’re making it light and airy by whipping in butter. We start with a classic pastry cream and then fold in a ton of hazelnut praline paste. You can buy a good one, or if you’re feeling ambitious, make your own. The texture comes from whipping that cooled pastry cream with a good amount of soft, room-temperature butter. Trust me, good butter makes all the difference here.
To finish it off, we’ll use some almond flakes and chopped roasted hazelnuts. They add a fantastic crunch and echo the nutty flavor of the cream.
The Step-by-Step Method
Alright, let’s do this. I’ll guide you through every step.
Part 1: Making the Choux Pastry Rings
This is where the magic begins. We’re basically using steam to puff up the dough in the oven. It’s kitchen science, and it’s so cool.
Melt and Simmer: In your saucepan, mix the butter, water, milk, salt, and sugar. Heat it over medium until the butter is melted and you see little bubbles simmering around the edge. Don’t let it boil like crazy, or too much water will evaporate.
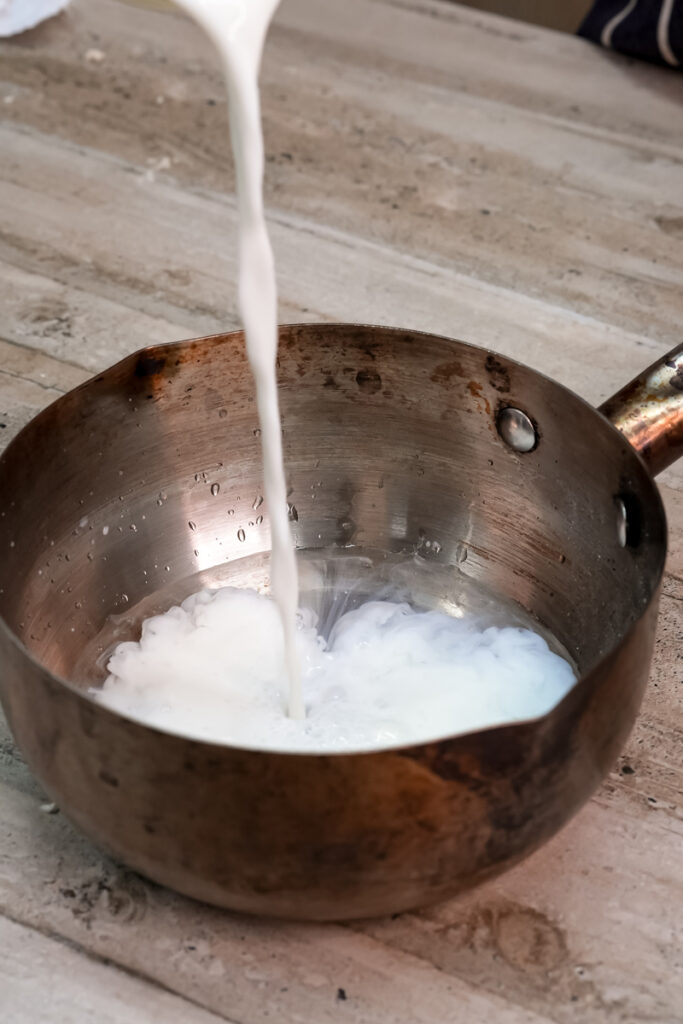
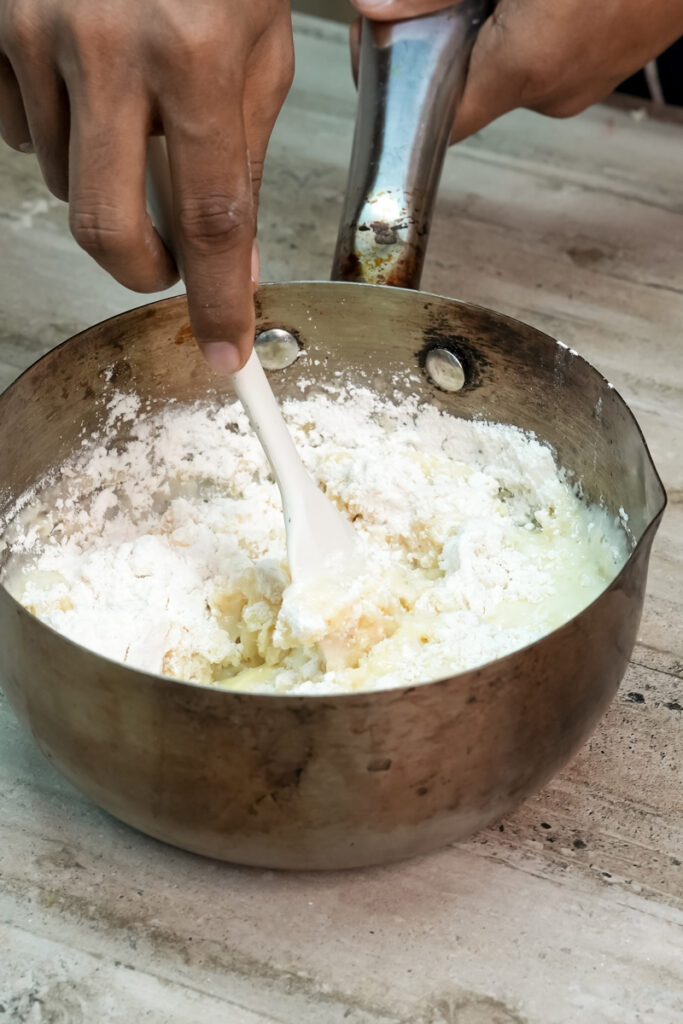
The “Panade”: Take the pot off the heat and dump in all the flour at once. Start stirring like you mean it! It’ll look like a lumpy mess for a second, but it will quickly come together into a smooth dough ball. This is called the panade.
Dry the Dough: This part is super important. Put the pan back on medium heat and cook the dough for 3-5 minutes. Keep stirring and squishing it against the sides of the pan. You’re basically cooking the flour and drying out the dough. You’ll know it’s ready when a thin film forms on the bottom of the pan.
Add the Eggs (Slowly!): Move the hot dough to your stand mixer. Let it mix on low for a minute to cool down a bit—we don’t want scrambled eggs! Now, start adding your beaten eggs, just a little at a time. Be patient here. The dough will look like it’s separating. Don’t panic! This is totally normal. Just keep mixing, and it will come back together into a smooth paste.
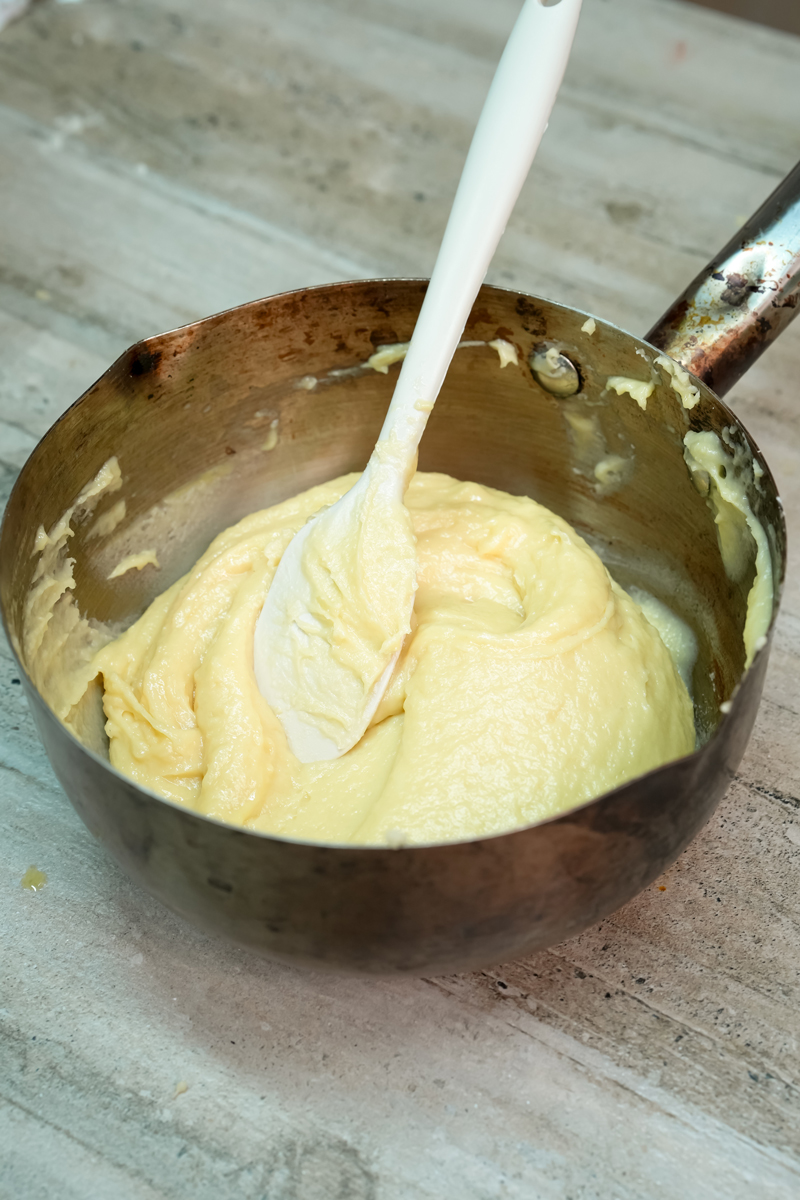
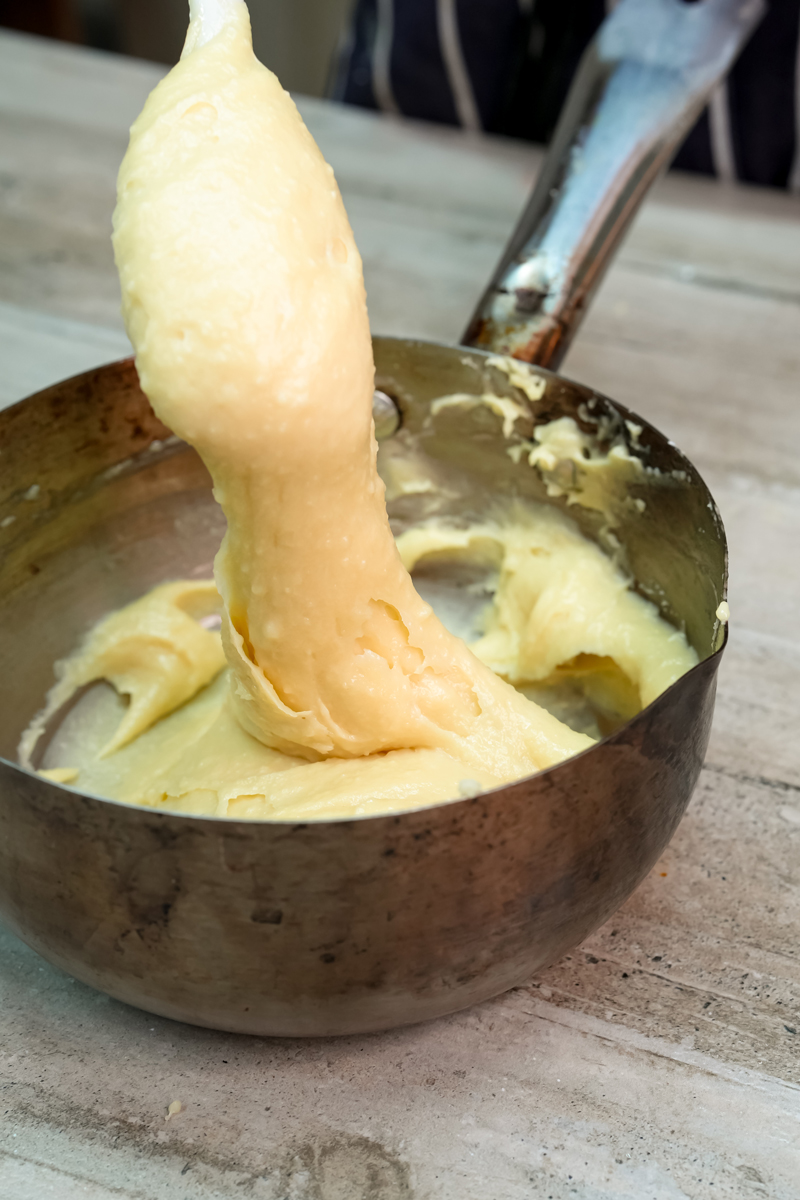
The “V” Test: How do you know when to stop adding egg? Lift the paddle out of the mixer. The dough should be shiny and slowly fall off in a ribbon, forming a “V” shape. If it’s too stiff, add a tiny bit more egg. If it’s too runny, you’ve gone a little too far (which is why we add the egg so slowly!).
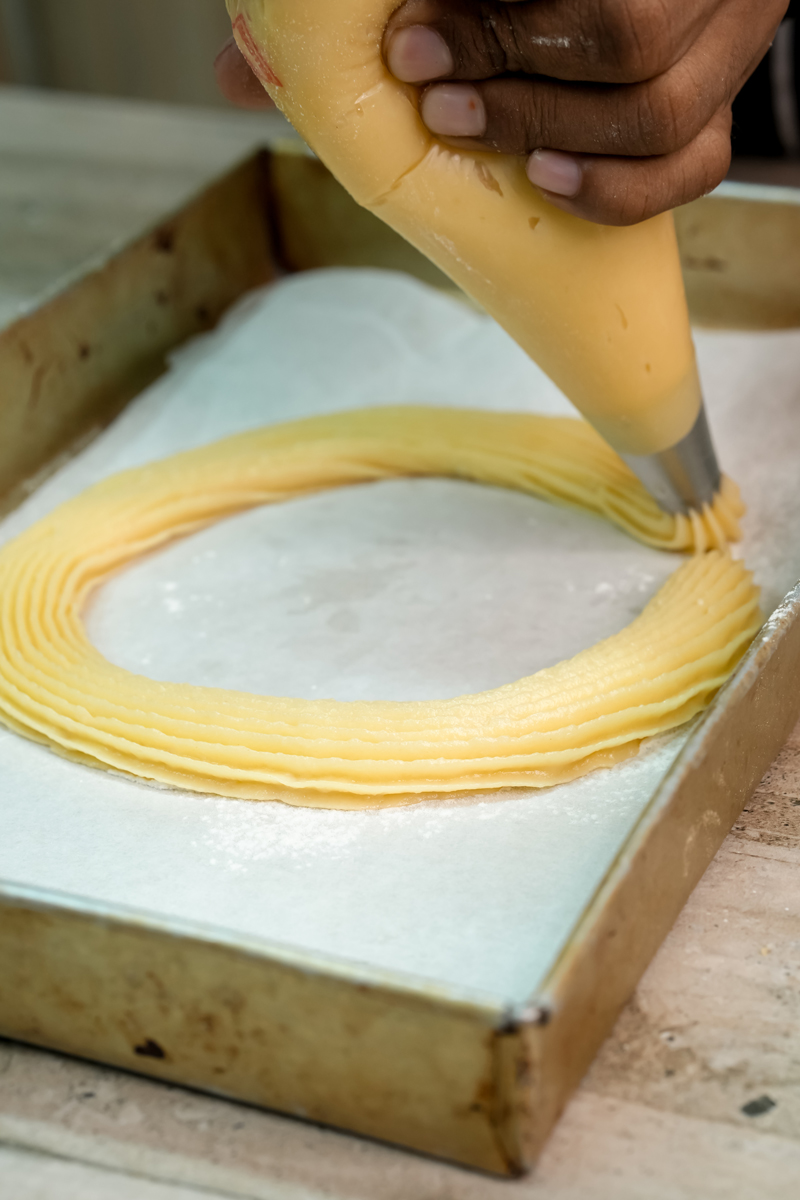
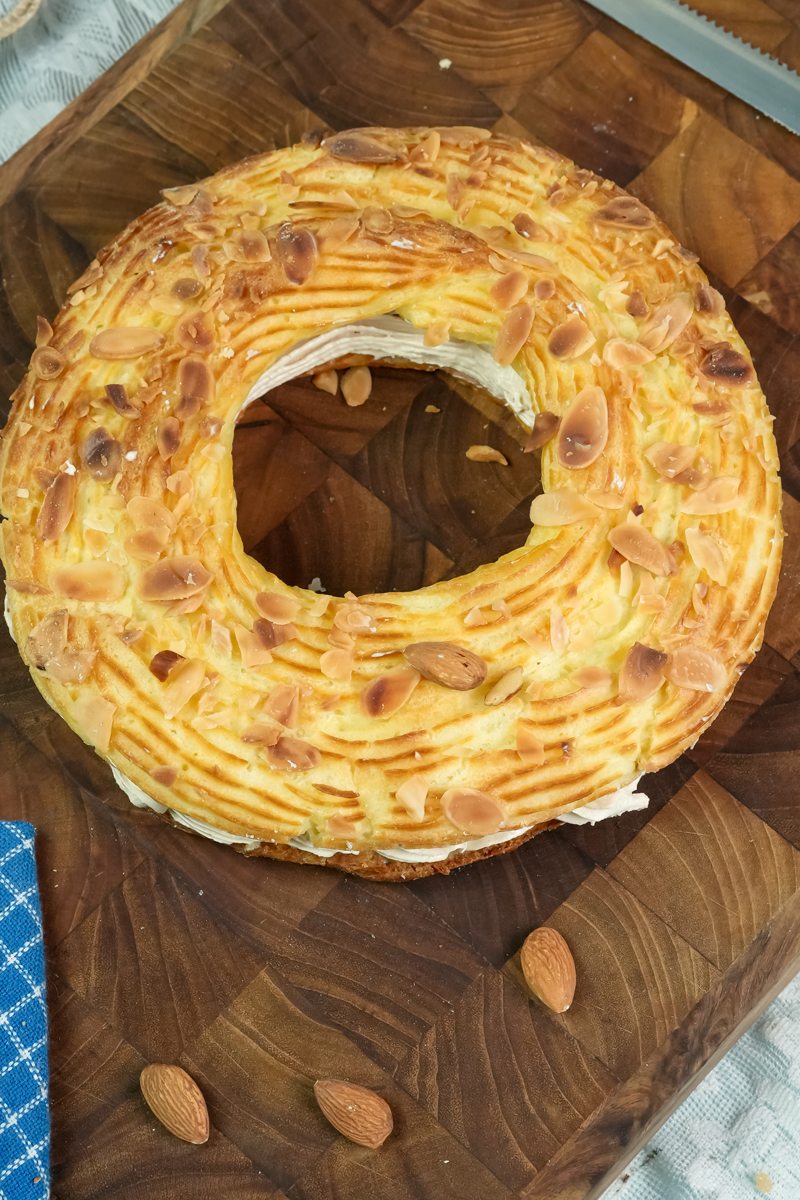
Pipe, Freeze, and Bake: Put the dough in a piping bag with a French star tip. On your baking sheet, pipe a circle, then another one right next to it, touching. Finally, pipe a third circle right on top, nestled between the first two. Sprinkle with almond flakes. Now for my favorite trick: freeze the piped rings for at least an hour. This helps them bake up taller and more evenly. Bake them, and whatever you do, do not open the oven door for the first 30 minutes! They will deflate into sad, flat pancakes. They’re done when they’re a deep golden brown and feel light as air.

Part 2: That Dreamy Praline Cream
While the choux rings are cooling, let’s make the filling.
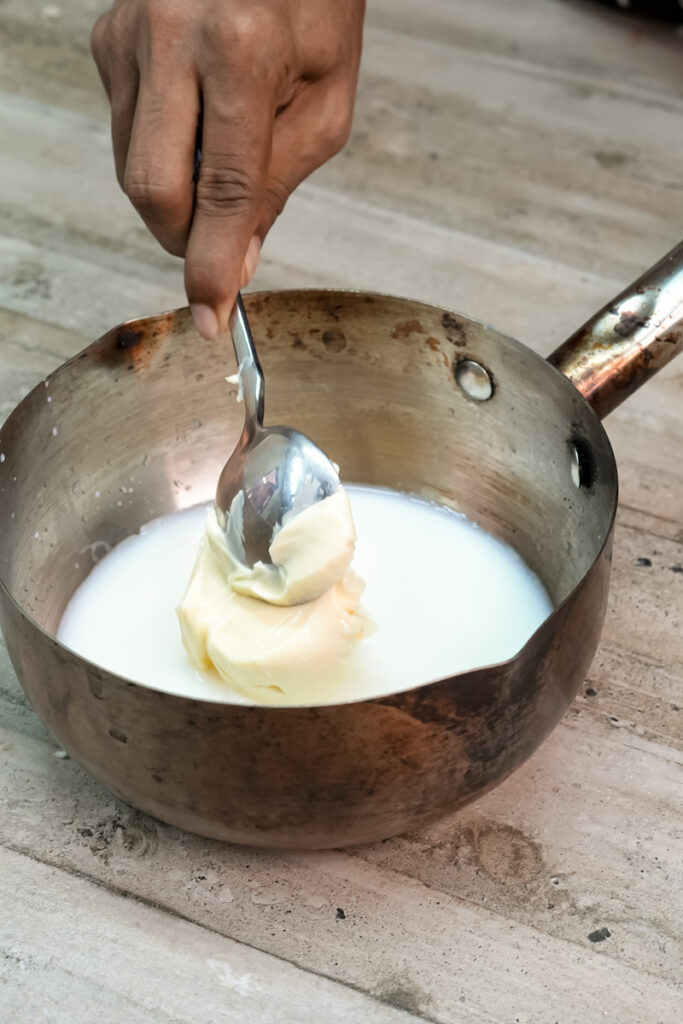
Make the Pastry Cream: Whisk your egg yolks and sugar until they’re light and fluffy. Then, whisk in the cornstarch and flour. Heat your milk until it’s just simmering. Now, you have to “temper” the eggs. Slowly pour the hot milk into the egg mixture while whisking constantly. This warms the eggs up gently so they don’t curdle. Pour it all back into the saucepan and cook over medium heat, whisking the whole time, until it gets thick like pudding. Take it off the heat and whisk in the first bit of butter until it’s silky.
Chill the Cream: To stop a skin from forming on top, press plastic wrap directly onto the surface of the cream. Let it cool down completely.
Whip the Mousseline: This is the final step for the cream. Make sure your pastry cream and the rest of your butter are both at the same room temperature. This is key! If one is colder, the cream can curdle. Whip the butter in your mixer for a few minutes until it’s pale and fluffy. Mix in the hazelnut praline paste. Then, add the cooled pastry cream one spoonful at a time, mixing until it’s all combined. You should have a stable, fluffy, and seriously delicious cream.

Part 3: Putting It All Together!
This is the fun part—the grand finale!
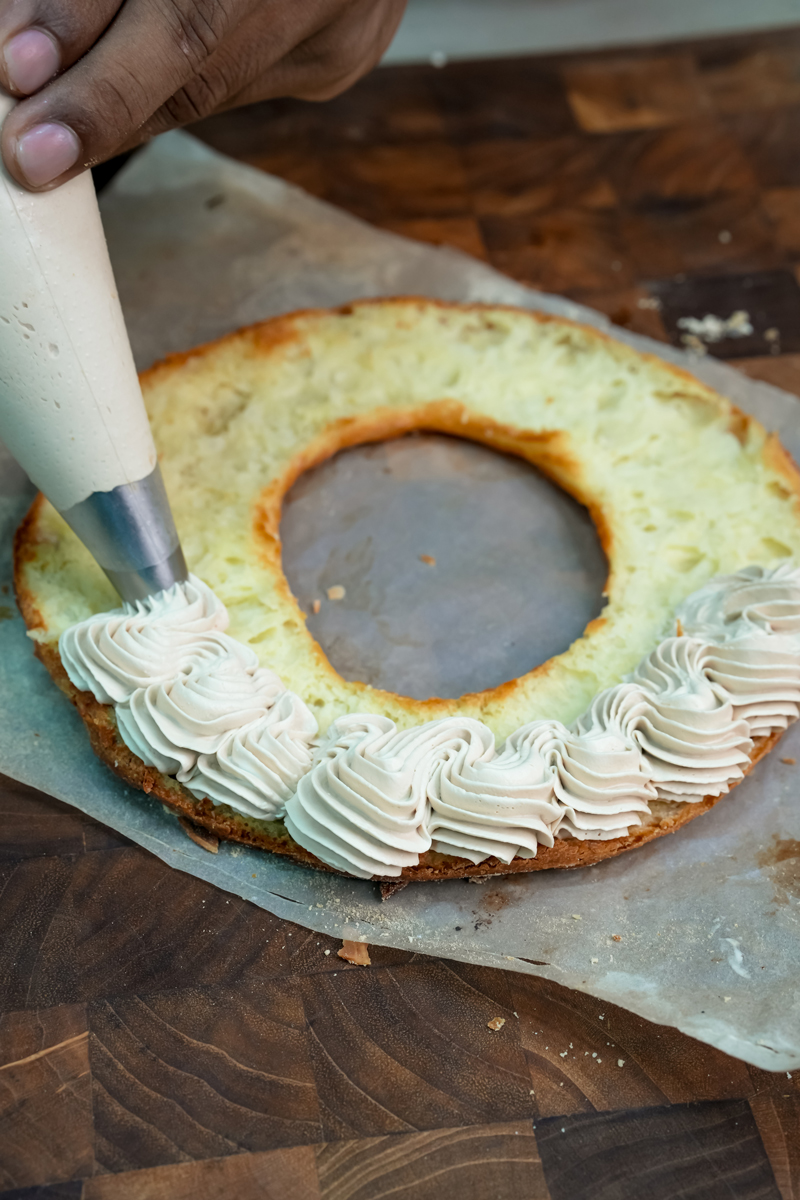
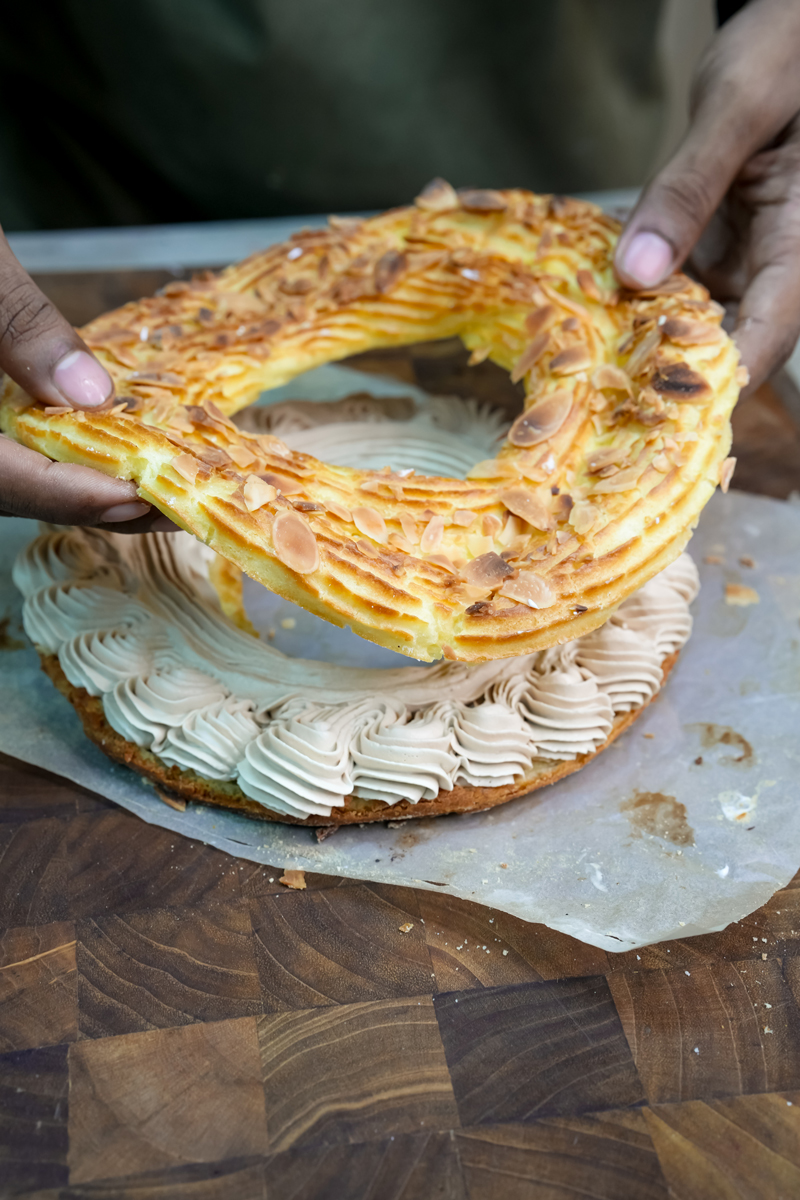
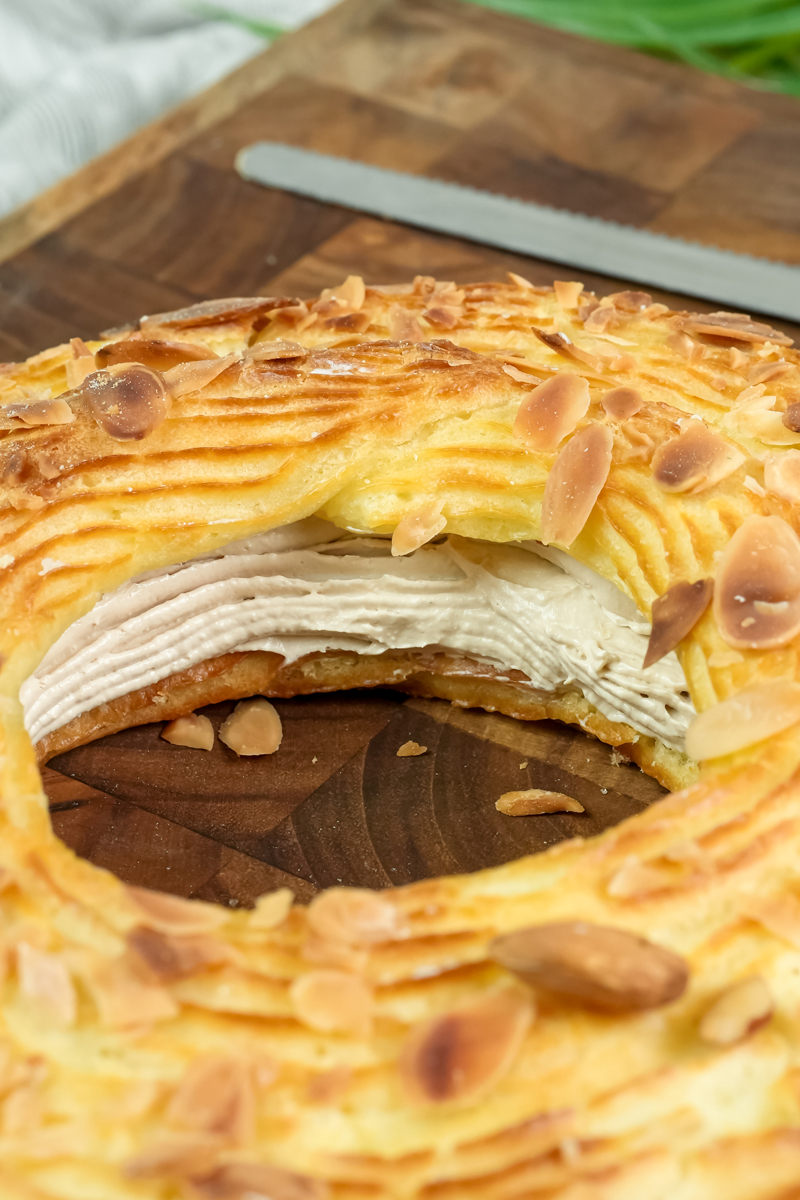
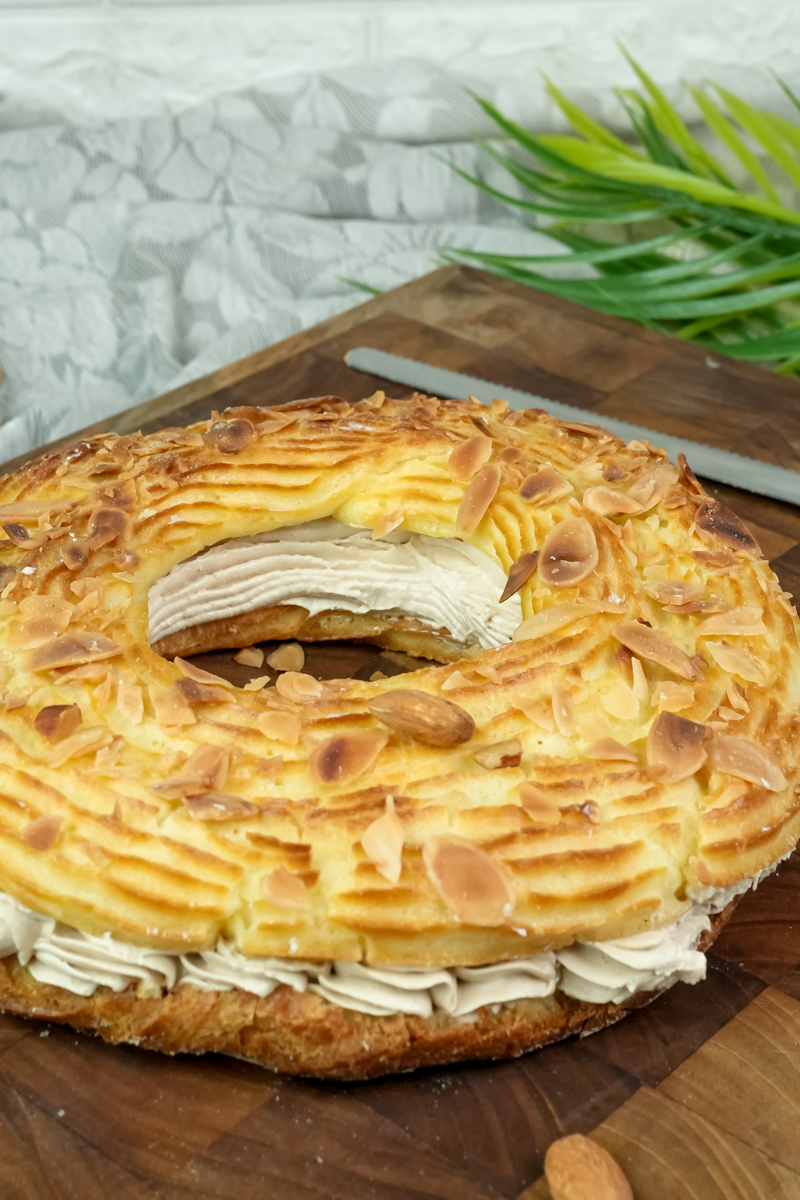
Prep the Shells: Once your choux rings are totally cool, use a serrated knife to carefully slice off the top third, like you’re taking the lid off a box.
Add a Surprise: Sprinkle some chopped roasted hazelnuts into the bottom shell. For an extra hit of flavor, you can drizzle in a little pure praline paste, too.
Pipe the Cream: Fill a piping bag with your praline mousseline and pipe it generously into the bottom half of the ring. Don’t be shy here!
The Finishing Touch: Dust the “lid” with powdered sugar, then gently place it on top of the cream. And that’s it! You made a Paris Brest.
Fun Ways to Mix It Up
The classic hazelnut is amazing, but feel free to play around!
- You could use pistachio praline paste for a beautiful green cream.
- In the fall, add a little cinnamon or cardamom to the cream.
- For a summer version, hide some fresh raspberries in the cream for a pop of tartness.
- In a pinch, you could even fill it with a simple chocolate mousse or vanilla whipped cream.
Serving and Storing
A Paris Brest is best eaten the day it’s made. That contrast between the crisp pastry and the soft cream is what makes it so special.
- Serving: Bring the whole thing to the table and slice it with a sharp, serrated knife. It’s a showstopper all on its own.
- Storage: If you have leftovers, keep them in an airtight container in the fridge for up to two days. The shell will get a little soft, but it will still be tasty! I don’t recommend freezing the whole, assembled pastry.
I hope you have a blast making this. Enjoy every single bite! Happy baking!
Paris Brest

A stunning French dessert with a crisp, almond-studded pastry ring filled with the most luscious hazelnut praline cream. It’s a true showstopper that’s surprisingly achievable in your own kitchen!
- Prep Time: 1 hour
- Cook Time: 40 minutes
- Total Time: 2 hours 40 minutes (includes chilling)
- Yield: 3 (7.5-inch) rings 1x
- Category: Dessert
- Cuisine: French
Ingredients
For the Choux Pastry (Pâte à Choux):
- 120 g Water
- 120 g Whole Milk
- 120 g Unsalted Butter, cubed
- 1 tsp Sugar
- ½ tsp Salt
- 140 g Bread Flour, sifted
- 220 g Eggs (about 4–5 large), lightly beaten, room temperature
- Almond flakes, for sprinkling
For the Hazelnut Praline Cream (Crème Mousseline):
- 500 ml Whole Milk
- 1 tsp Vanilla Extract
- 120 g Egg Yolks (from about 6 large eggs)
- 150 g Caster Sugar
- 30 g Corn Starch
- 30 g All-Purpose Flour
- 100 g Unsalted Butter, softened
- 150 g Hazelnut Praline Paste
- 250 g Unsalted Butter, softened (for finishing)
For Assembly:
- Roasted chopped hazelnuts
- Powdered sugar, for dusting
- Extra hazelnut praline paste (optional)
Instructions
- Make the Choux Dough: In a saucepan, bring the water, milk, butter, sugar, and salt to a simmer. Remove from heat, dump in all the bread flour, and stir vigorously until a dough forms. Return to medium heat and cook for 3-5 minutes, stirring constantly, to dry out the dough.
- Add the Eggs: Transfer the dough to a stand mixer. Mix on low for 1 minute to cool slightly. Slowly stream in the beaten eggs, a little at a time, waiting for each addition to be fully incorporated. Stop when the dough is glossy and falls from the paddle in a slow “V” shape.
- Pipe & Bake the Rings: Transfer the dough to a piping bag with a French star tip. Pipe three rings onto a lined baking sheet (two side-by-side, one on top). Sprinkle generously with almond flakes. Freeze for at least 1 hour—this is the key to a great rise!
- Bake: Bake in a preheated oven at 180°C / 350°F for 35-40 minutes. Do not open the oven door for the first 30 minutes! The rings are done when they are deep golden-brown and feel light. Let cool completely on a wire rack.
- Start the Cream: While the rings bake, make the pastry cream. Whisk egg yolks, sugar, corn starch, and flour. Heat the milk and vanilla. Slowly pour the hot milk into the egg mixture while whisking constantly. Return everything to the pot and cook, whisking, until very thick.
- Finish the Cream: Remove from heat and whisk in the first 100g of butter. Press plastic wrap directly onto the surface and chill completely. Once chilled, whip the remaining 250g of butter until light and fluffy. Beat in the praline paste. Then, add the cooled pastry cream one spoonful at a time, mixing until smooth and airy.
- Assemble Your Masterpiece: Carefully slice the cooled pastry rings in half horizontally. Sprinkle the bottom half with chopped hazelnuts. Pipe the praline cream generously inside. Dust the top “lid” with powdered sugar and place it gently on top.
Notes
- Tips & Tricks: For the creamiest filling, make sure your chilled pastry cream and your softened butter are at the same room temperature before whipping them together. This prevents the cream from splitting.
- Serving Suggestions: This dessert is best served the day it is made to enjoy the contrast between the crisp shell and soft cream. Use a sharp, serrated knife for clean slices.
- Storage: Store leftovers in an airtight container in the fridge for up to 2 days. The pastry will soften but will still be delicious. The unfilled, baked pastry rings freeze beautifully for up to a month! Just re-crisp them in a 170°C / 338°F oven for 5-7 minutes before filling.