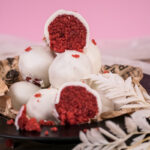
Strawberry Cake Pops
Forget the overly sweet, store-bought versions. This from-scratch recipe creates perfectly moist and flavorful strawberry cake pops with a tangy cream cheese binder, all wrapped in a crisp chocolate shell. They are a fun project for any celebration and taste absolutely divine!
- Prep Time: 45 minutes
- Cook Time: 25 minutes
- Total Time: 3 hours 10 minutes
- Yield: 20 cake pops 1x
- Category: Dessert
- Cuisine: American
Ingredients
Scale
For the Strawberry Cake:
- 150g Cake Flour
- 150g Unsalted Butter, softened
- 290g Granulated Sugar
- 3 large Egg Whites, room temperature
- 1 ½ tsp Vanilla Extract
- 1 tsp Baking Powder
- ½ tsp Baking Soda
- ¼ tsp Salt
- 160ml Buttermilk, room temperature
- 60g Strawberry Puree
- 1–2 drops Pink Food Coloring (optional)
For Assembly & Coating:
- 115g Block-Style Cream Cheese, softened
- 200g Pink or White Candy Melts
- Crushed Freeze-Dried Strawberries, for garnish
Instructions
- Prep for Baking: Preheat your oven to 329°F (165°C). Line the bottom of an 8-inch round cake pan with parchment paper (do not grease the sides). In a medium bowl, sift together the cake flour, baking powder, baking soda, and salt.
- Make the Cake Batter: In a stand mixer, cream the butter and sugar on medium-high for 3 minutes until pale and fluffy. Add the vanilla. On low speed, add the egg whites one at a time, then whip on high for 5 minutes until airy.
- Combine & Bake: Reduce mixer speed to low. Alternate adding the dry ingredients and the buttermilk, beginning and ending with the dry mixture. Mix only until just combined. Gently fold in the strawberry puree and food coloring. Pour into the pan and bake for 25 minutes, or until a toothpick comes out clean.
- Cool Completely: Let the cake cool in the pan for 10 minutes before flipping it onto a wire rack to cool completely. This is crucial for the right texture.
- Assemble the Pops: Once cool, crumble the cake into fine crumbs in a large bowl. Add half the cream cheese and mix with your hands until it forms a dough-like consistency (similar to Play-Doh). Add more cream cheese sparingly if needed—be careful not to make the mixture too wet.
- Roll & Chill: Use a small cookie scoop to portion 20g balls. Roll them until smooth, place on a parchment-lined baking sheet, and chill in the fridge for at least 30 minutes.
- Melt Coating & Prep Sticks: Melt the candy melts in a deep, microwave-safe bowl in 30-second intervals, stirring until smooth. Dip about ½ inch of a lollipop stick into the melted coating, then insert it halfway into a chilled cake ball. Return the pops to the fridge for 10 minutes to set the “glue.”
- Dip & Decorate: Holding the stick, dip a cake pop straight down into the coating until fully submerged. Lift it out, allowing excess to drip off. Immediately add your strawberry sprinkles before the coating hardens. Place the finished pop upright in a stand to dry completely.
Notes
- Tips & Tricks: For the best results, use room temperature eggs and buttermilk. Don’t over-mix the batter after adding the flour. The trick to preventing cake pops from falling off the stick is to use the melted coating as a “glue” and let it set before dipping the whole pop.
- Serving Suggestions: Display your beautiful cake pops upright in a cake pop stand, or arrange them on a platter for a party.
- Storage Instructions: Store finished cake pops in an airtight container. They will last for up to 2 days at room temperature, up to a week in the refrigerator, or up to a month in the freezer. To thaw frozen pops, let them sit in the refrigerator overnight to prevent condensation on the chocolate shell.
Find it online: https://recipesh.com/strawberry-cake-pops/