Hey there! Ready to bake something really fun and tasty together? Let’s pretend I’m right there in your sunny Los Angeles kitchen, and we’re going to tackle a Strawberry Swiss Roll Cake. Seriously, this cake is a winner. It’s got a light, fluffy cake base swirled with creamy filling and bursting with fresh strawberries. Looks fancy, tastes amazing, but guess what? It’s totally doable, even if you’re not a pro baker.
You know those pretty rolled cakes? Sometimes called roulades? They started popping up way back in 19th century Europe. Simple idea, really: bake a thin cake, roll it up while it’s hot, then unroll, fill, and roll it back up. What makes this one special is that pop of strawberry flavor. Perfect for spring, a weekend treat, or honestly, just whenever you need a little deliciousness. I’ve tried to make this recipe super easy to follow. We’re using a simple cake method and a classic whipped cream filling. Think of it as a fun baking project – an Easy Strawberry Swiss Roll Cake. Let’s do this!

What You’re In For: A Quick Peek
Here’s the lowdown before we get our aprons dirty.
- How Long Will This Take?
- Mixing the batter: 10-15 minutes. Easy peasy.
- Baking: Another 10-15 minutes. Super quick!
- Cooling the rolled cake: This needs patience! About 30-60 minutes. Hands-off time, though.
- Making the filling & assembly: Roughly 10 minutes.
- Total time: Around 1.5 to 2 hours, but a good chunk of that is just waiting for the cake to cool. Perfect time to tidy up or grab a coffee!
- How Much Cake Do We Get? This recipe makes enough for 10-12 slices, give or take how generous you are! Cutting it in half is possible, but you’ll need a smaller pan (maybe 8×12 inches?). Just watch the baking time, and rolling a smaller cake can be a bit more fiddly. Doubling it? You’ll need a bigger pan or bake in batches. Here’s a handy guide if you want to adjust: Servings Eggs Sugar Oil Essence Flour Baking Powder Approx. Pan Size 5-6 2 50g 13g ½ tsp 60g ½ tsp ~8×12 inch 10-12 3 75g 20g 1 tsp 90g 1 tsp ~10×15 inch 20-24 6 150g 40g 2 tsp 180g 2 tsp ~12×18 inch
- How Hard Is It, Really? Let’s call it Intermediate. Making the cake part is pretty simple. The trickiest bit? Rolling the cake while it’s hot so it doesn’t crack. It takes a little nerve the first time! I remember my first Swiss roll attempt… minor cracking disaster! But don’t worry, this hot-roll trick really helps prevent that. I’ll walk you right through it.
- Stuff You’ll Need:
- Electric Mixer: A stand mixer with the whisk is great, but a handheld one works fine too.
- Baking Sheet: Often called a Jelly Roll Pan. Aim for around 10×15 inches.
- Parchment Paper: Don’t skip this!
- Clean Kitchen Towel: Important: Use one with a flat weave (like flour sack or linen), not a fuzzy terry cloth one. The fuzz can stick!
- Offset Spatula: Makes spreading easier, but a regular spatula or butter knife can work in a pinch.
- Mixing Bowls
- Whisk
- Sifter or Fine Strainer: For lump-free flour.
- Wire Cooling Rack
- Can I fake it? Sure! Whisking by hand is a workout but doable. No offset spatula? Spread carefully. No jelly roll pan? Use a similar sized rimmed baking sheet, but keep an eye on baking time – a different size changes the cake thickness.
- Can I Make It Ahead? Yes! Bake the cake, roll it up in the towel, and let it cool completely. You can leave it like that (rolled in the towel or gently wrapped in plastic once cool) at room temperature for a day. Whip up the filling and assemble it closer to serving time. The filling tastes best fresh.
Ingredient List
Alright, let’s round up everything we need. Good ingredients make a difference, but honestly, this recipe is pretty forgiving.
For the Cake Part:
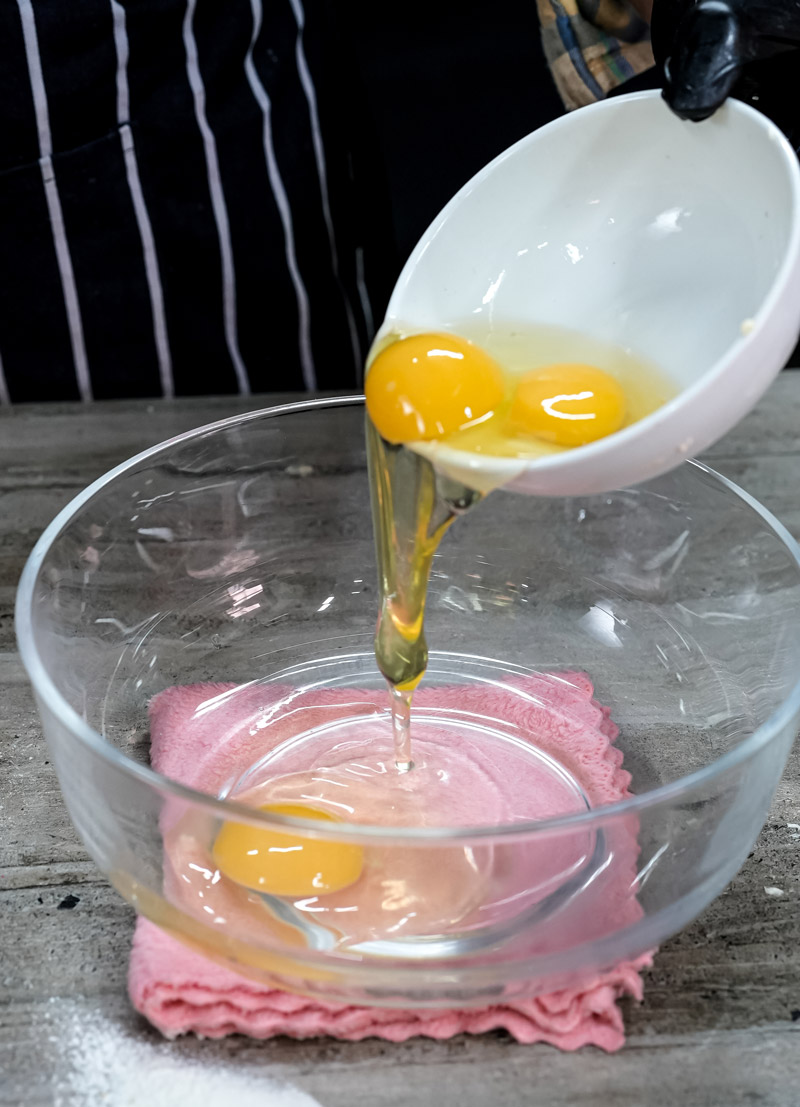
- 3 Large Eggs: Super important: make sure they’re at room temperature. Trust me on this! Cold eggs just don’t whip up as fluffy. Take ’em out of the fridge maybe 30-60 minutes before you start. I learned that one the hard way!
- 75g Granulated Sugar: Plain old white sugar is perfect. Caster sugar works too if you have it.
- 20g Neutral Oil: Like vegetable, canola, or sunflower oil. Something light that doesn’t have a strong flavor. Melted butter (cooled slightly) is okay, but oil tends to make the cake a bit more flexible for rolling.
- 1 tsp Strawberry Essence: Gives a nice strawberry hint to the cake itself. No strawberry essence? No problem! Use 1 tsp of good vanilla extract instead. The fresh berries in the filling will still shine.
- 90g All-Purpose Flour: Regular flour works great. Cake flour gives an even softer texture if you want to get fancy, but it’s not necessary. Definitely sift this!
- 1 tsp Baking Powder: Gives our cake a little lift. Check the date – old baking powder is sleepy. Sift it with the flour! Gets rid of clumps.
- Pinch of Salt (Optional): Tiny bit makes everything else taste better. Highly recommend.
- Powdered Sugar (about ¼ cup): This is for dusting the towel. It’s like edible non-stick spray for rolling the hot cake.
For the Creamy Strawberry Filling & Pretty Topping:
- 1 cup (240ml) Heavy Whipping Cream: Make sure this is COLD. Straight from the fridge! Cold cream whips up way better.
- 2-4 tbsp Powdered Sugar: Also called confectioners’ sugar. Add more or less depending on how sweet you like things (and how sweet your berries are). Sifting helps make it smooth.
- ½ tsp Vanilla Extract: Goes so well with strawberries.
- 1 – 1.5 cups Fresh Strawberries: Washed, stems removed, and sliced or chopped up. Find some nice ripe, sweet ones! These go in the filling.
- More Fresh Strawberries (halved or whole): These are for making the top look pretty – the essential Strawberry topping!
Let’s Bake! Step-by-Step Guide
Okay, aprons on? Let’s do this!
Get Ready: Oven On, Pan Prepped!
First things first. Crank up that oven to 375°F (190°C). Let it get nice and hot. While it’s heating, grab your 10×15 inch pan.
Now, the magic trick for easy removal: parchment paper. Line the whole pan, bottom and sides. Let some paper hang over the long edges like little handles. Seriously, don’t skip this!
Here’s a weird tip: Don’t grease the pan OR the paper. Sounds wrong, right? But we want the cake batter to cling to the sides as it bakes. This helps it get tall and fluffy. Greasing makes it slide down. Weird, but true!
Next, lay out that clean, flat-weave kitchen towel on your counter. Sprinkle it generously with powdered sugar. Like, give it a good even coating. This is what stops the hot cake from sticking when we roll it. Think of it as a sugary welcome mat. Set this towel aside – we need it the second the cake comes out of the oven.
Whip It! Making the Batter Light and Airy
Time to use those muscles (or the mixer’s!). Put your 3 room-temp eggs in your mixer bowl (use the whisk attachment) or a big bowl if using a hand mixer. Add the 75g sugar.
Start mixing on low just to get things combined, then turn it up to medium-high. Now, be patient. Let it whip for a good 5 to 8 minutes.
What are you looking for? The eggs and sugar will get super pale, thick, and way bigger – almost triple the size!
The test? It’s called the “ribbon stage.” Lift the whisk. Does the batter fall off in a thick ribbon that sits on the surface for a second before sinking back in? Yes? Awesome! If it disappears right away, keep whipping.
Once you hit that ribbon stage, turn the mixer speed down to low. Slowly drizzle in the 20g oil and the 1 tsp strawberry essence (or vanilla). Mix just until they disappear. Like, 15-20 seconds max. Don’t mix too much now – we want to keep all that air we just whipped in!
Fold Gently: Keep it Fluffy!
Okay, put the mixer away. Time for a gentle touch.
Grab your 90g flour, 1 tsp baking powder, and that pinch of salt. Put your sifter (or fine strainer) over the bowl with the whipped eggs.
Sift the dry stuff right onto the egg mixture. Why sift? It gets rid of lumps and makes the flour lighter, easier to mix in without deflating everything.
Now, use a big rubber spatula. We need to fold, not stir. Cut down the middle with the spatula, scrape along the bottom, bring it up the side, and gently fold it over the top. Turn the bowl a bit and repeat.
Keep doing this gentle fold, fold, fold until you don’t see any more white streaks of flour. But stop as soon as it’s mixed! The batter should still look really light and airy, kind of like a mousse. Be gentle! This careful folding is what makes our Easy Strawberry Swiss Roll Cake so tender.
Spread and Bake: Time for the Oven!
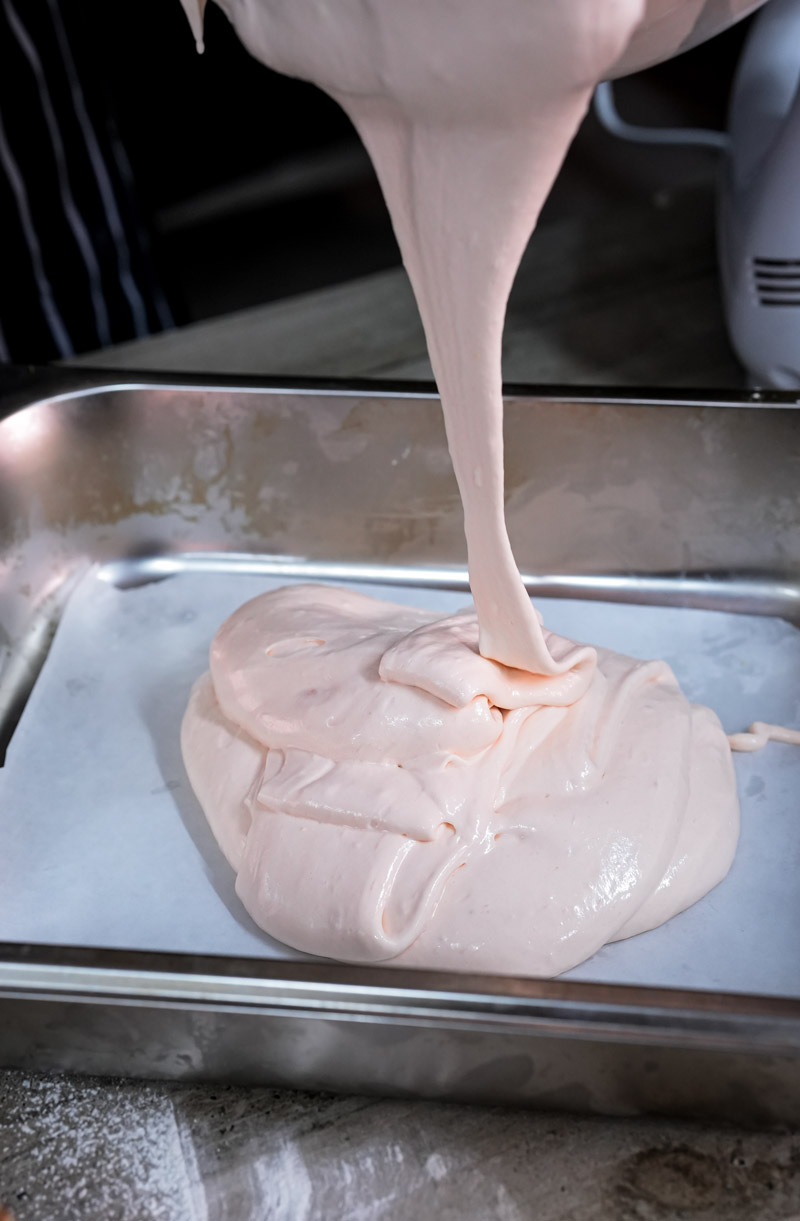
Carefully pour your lovely, light batter into the middle of your parchment-lined pan.
Use your offset spatula (or the back of a spoon) to gently spread the batter out. Try to get it even all the way to the corners. An even layer means even baking!
Make it as smooth as you can. Now, carefully slide the pan into your hot 375°F (190°C) oven. Center rack is best.
Set a timer for 10 minutes to start. Baking usually takes 10-15 minutes, but ovens vary. We’ll check it soon.
The Roll! (While It’s Hot!)
This is the most important step for a crack-free Strawberry Swiss Roll, and you gotta be quick!
Start checking the cake around 10 minutes. It should be light golden brown on top. When you gently poke the middle, it should spring right back. The edges might just be starting to pull away from the pan sides. Don’t let it get too brown or dry!
As soon as it’s done (probably 10-15 mins total), pull the pan out of the oven. Have that sugar-dusted towel right there! Quickly run a knife around the edges of the cake, just to loosen it from the parchment.
Use the parchment paper handles to lift the whole cake (still on the paper) out of the hot pan.
Now, take a breath, and confidently flip the whole thing over onto the powdered sugar towel. Cake side down, parchment side up. Carefully peel off the parchment paper. It should come off easily.
Okay, immediately, starting from one of the short ends, gently but firmly roll the hot cake up with the towel inside. The towel keeps the cake from sticking to itself and helps make the swirl. Don’t roll it crazy tight, but snug.
Why roll it hot? The heat and steam make the cake flexible, like it’s learning yoga! This teaches it the rolled shape so it doesn’t crack later. This hot roll is the secret to this Strawberry Swiss Roll Cake Recipe.
Cool Down: Let it Chill
Carefully move your cake, still rolled in the towel, onto a wire rack. Make sure the seam (the end of the roll) is facing down. Now, just let it sit there and cool down completely. This takes maybe 30 minutes to an hour.
Seriously, don’t unroll it while it’s warm! Letting it cool fully in the rolled shape is key. It locks in that curve, making it less likely to crack when you unroll it later. Cake muscle memory!
Whip the Cream: Filling Time!
While the cake cools, let’s make the filling. Grab your 1 cup of heavy cream. Remember, cold is key!
Bonus tip: Chill your mixing bowl and whisk in the freezer for 10-15 mins first. Makes whipping even easier.
Pour the cold cream into the cold bowl. Start beating on medium speed, then bump it up to medium-high.
Watch it! First, bubbles. Then it gets thicker (soft peaks – the peak flops over when you lift the whisk).
When you hit soft peaks, add the 2-4 tablespoons of sifted powdered sugar (start with 2, taste later) and the ½ teaspoon vanilla.
Keep beating, but watch very closely now! You want stiff peaks – they should stand up straight when you lift the whisk. But stop right away! If you go too far, it gets grainy, then turns into butter. Not what we want!
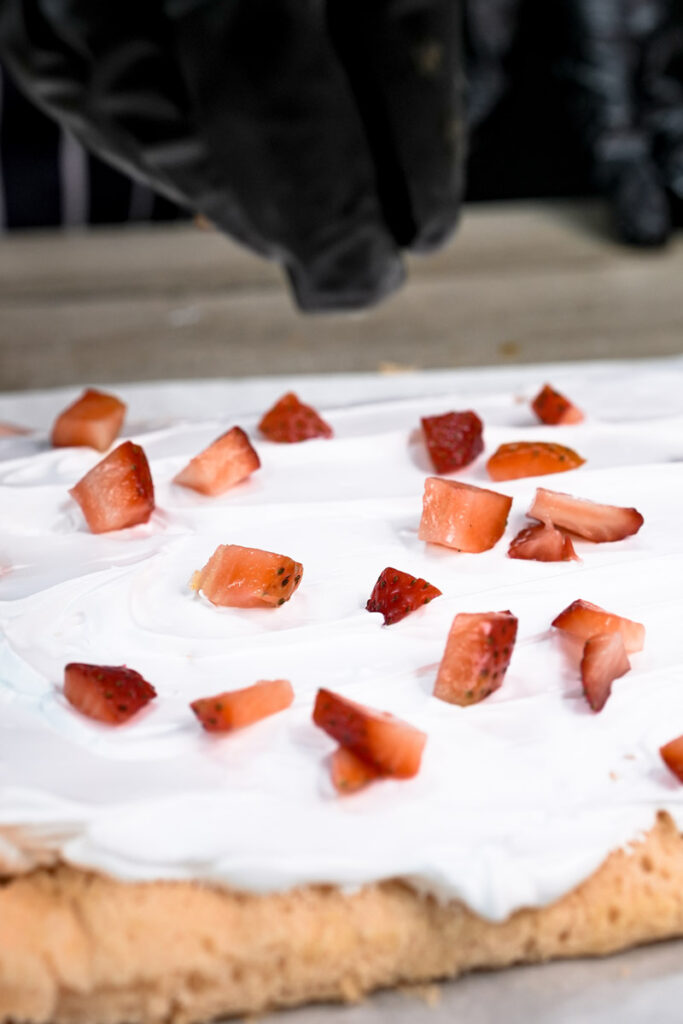
Once you have nice stiff peaks, gently fold in your 1 to 1.5 cups of sliced or chopped strawberries with a spatula. Just mix ’em in.
Give it a little taste. Sweet enough? More vanilla? Fix it now!
Unroll, Fill, Re-Roll: Putting it Together!
Is the cake roll totally cool? Awesome. Time to assemble!
Gently, carefully unroll the cake. Leave it flat on the towel, or move it to a clean sheet of parchment. Don’t freak out if you see a tiny crack or two – totally normal!
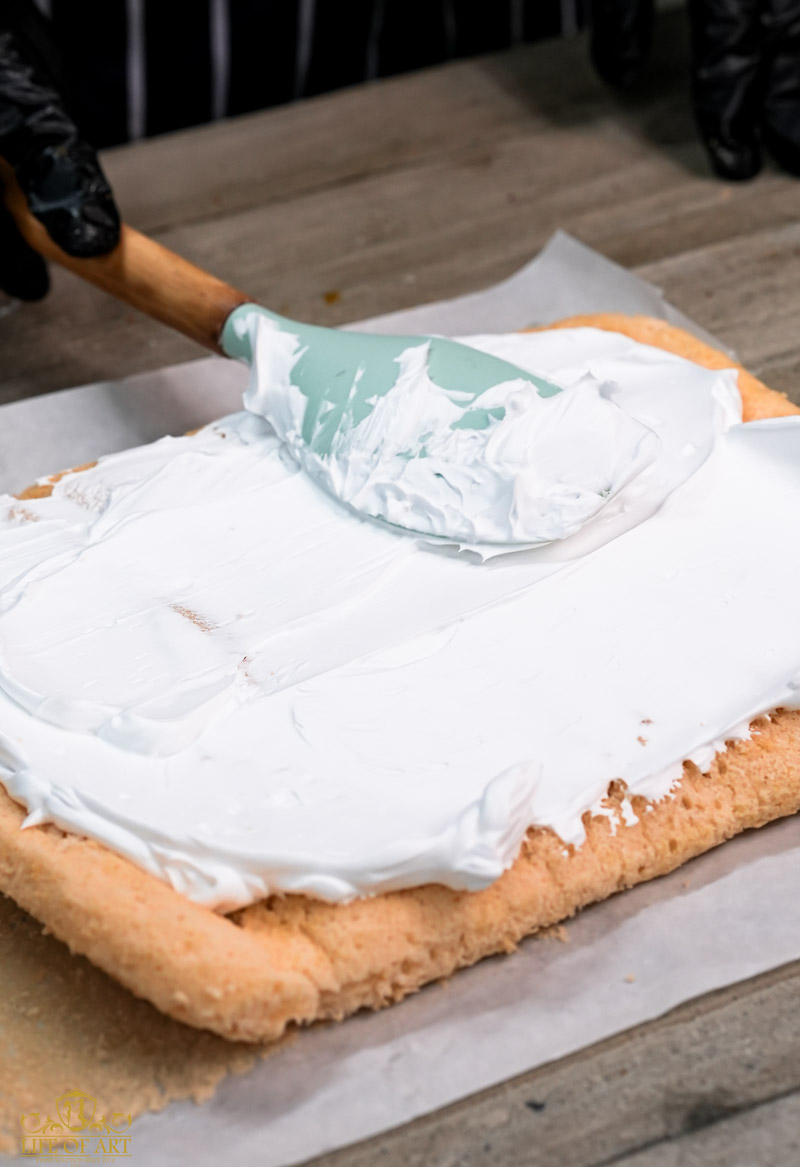
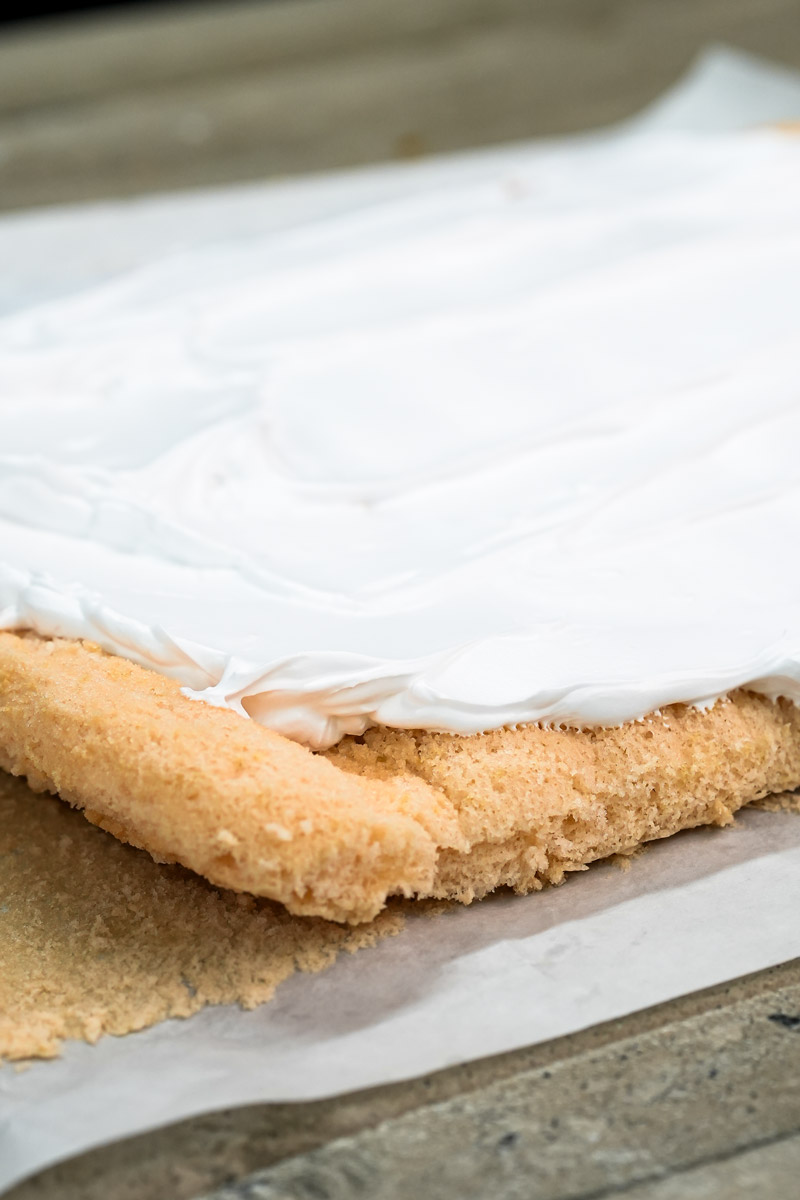
Spread that yummy strawberry cream filling all over the cake with your offset spatula.
Pro tip: Leave about a 1-inch strip bare along the short edge that will end up on the outside of the roll. This stops the cream from smooshing out the end when you roll it.
Now, using the towel (or parchment) underneath to help lift, carefully start rolling the cake back up again. This time, without the towel inside! Roll it gently but snugly. Try to keep it round, not flat. You’re just rolling it back into the shape it cooled in.
Chill Out Again: Let it Set
You did it! The roll is assembled! Carefully place your Strawberry Swiss Roll (seam-side down) on a serving plate or a piece of plastic wrap.
To make slicing easier and let the filling firm up, it needs a little time in the fridge. Wrap it gently in plastic wrap (stops it drying out) and chill for at least 30 minutes. An hour is even better. This chill time makes for prettier slices with a nice defined swirl.

Make it Pretty & Serve!
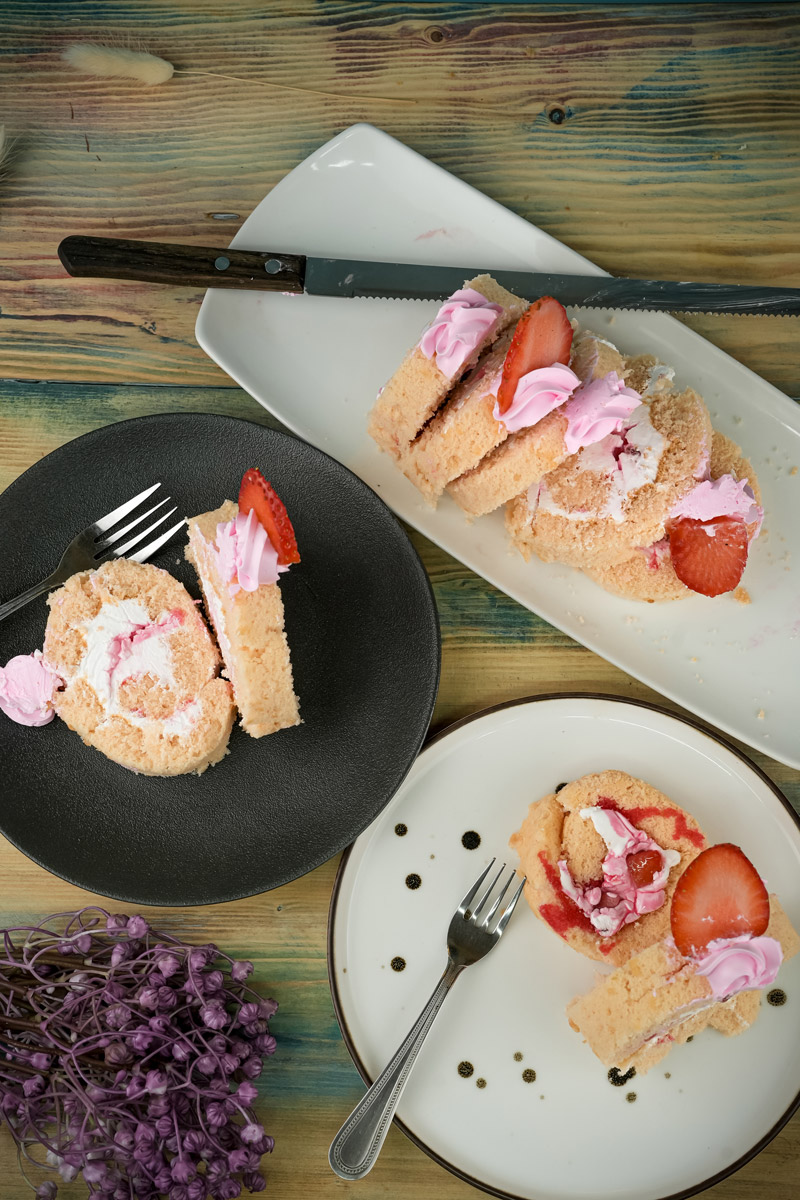
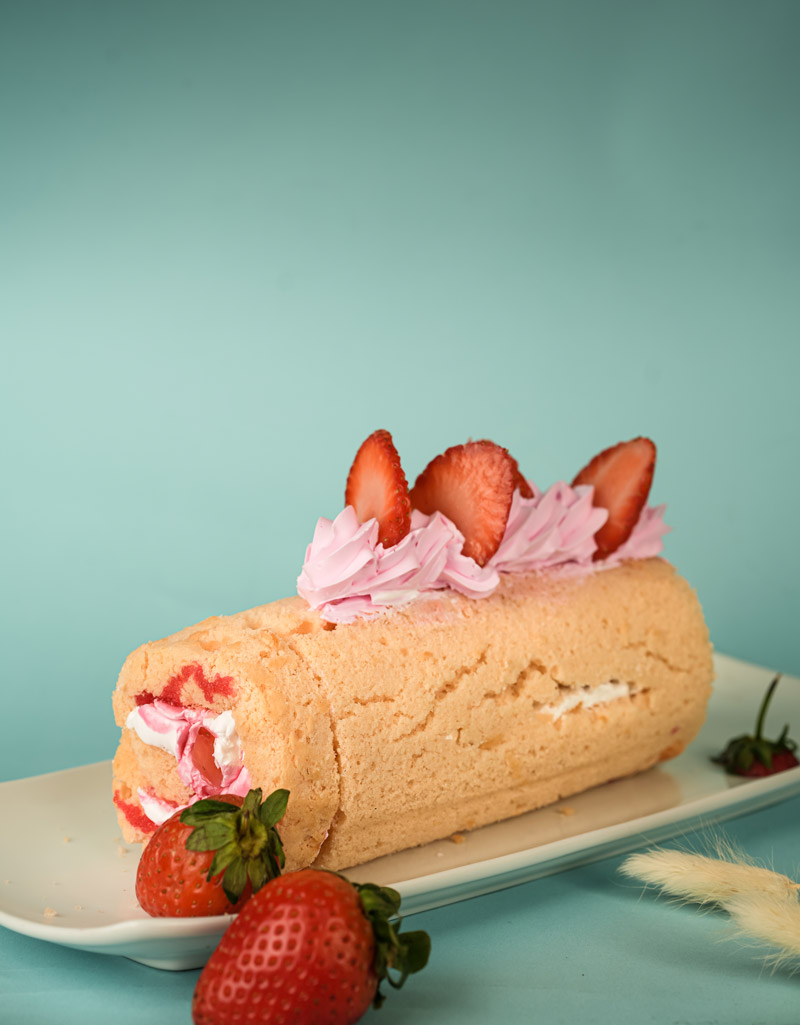
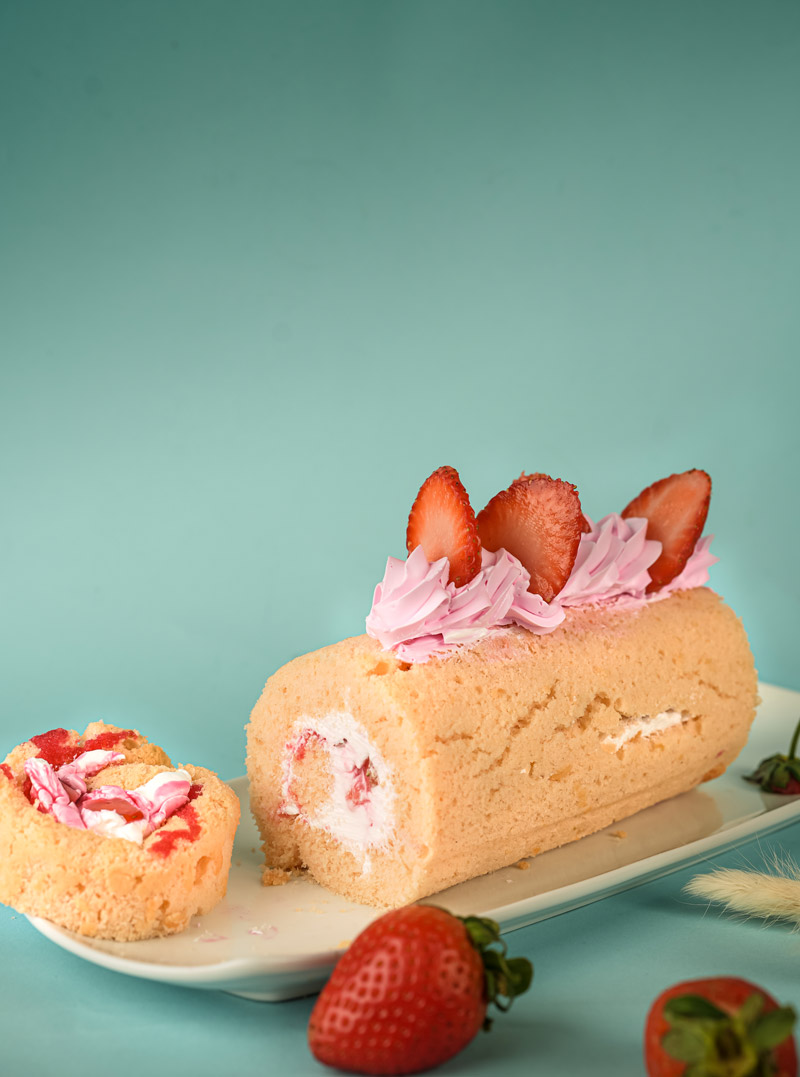
Almost there! Right before serving, unwrap your chilled roll. Want it to look extra neat? Use a sharp knife to trim about half an inch off each end. This shows off that nice swirl inside.
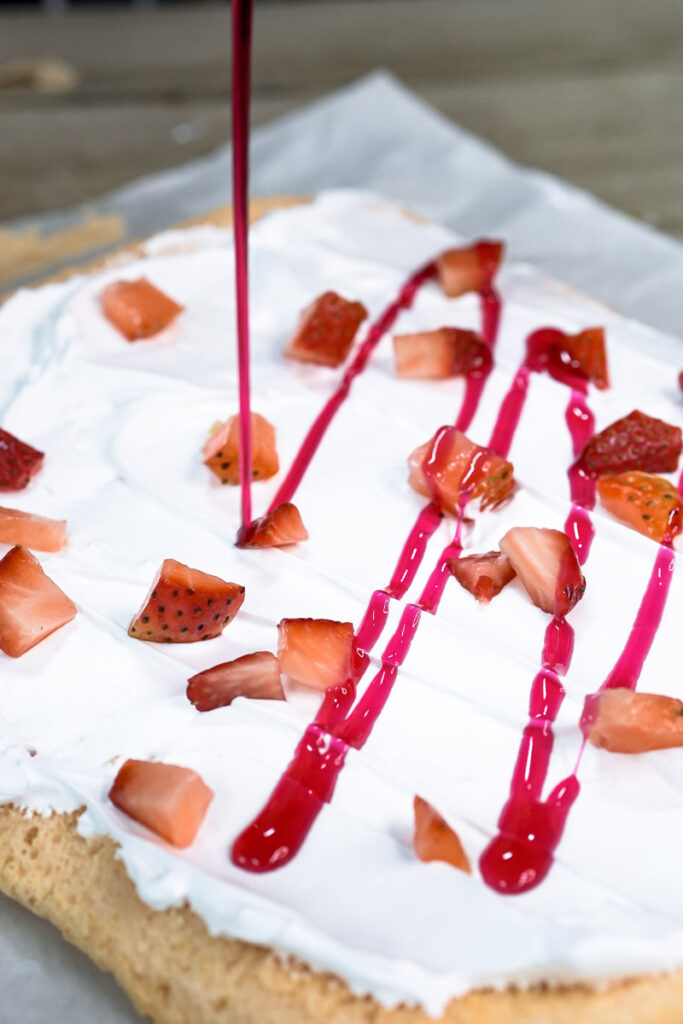
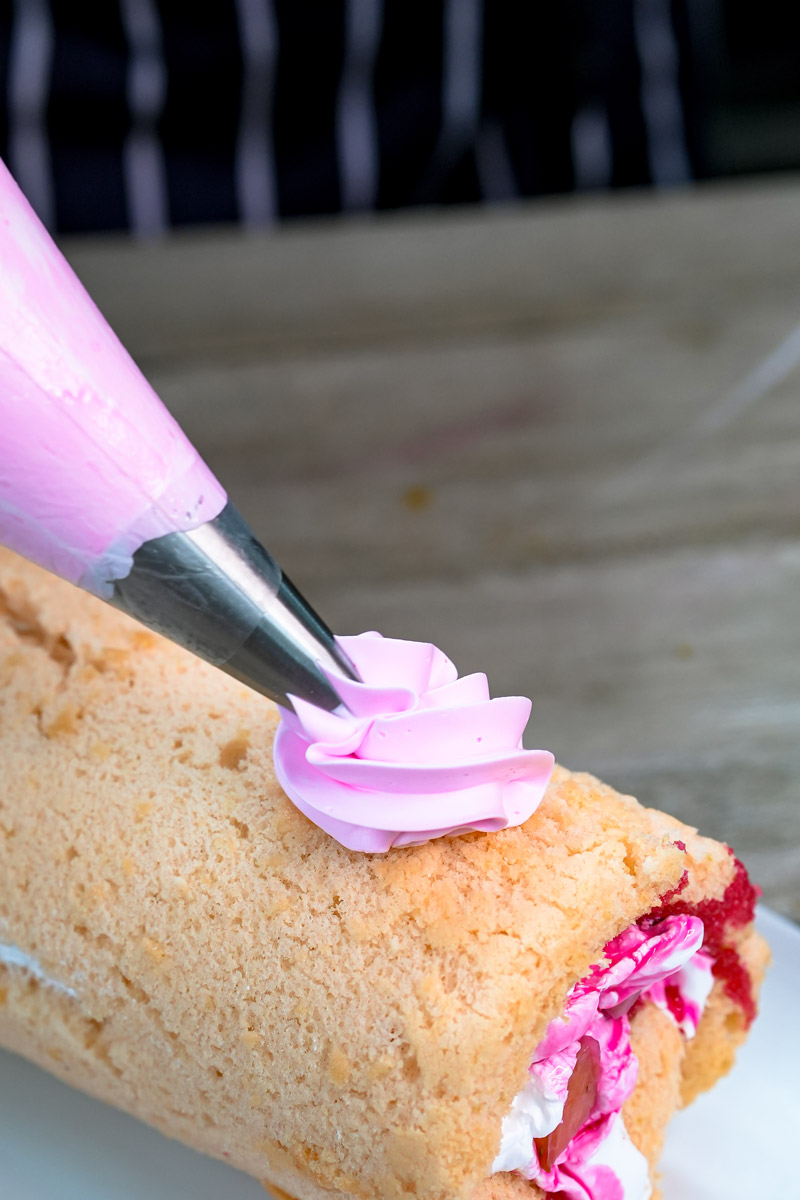
Now for the final touches to make it a real Strawberry Swiss Roll Cake with Strawberry topping: Sprinkle the top generously with powdered sugar (use that sifter again for a fine dusting). Arrange your extra fresh strawberries on top. Halved or whole berries look great.
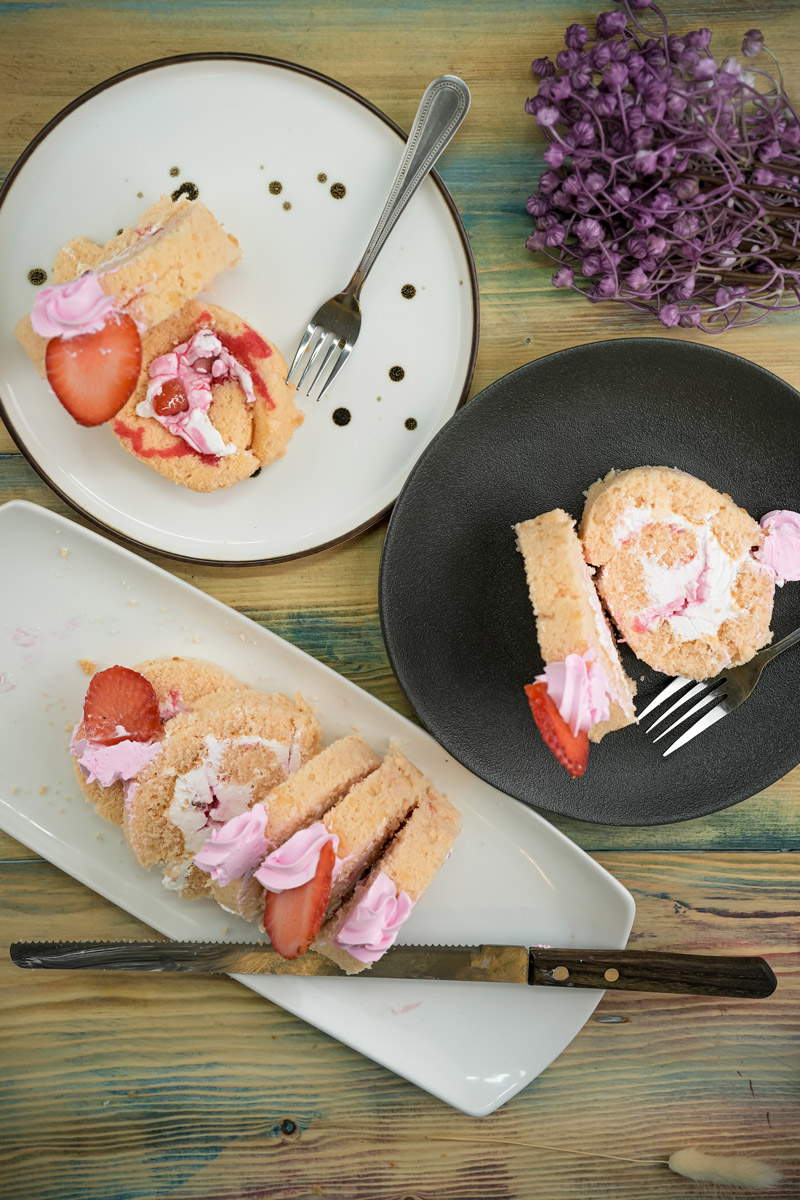
Use a sharp knife (wipe it clean between cuts for neat slices!) to cut the roll into 1-inch thick slices.
Serve it up and get ready for the compliments! Enjoy your amazing homemade cake!
Fun Twists: Making It Your Own
This Strawberry Swiss Roll Cake Recipe is a great starting point. Want to play around? Here are some ideas:
- Dietary Needs?
- Gluten-Free: Use a good gluten-free flour blend (one that says 1-to-1 or includes xanthan gum) instead of regular flour. Keep an eye on baking time; GF cakes can sometimes bake a bit differently.
- Dairy-Free: Use dairy-free whipping cream (like cold coconut cream from a can, or a store-bought vegan version). Make sure your oil is dairy-free (most are).
- Vegan: This is tougher because the eggs are really important for the cake’s structure. You could try an egg replacer like aquafaba, but results can really vary. Plus, you’d need the dairy-free swaps too. Might take some experimenting!
- Flavor Fun:
- Add lemon zest (about 1 tsp) to the cake batter with the eggs for a fresh taste.
- Swap strawberry essence for almond extract. Maybe spread a thin layer of strawberry jam on the cake before adding the cream!
- Fold mini chocolate chips into the cream. Yum!
- Use different berries! Raspberries, blueberries, blackberries… go wild!
- Fancy or Casual? Just powdered sugar and berries on top is perfect for everyday. Want to dress it up? Drizzle melted white or dark chocolate over it. Pipe some extra whipped cream swirls. Add toasted sliced almonds around the bottom edge.
- Seasonal Swaps: Peaches and cream in summer? A spiced cake with apple filling in the fall? Orange and cranberry for winter? Totally doable!
Serving and Storing Your Cake
You baked it, now let’s enjoy it!
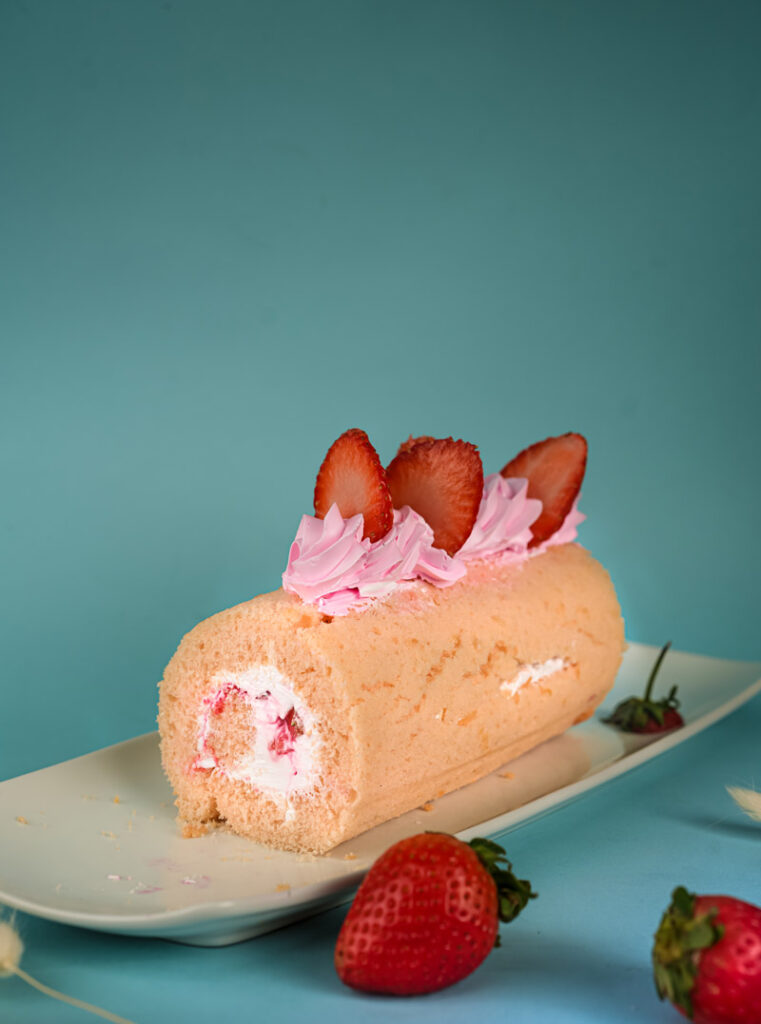
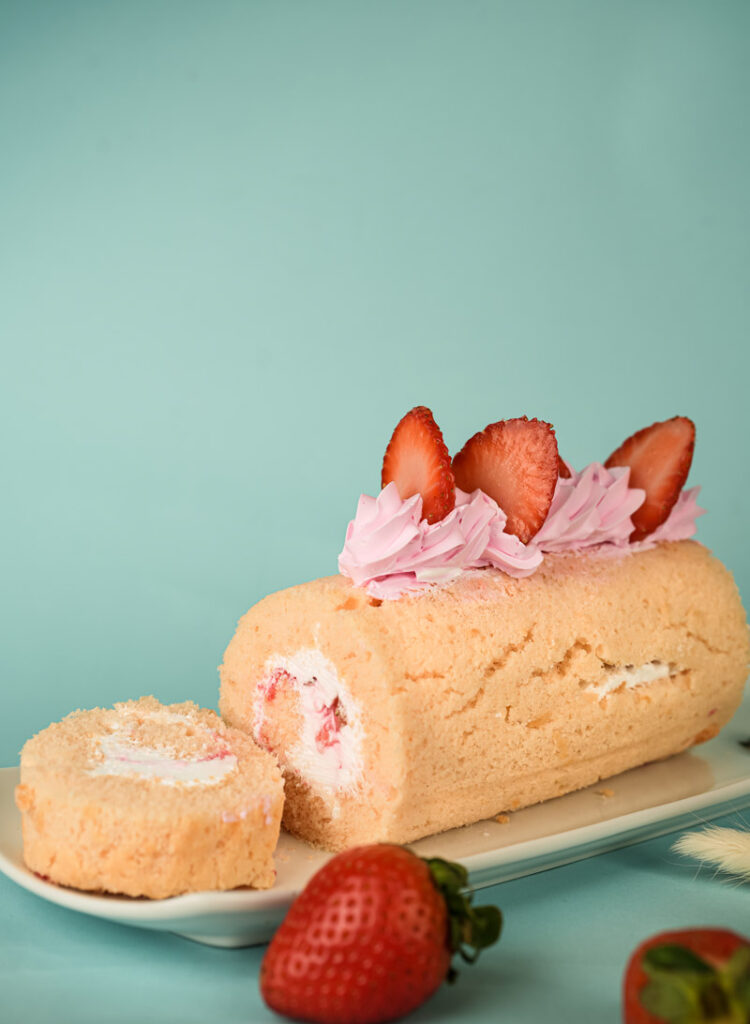
- On the Plate: Slice it nicely (remember: sharp knife, wiped clean!). Lay the slices flat to show off the swirl, or stand them up. A little mint leaf or an extra berry on the plate looks cute. That Strawberry topping really makes it pop!
- What Goes With It? It’s great by itself! Also lovely with tea or coffee. Want dessert dessert? A small scoop of vanilla ice cream is never wrong.
- Storing Leftovers: Because of the cream, leftovers must go in the fridge. Wrap the roll well in plastic wrap or put it in an airtight container. It’s best eaten within 2-3 days. The cake can get a bit dry after that.
- Reheating? Nope! Serve this one chilled.
- Make-Ahead & Freezing: Like we said, you can bake and roll the cake (in the towel) a day ahead. Fill it closer to serving. Freezing the finished cake isn’t ideal. The cake texture can get weird, and fresh strawberries get mushy when thawed. If you absolutely have to freeze it, wrap it super tightly in plastic wrap, then foil. Thaw it overnight in the fridge. But honestly? It’s way better fresh.

And that’s everything! You’re all set to make a really delicious Easy Strawberry Swiss Roll Cake. I hope you have as much fun baking it as you do eating it! Happy baking!
PrintStrawberry Swiss Roll Cake

Whip up this beautiful swirl of light cake, creamy filling, and fresh strawberries! It looks impressive but is surprisingly simple to make. Perfect for celebrations or just because. Let’s bake!
- Prep Time: 15 mins
- Cook Time: 15 mins
- Total Time: Approx. 2 hrs (Cooling & Chill: 1 – 1.5 hrs)
- Yield: 10–12 slices 1x
- Category: Dessert
- Cuisine: European-Inspired
Ingredients
For the Cake:
- 3 Large Eggs (room temperature is key!)
- 75g Granulated Sugar
- 20g Neutral Oil (like Vegetable or Canola)
- 1 tsp Strawberry Essence (or Vanilla Extract)
- 90g All-Purpose Flour (sifted)
- 1 tsp Baking Powder (sifted)
- Pinch of Salt (Optional)
- Approx. ¼ cup Powdered Sugar (for dusting towel)
For the Filling & Topping:
- 1 cup (240ml) Heavy Whipping Cream (very cold!)
- 2–4 tbsp Powdered Sugar (sifted, to taste)
- ½ tsp Vanilla Extract
- 1 – 1.5 cups Fresh Strawberries (washed, hulled, sliced/diced for filling)
- Extra Fresh Strawberries (halved or whole, for topping)
Instructions
- Prep Oven & Pan: Preheat oven to 375°F (190°C). Line a 10×15 inch jelly roll pan completely with parchment paper (let ends hang over). Do NOT grease. Lay a clean, flat-weave kitchen towel flat and dust generously with powdered sugar. Set aside.
- Whip Eggs: Beat room temp eggs and granulated sugar on medium-high speed for 5-8 minutes until very pale, thick, and falls in ribbons off the whisk.
- Combine: On low speed, briefly mix in oil and essence. Sift flour, baking powder, and salt over egg mixture. Gently fold with a spatula just until no streaks remain. Don’t overmix!
- Spread & Bake: Pour batter into prepared pan. Spread gently and evenly to corners. Bake for 10-15 minutes, until light golden and springs back when touched.
- THE HOT ROLL: Immediately loosen cake edges. Lift cake using parchment and flip onto the sugar-dusted towel. Peel off parchment carefully. Starting at a short end, roll the hot cake up snugly with the towel inside.
- Cool Completely: Place rolled cake (seam-down) on a wire rack. Let cool completely in the towel (30-60 mins).
- Make Filling: Whip cold heavy cream until soft peaks form. Add sifted powdered sugar and vanilla. Beat until stiff peaks form (don’t overbeat!). Gently fold in sliced/diced strawberries.
- Assemble: Carefully unroll cooled cake. Spread filling evenly, leaving a 1-inch border on the far short edge. Roll cake back up (without the towel this time!).
- Chill: Wrap roll in plastic wrap. Chill in fridge for at least 30 minutes (or up to an hour) to set.
- Serve: Unwrap cake. Trim ends if desired. Dust with powdered sugar and top with extra fresh strawberries. Slice and enjoy!
Notes
- Serving: Slice cleanly with a sharp knife (wipe between cuts). Looks lovely on dessert plates! Great with tea or coffee.
- Tips & Tricks:
- Room temp eggs are crucial for a fluffy cake.
- Use a flat-weave towel (not terry cloth) to avoid texture marks.
- Rolling the cake while hot is the secret to preventing cracks!
- Don’t overbake the cake, or it might crack more easily.
- Make sure cream is very cold for best whipping results.
- Storage: Keep leftovers tightly wrapped in the refrigerator due to the cream filling. Best enjoyed within 2-3 days. Do not reheat. Freezing is not recommended as texture suffers.