Hey there, fellow bakers! Ready to bake something that just feels like a warm hug? Today, we’re making classic Vanilla Butter Cupcakes. Seriously, is there anything better? That simple vanilla flavor takes you right back, doesn’t it? And everyone loves them. Plus, they’re the perfect little base for piling on your favorite frosting.
Did you know cupcakes have been around forever? Well, almost. Back in the day, like late 1700s, people started baking little cakes in actual cups or tiny molds. Way easier than a giant cake! This recipe keeps that simple charm but adds a couple of little secrets. A bit of almond flour? Makes them so moist. That Dano cream? Oh yeah, extra richness. I think you’ll find these are seriously Moist Vanilla Butter Cupcakes. Easy enough for a Tuesday, special enough for a party.
Let’s bake!
What You’re Getting Into: The Quick Look
- How Long? Not long at all!
- Prep: About 15-20 minutes. Mostly just measuring and mixing. Easy peasy.
- Bake: Super quick! 15-20 minutes in the oven.
- Total: Plan for maybe 30-40 minutes, plus cooling time. And cooling is super important, don’t skip it!
- How Many? This recipe makes about 5-6 regular-sized cupcakes. Perfect for a small family or, you know, just for you!
- Need More? Double it! This recipe is great for doubling. Just use twice the amount of everything. Check out this handy table:
- How Hard? Honestly? Super Easy. If you’re new to baking, this is a great place to start. The steps are simple, and it’s a small batch, so less pressure!
- What Stuff Do I Need? You probably have most of this stuff already banging around your kitchen:
- A regular muffin/cupcake pan (the 6-cup kind is perfect)
- Cupcake liners (paper ones are fine, silicone works too)
- Mixing bowls (a medium one and a small one should do it)
- An electric mixer (handheld is great, stand mixer is fancy!). Or a whisk and some good old-fashioned arm power.
- A rubber spatula or a wooden spoon
- Measuring cups and spoons (the usual suspects)
- A wire rack for cooling those beauties
- What if I don’t have…? No electric mixer? You can mix the butter and sugar by hand with a whisk. It just takes longer and gives your arm a workout! No wire rack? Let them cool on a plate, maybe propped up a little so air can get underneath.
- Can I Make Them Ahead? Totally! Bake the cupcakes the day before. Let them cool all the way, then keep them in an airtight container (like Tupperware) on the counter. Frost them right before you want to serve them. Frosting can often be made ahead too and kept in the fridge – just let it soften up a bit first.
The Ingredients: Good Stuff Makes Good Cupcakes!
Okay, let’s chat about what goes into these little guys. Using decent ingredients and getting them ready before you start mixing makes a huge difference. We want Fluffy Vanilla Butter Cupcakes, right?
First up: 100g of Butter. Please, please use unsalted butter if you can. It lets you control the salt. The most important thing? It absolutely must be soft, like room temperature soft. Not melty goo, not hard as a rock. Soft enough that you can easily poke it with your finger. This is the secret weapon for creaming!
Then we need 75g of Sugar. Plain old white granulated sugar is perfect. Caster sugar? Fine too, dissolves a bit faster, but no big deal if you don’t have it.
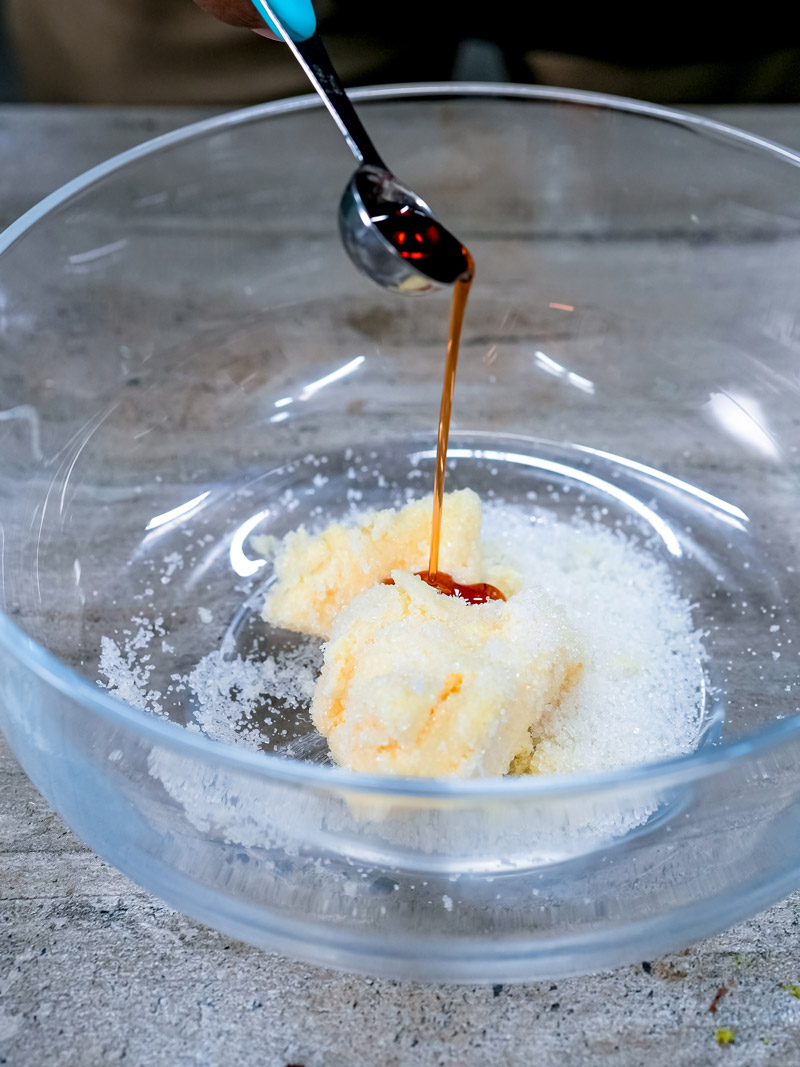
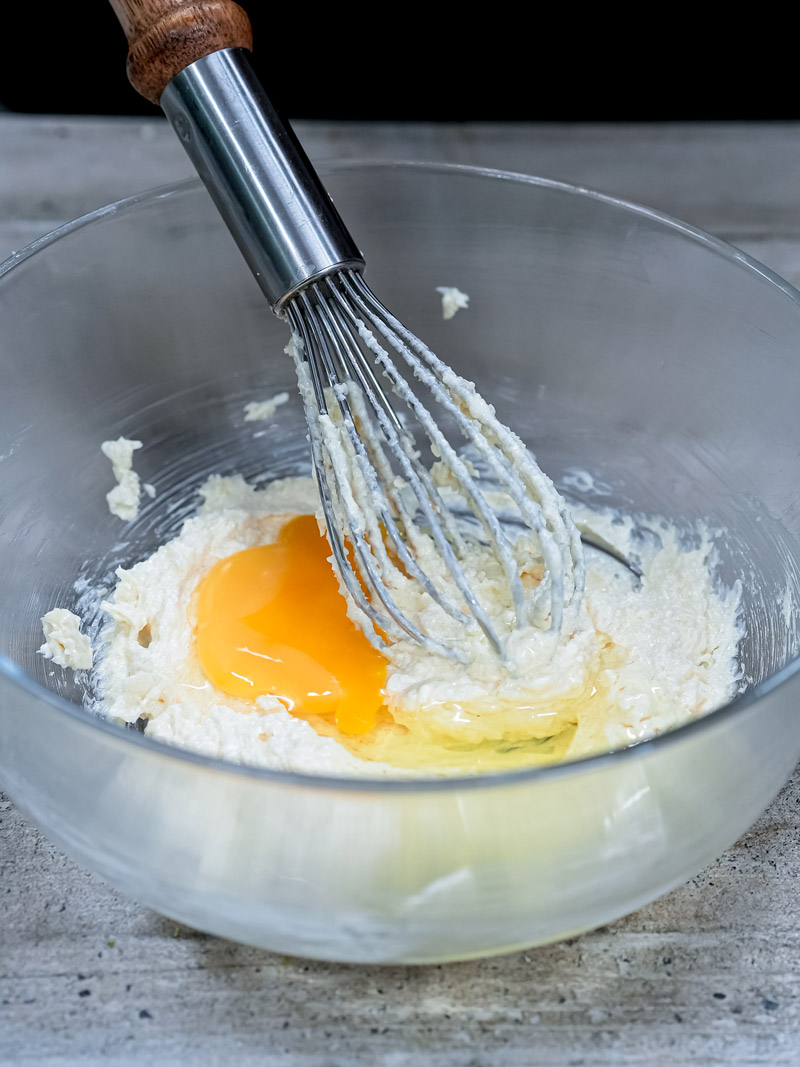
Flavor time! 1 teaspoon of Vanilla Essence. Get the good stuff if you can find it – pure vanilla extract. It really makes a difference you can taste. One large Egg. This helps hold everything together and makes things rich. Just like the butter, make sure your egg isn’t fridge-cold! Room temp is best. It mixes in way better.
Now for the fun extras! 1 tablespoon of Dano Cream. This stuff is awesome for making cakes moist and rich. It’s usually a thick, sterilized cream. Can’t find it? No worries! A tablespoon of full-fat sour cream or plain Greek yogurt works great as a swap. Just make sure it’s room temperature too. We also add 1 tablespoon of Almond Flour. Don’t worry, it won’t make them taste like marzipan. It just adds this lovely hint of nuttiness and makes the texture super tender and moist. Fine ground is best if you have it.
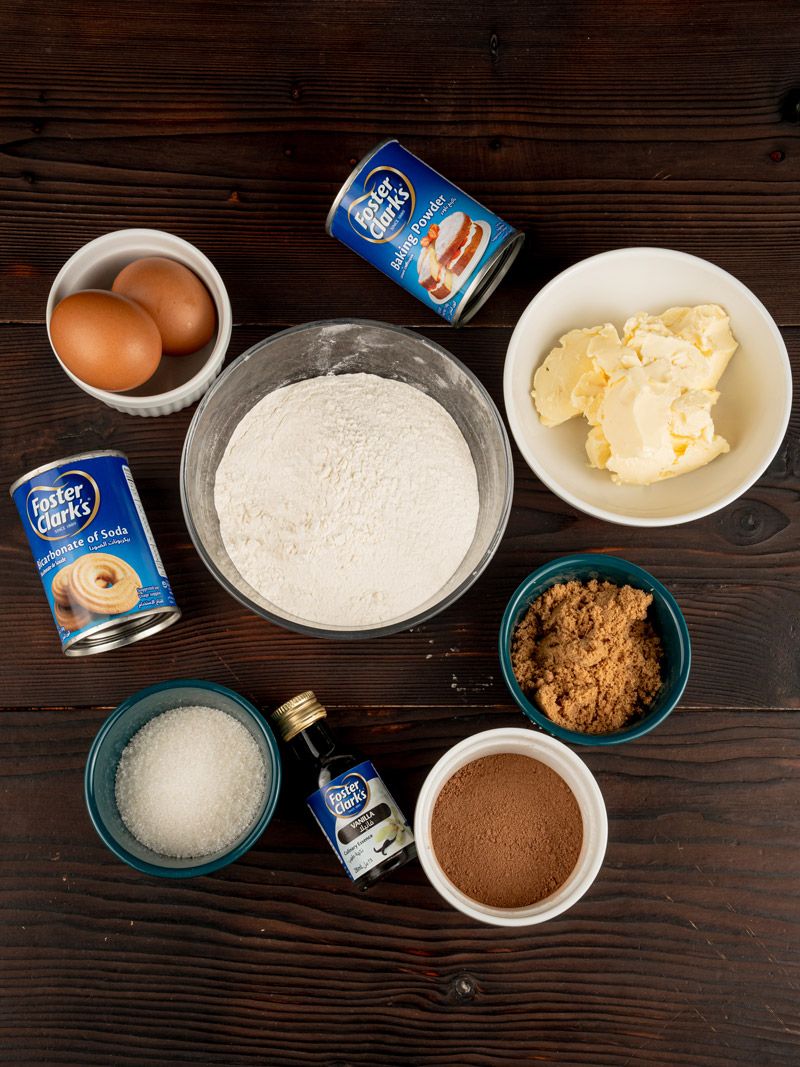
For the cakey part, 100g of All-Purpose Flour. Regular plain flour. Nothing fancy needed. Give it a little whisk in its container before you measure it out – helps lighten it up. To make them puff up, we need 1/2 teaspoon of Baking Powder and 1/2 teaspoon of Baking Soda. Check those dates on the tins! Old ones won’t work well, and you’ll get sad, flat cupcakes. Baking soda needs something acidic (like our Dano cream or yogurt swap) to get going, while baking powder has its own power built-in.
Optional, but nice: 1 tablespoon of Milk Powder. Adds a little something extra to the flavor and helps make the cupcake tender. If you don’t have it, skip it!
Wait a minute! Looking at this list, it feels like we need a splash of liquid to make a nice batter. With these ingredients, I’d definitely add 1 to 2 tablespoons of Milk. Whole milk is fab, but low-fat works, or even almond or soy milk. We’ll add it bit by bit. It’s key for getting the batter just right! Try to have this at room temp too, if you remember.
And finally, even though it wasn’t in the original list, I always add a tiny pinch of Salt (like 1/8 tsp) to sweet things. Trust me. It doesn’t make it salty; it just makes all the other flavors, like the vanilla and butter, taste better. Add it with the flour.
Quick Ingredient Prep Recap:
- Butter, Egg, Dano Cream (or swap): Get these out of the fridge ahead of time! Room temperature is a must.
- Flour: Give it a quick whisk before measuring.
- Baking Powder/Soda: Are they fresh? Check the dates!
- Milk: Have 1-2 tbsp ready. Room temp is good if you can.
Let’s Bake! Your Step-by-Step Guide
Oven On, Pan Ready!
Okay, first things first. Let’s get that oven heating up. Turn it on to 350°F (175°C). A properly hot oven is key for getting those cupcakes to rise nice and tall right away. While it’s getting hot, grab your muffin pan. Pop a paper or silicone liner into 5 or 6 of the cups. These little guys stop sticking, make cleanup easy, and look cute. Set your pan aside. Ready to go!
Mix the Dry Stuff.
Find a medium bowl. Dump in your 100g all-purpose flour. Add the 1 tbsp almond flour (hello moisture!), the 1/2 tsp baking powder and 1/2 tsp baking soda (the lift crew!), the optional 1 tbsp milk powder, and that important pinch of salt. Now, grab a whisk and just stir it all together for maybe 30 seconds. This helps spread the baking powder and soda evenly. You don’t want one weird salty or bubbly bite! Make sure it looks all mixed up, then set this bowl aside for now.
Cream Butter & Sugar: Get Fluffy!
This step? It’s where the Fluffy Vanilla Butter Cupcake magic really happens. Get a bigger bowl. Plop in your 100g super soft butter (remember, soft enough to poke easily, not melted!) and the 75g sugar. Grab your electric mixer (or that whisk!). Start on medium speed, then bump it up to medium-high. Let it go for a good 2 to 3 minutes. Seriously. Watch it change!
It will go from yellowy butter color to much paler, almost white. It’ll look way lighter and fluffier. Like a cloud. You’re beating air into it! Those tiny air bubbles = lift in the oven. Don’t skip this time. Scrape down the sides of the bowl with your spatula at least once while mixing so everything gets mixed in. Starting to smell amazing, right?
Add the Wet Stuff (Mostly!).
Okay, mixer down to medium speed now. We don’t want stuff flying everywhere! Crack your 1 room temp egg right into the fluffy butter-sugar mix. Beat it just until you don’t see yellow streaks anymore and it looks all smooth and creamy. Sometimes it looks a bit lumpy or split here – don’t panic! It usually comes together, especially once the flour goes in.
Now, drizzle in the 1 tsp vanilla essence and add the 1 tbsp room temperature Dano cream (or your sour cream/yogurt). Mix again on low, just until it’s all blended. Scrape that bowl again! Get everything off the sides and bottom.
Dry, Wet, Dry: The Gentle Mix.
Here’s where we need to be a bit careful. We want tender cupcakes, not tough ones. We’ll add the flour mix and the milk in turns. This helps everything mix together gently. Mixer on its lowest speed (or just use your spatula!). Add about one-third of the flour mix you made earlier. Mix just until you barely see flour streaks. It’s okay if it’s not perfectly mixed yet!
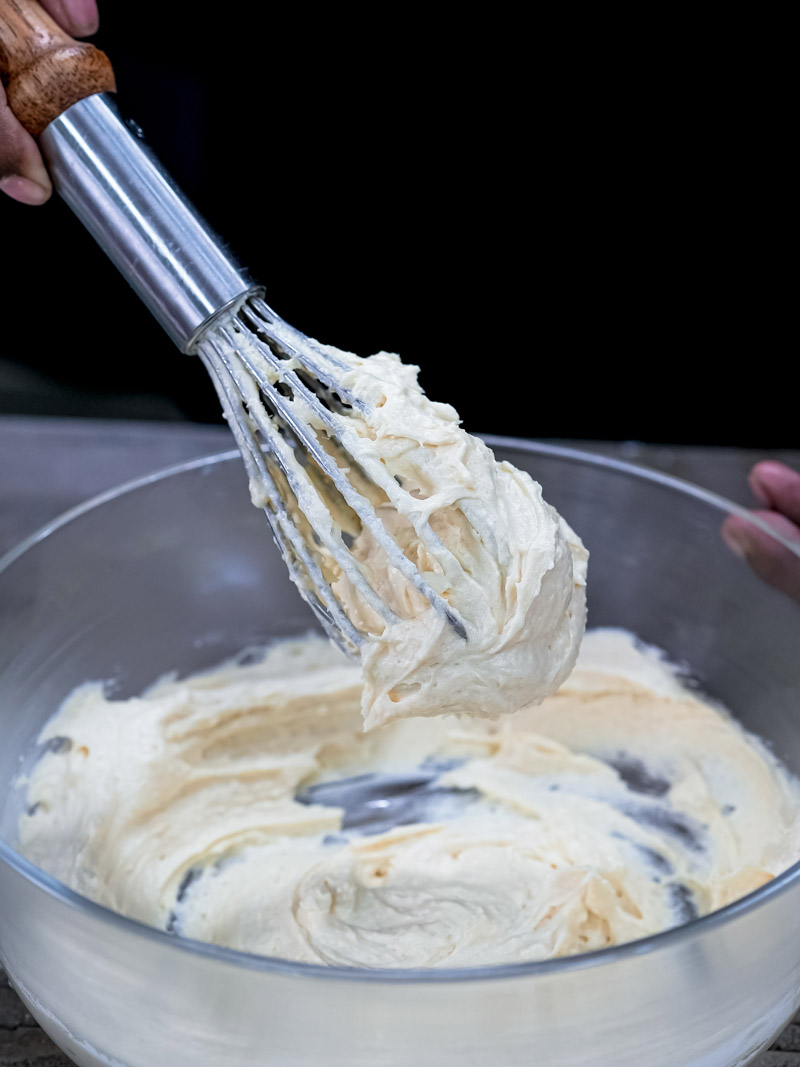
Now, pour in 1 tablespoon of your room temp milk. Mix on low just until the milk disappears. Add another third of the dry stuff, mix gently, then add the other 1 tablespoon of milk. (Look at the batter here – does it look super stiff? Maybe add a tiny splash more milk. Does it look too thin? Maybe hold back a little. It should be thick but scoopable). Mix again until the milk is gone. Add the last bit of the dry stuff. Mix on the lowest speed, and stop mixing the instant you don’t see big dry patches of flour. Seriously, stop!
Overmixing now makes tough cupcakes. A few lumps? Totally fine. Better under-mixed than over-mixed here. The batter should look thick, pale, and smell awesome.
Fill ‘Em Up!
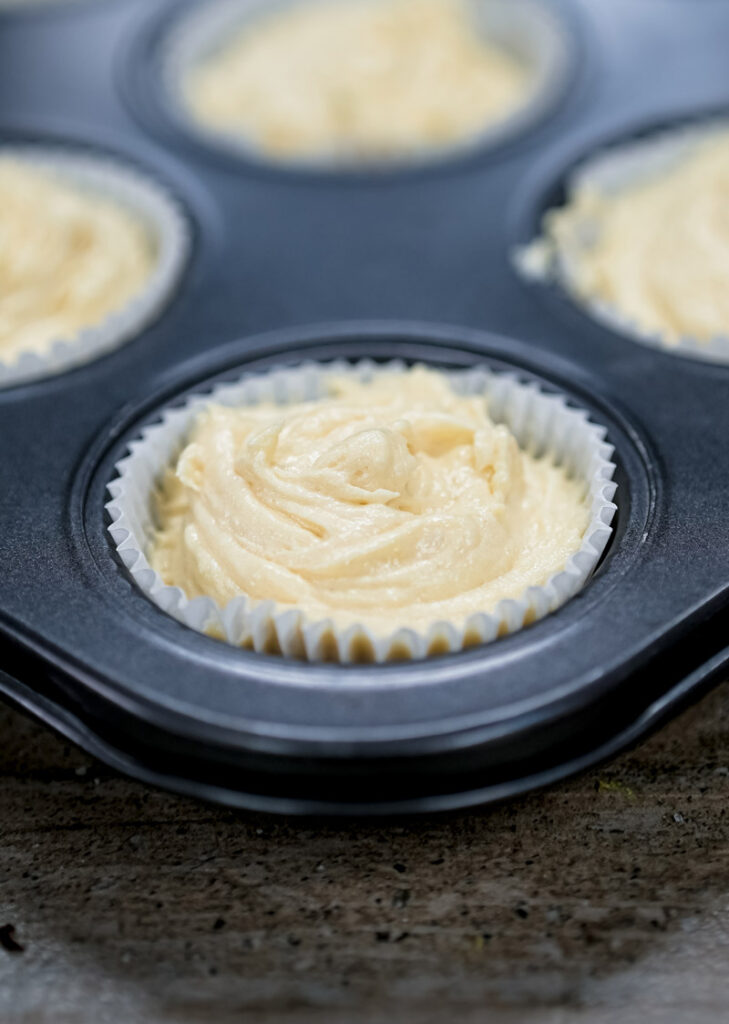
Time to get the batter into the liners. An ice cream scoop is perfect for this! Makes all the cupcakes the same size so they bake evenly. If you don’t have one, use two spoons – one to scoop, one to scrape it off into the liner. Fill each cup about two-thirds full. Don’t fill them to the top! They need room to grow and get that nice rounded top without spilling over. Try to make them all about the same level.

Into the Oven!
Carefully carry your pan to the hot oven. Slide it onto the middle rack – that’s where the heat is most even. Close the door gently. No slamming! Set a timer for 15 minutes to start. Try really hard not to open the oven door early. Peeking lets the heat out and can make your cupcakes sink. Boo! Around 15 minutes, peek through the window. They should be puffing up! Let them bake until they hit the 18-20 minute mark, or until they look done. How do you know they’re done?
Look: Tops should be a nice light golden brown.
Touch: Gently poke the middle of one cupcake top. It should spring right back. If your finger leaves a dent, they need another minute or two.
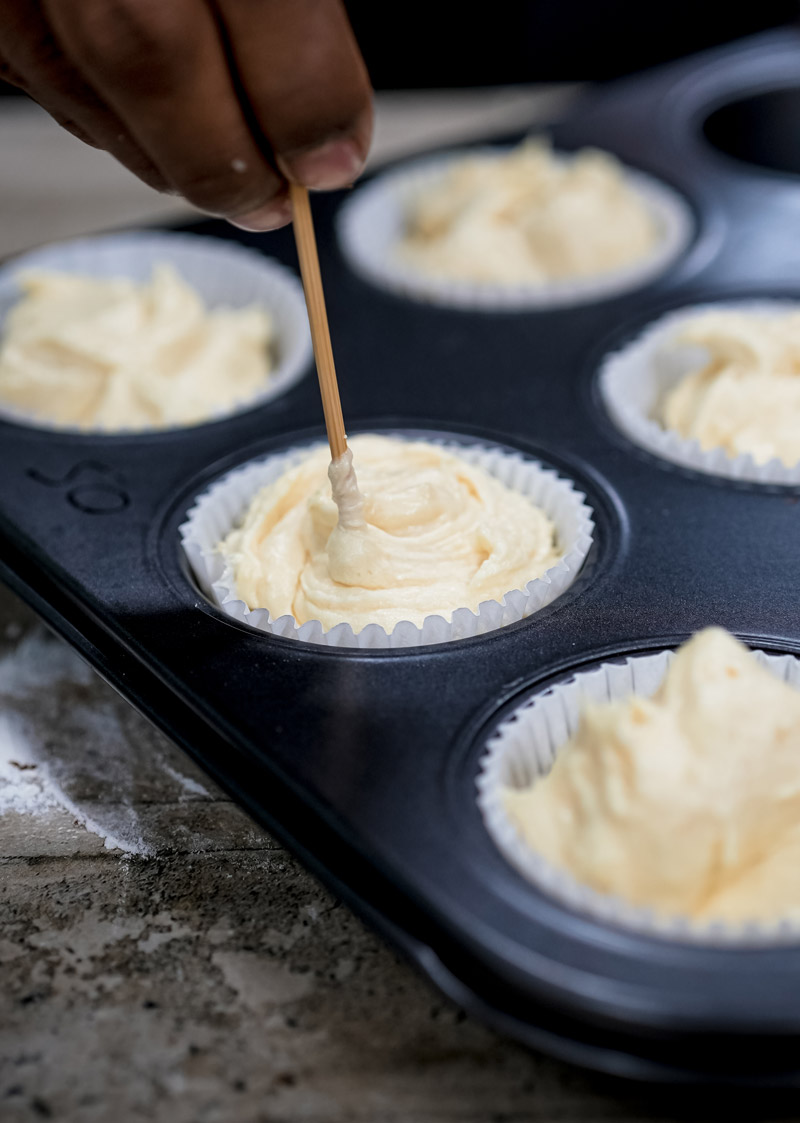
Toothpick Test: The old classic! Stick a wooden toothpick right into the center of a cupcake. Pull it out. If it comes out clean (no wet batter, maybe a few dry crumbs), they’re done! If it’s wet, give them another minute and test again. Your kitchen should smell heavenly right about now!
Cool Down Time! (Be Patient!)
Yay! Use oven mitts to take the hot pan out of the oven. Put it on a wire rack or counter (on a trivet!). Let the cupcakes sit in the pan for about 5 minutes. This helps them firm up a little so they don’t fall apart when you move them. After 5 minutes, gently lift the cupcakes out of the pan and put them directly on the wire cooling rack. Why? Air needs to get all around them, even underneath, so they don’t get soggy bottoms.
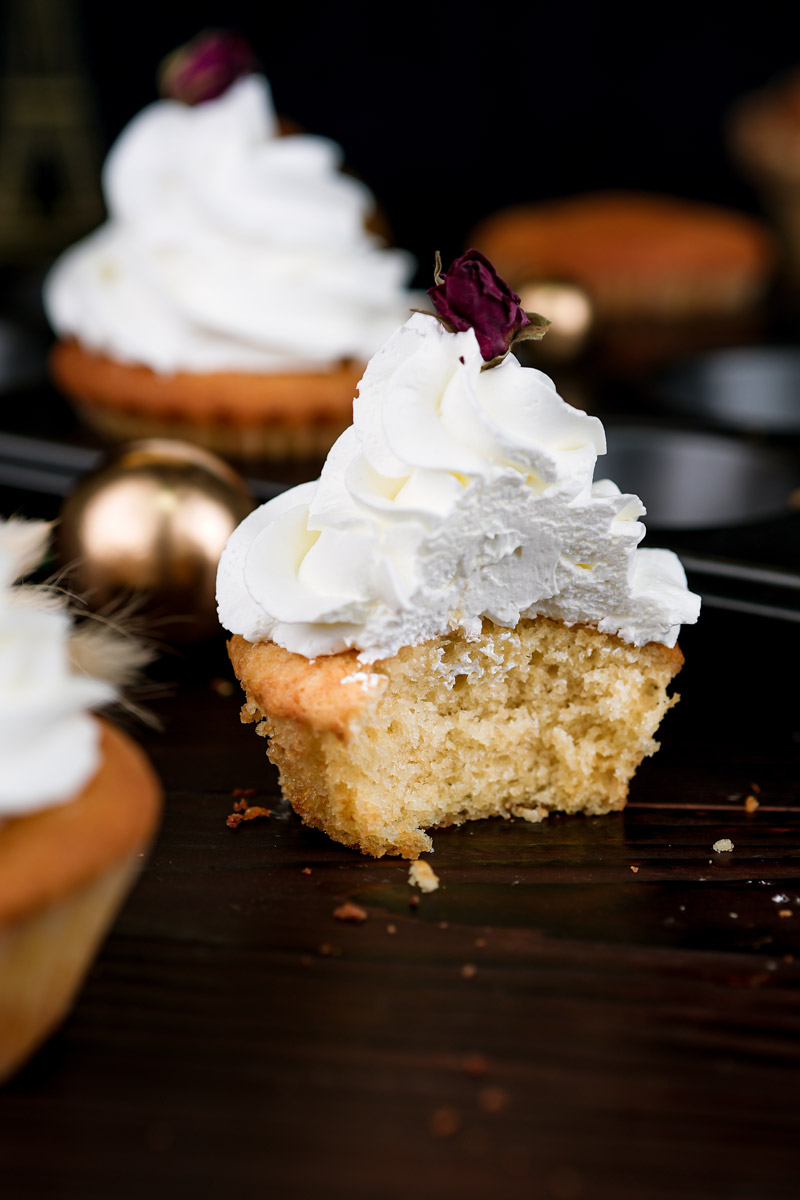
Now for the hard part… waiting. They need to be totally cool before you frost them. If you try to frost warm cupcakes, the frosting will just melt and slide off. Sad face. Give them a good 30-60 minutes, maybe longer. Touch the bottom – if it feels even a tiny bit warm, wait some more. Cooling lets the inside finish setting up and makes the flavor even better. Okay, now you can dream about frosting!

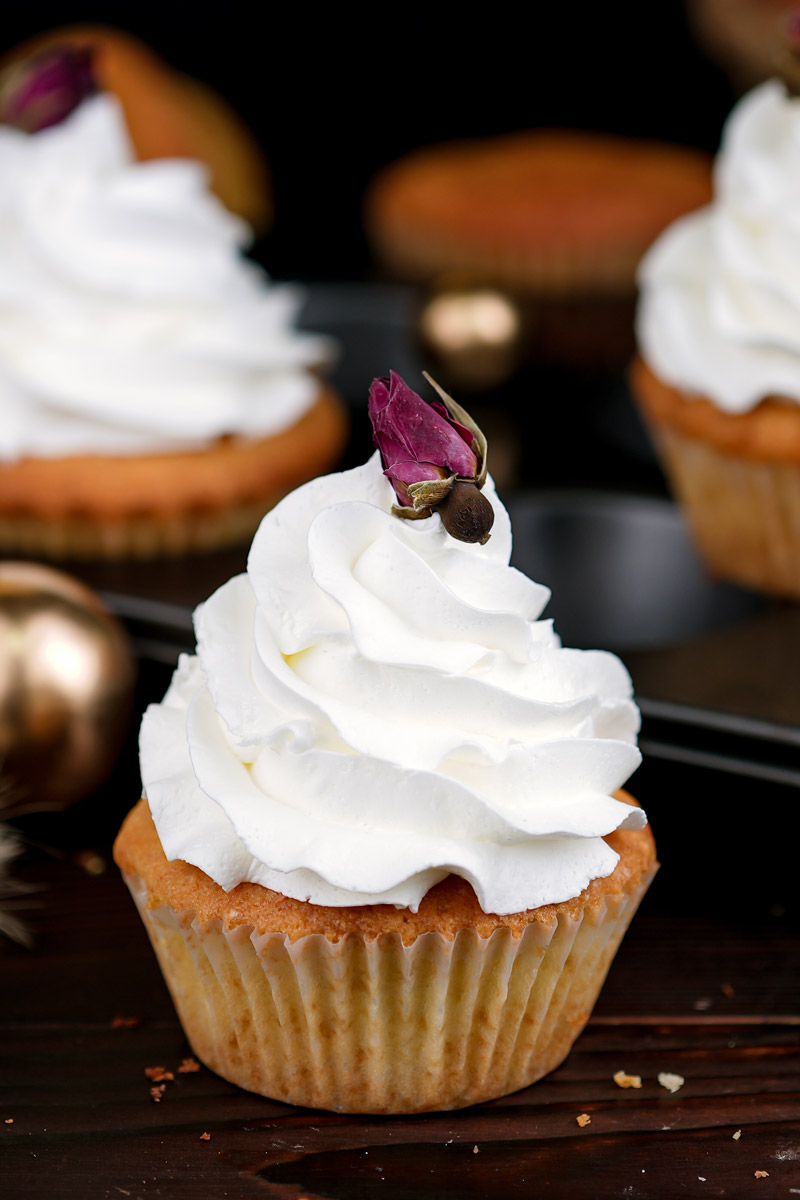
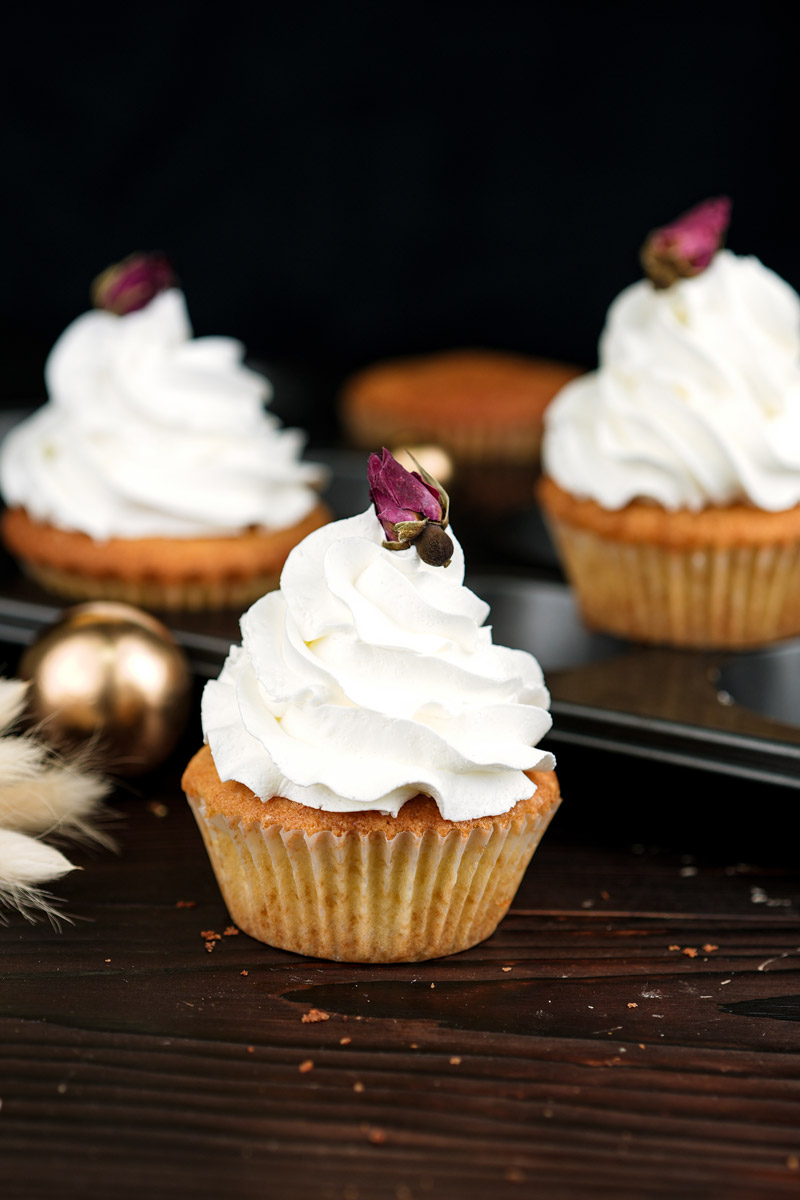
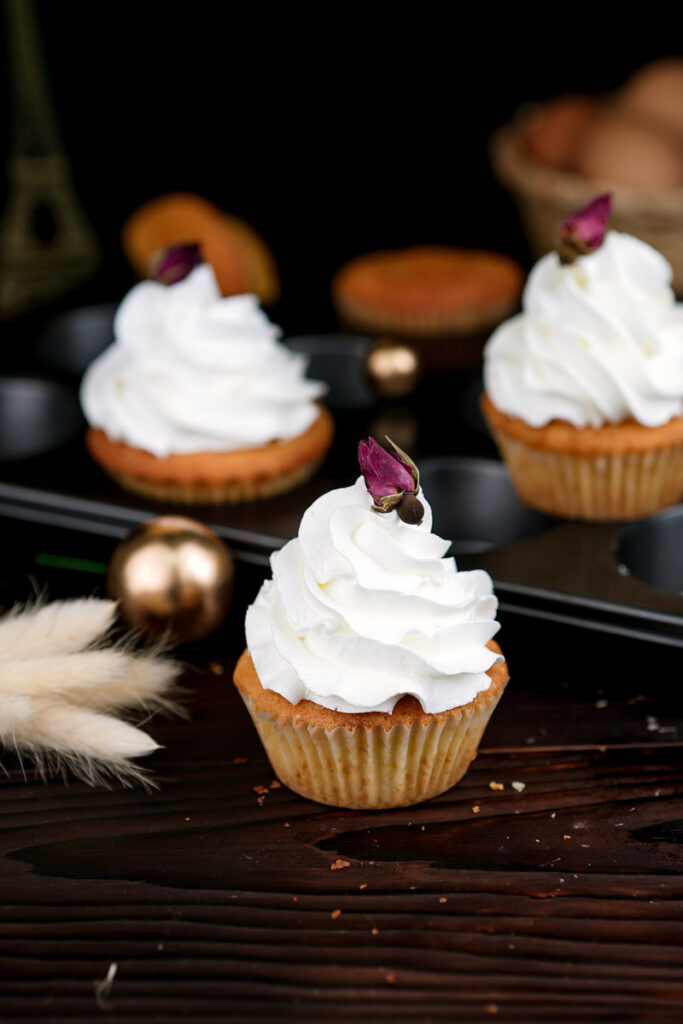
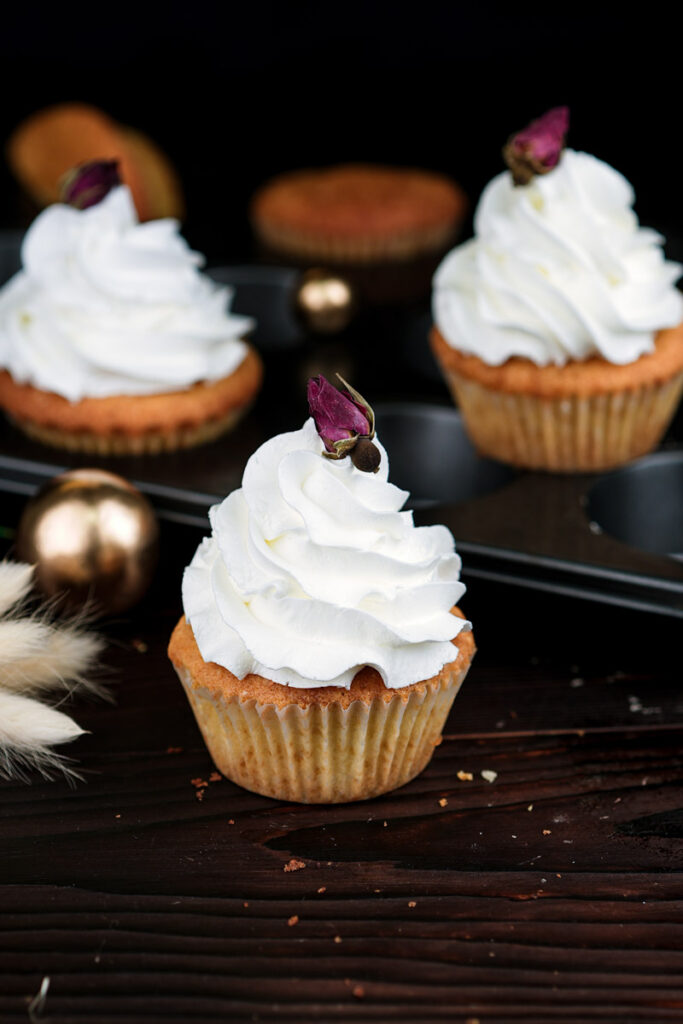
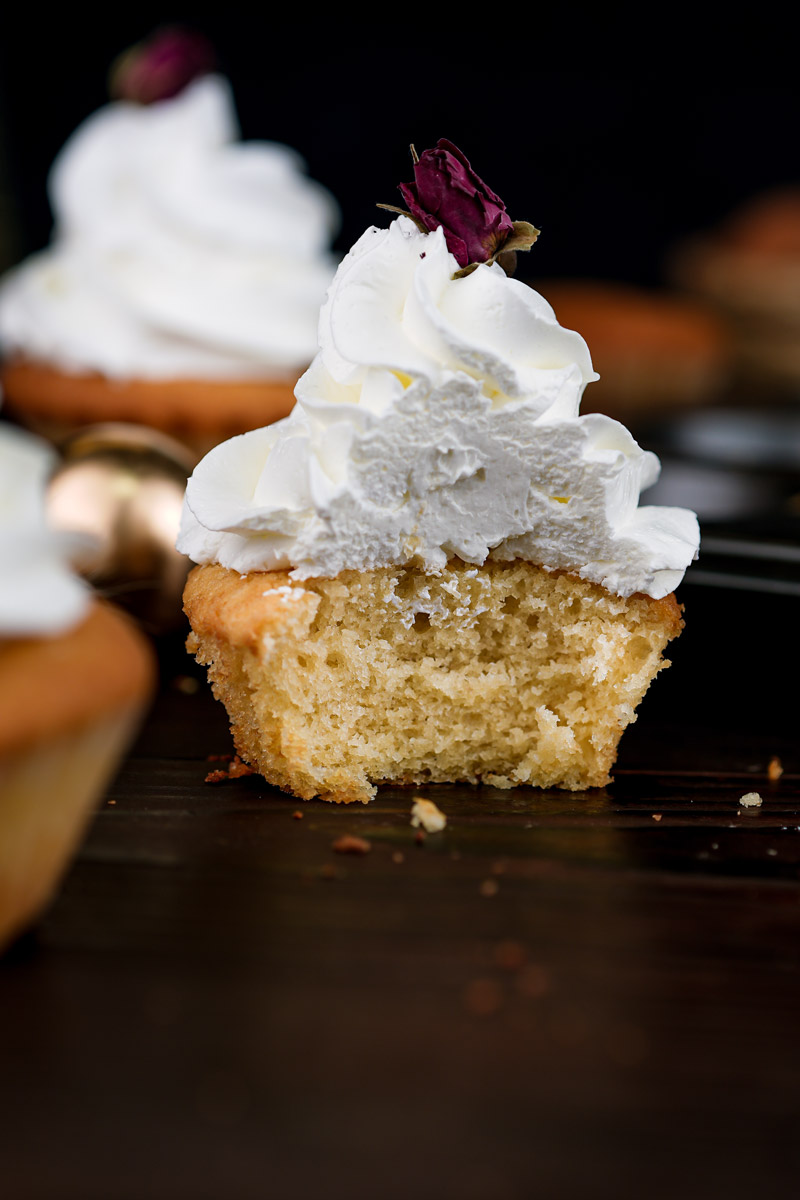
Frosting Fun! The Finishing Touch
Okay, the recipe was for the cake part, but let’s be real, Vanilla Cupcakes with Buttercream need that swirl on top! A simple American buttercream is super easy and classic:
- Beat some softened unsalted butter until it’s creamy.
- Slowly add powdered sugar (sift it first if it’s lumpy!) until it’s thick and fluffy.
- Beat in a little splash of milk or cream, some vanilla extract, and a tiny pinch of salt until it’s the consistency you like.
- Pipe it or spread it onto your completely cooled cupcakes. Yum!
Mix It Up! Make Them Your Own
This recipe is a great starting point. Have fun with it!
- Flavor Ideas:
- Add a little lemon or orange zest (about 1/2 tsp) when you cream the butter and sugar. So fresh!
- Use almond extract instead of vanilla for a different vibe.
- Carefully fold in about 1/4 cup of mini chocolate chips or rainbow sprinkles right at the end.
- Need Changes?
- Gluten-Free: Easy! Just swap the regular flour for a good gluten-free baking flour blend (the kind that says “1-to-1” or includes xanthan gum). The almond flour is already GF! Make sure your baking powder is GF too.
- Dairy-Free: Use a good vegan butter stick, a dairy-free yogurt or thick coconut cream instead of the Dano cream, dairy-free milk (like almond or soy), and skip the milk powder (or use coconut milk powder).
- Vegan: This needs a bit more work. You’ll need to replace the egg (try a “flax egg”: mix 1 tbsp flaxseed meal with 3 tbsp water and let it sit for 5 mins until gloopy) plus do all the dairy-free swaps above. Texture might be a little different, but still yummy!
- Fancy or Simple? Going to a party? Core out the middle of the cooled cupcakes (a small knife or apple corer works) and fill with jam or chocolate sauce before frosting. Use pretty piping tips and sprinkles! Just a Tuesday treat? A simple swirl of frosting or even just a sprinkle of powdered sugar is perfect.
- Seasonal Fun: Add a pinch of cinnamon in the fall, or top with fresh strawberries in the summer.
How to Serve & Store Your Masterpieces
You baked them! Now what?
- Serving: These Moist Vanilla Butter Cupcakes are best served at room temperature. That’s when the flavor and texture are perfect. Pile them on a cute plate or stand. A glass of milk alongside? Classic.
- Storing Leftovers (If Any!):
- Unfrosted: Once they’re totally cool, pop them in an airtight container. They’ll be good on the counter for about 2 days. Fridge can make them a bit dry sometimes.
- Frosted: If you used a basic buttercream like the one above, they’re usually fine in an airtight container at cool room temp for a day or maybe two. If your kitchen is hot, or if you used cream cheese frosting, keep them in the fridge. But! Let them sit out on the counter for about 30 minutes before eating so they’re not cold and hard.
- Making Ahead & Freezing:
- Cupcakes: Yes! Bake them, cool them completely. Put them in a freezer-safe container (single layer) or wrap each one in plastic wrap and then put them in a freezer bag. Freeze for up to 2-3 months. Let them thaw on the counter (unwrap them first).
- Frosting: Buttercream usually freezes great too. Put it in an airtight container or bag. Freeze for up to 3 months. Thaw it in the fridge overnight, then let it come to room temp. You might need to give it a quick whip with the mixer before frosting.
There you go! Everything you need for amazing Homemade Vanilla Butter Cupcakes. I really hope you have fun baking these and love how they turn out! Happy Baking!
PrintVanilla Butter Cupcakes

Whip up these incredibly moist and fluffy vanilla cupcakes! They’re simple to make, taste like pure comfort, and are perfect for frosting your way. Seriously easy, seriously delicious.
- Prep Time: 15 mins
- Cook Time: 18-20 mins
- Total Time: 35 mins (+ cooling!)
- Yield: 5–6 cupcakes 1x
- Category: Dessert
- Cuisine: American/Classic
Ingredients
- 100g Unsalted Butter, very soft (room temp!)
- 75g Granulated Sugar
- 1 Large Egg, room temp
- 1 tsp Vanilla Extract
- 1 tbsp Dano Cream (or full-fat sour cream/Greek yogurt), room temp
- 100g All-Purpose Flour
- 1 tbsp Almond Flour
- ½ tsp Baking Powder
- ½ tsp Baking Soda
- Optional: 1 tbsp Milk Powder
- Pinch of Salt (about ⅛ tsp)
- 1–2 tbsp Milk (any kind), room temp
Instructions
- Get Ready: Heat your oven to 350°F (175°C). Line 5-6 muffin cups with liners.
- Dry Mix: Whisk together both flours, baking powder, baking soda, salt, and milk powder (if using) in a medium bowl. Set aside.
- Cream Butter & Sugar: In a larger bowl, beat the softened butter and sugar with an electric mixer for 2-3 minutes until pale and super fluffy. This step is key!
- Add Wet Stuff: Beat in the room temp egg until just combined. Then mix in the vanilla and Dano cream (or substitute). Scrape the bowl!
- Combine Gently: Add about ⅓ of the dry mix to the butter mixture, mix on low speed until just combined. Add 1 tbsp milk, mix gently. Add another ⅓ dry mix, mix gently. Add the last 1 tbsp milk, mix gently. Add the final ⅓ dry mix. Mix on low only until you don’t see dry flour. Do NOT overmix! A few lumps are okay.
- Fill Cups: Scoop batter evenly into liners, filling each about ⅔ full.
- Bake: Bake for 18-20 minutes, or until a toothpick stuck in the center comes out clean and the tops spring back when lightly touched.
- Cool Down: Let cupcakes sit in the pan for 5 minutes, then move them to a wire rack to cool completely before frosting. Don’t rush this!
Notes
- Serving: Perfect with your favorite buttercream! Enjoy at room temperature for the best taste.
- Tips & Tricks:
- Room temp ingredients (butter, egg, cream, milk) are crucial for a smooth batter!
- Don’t skip the 2-3 minute creaming step – it makes them fluffy!
- Be careful not to overmix once the flour goes in. Stop as soon as it’s combined.
- Storage:
- Unfrosted: Store in an airtight container at room temp for up to 2 days.
- Frosted: Store in an airtight container. Room temp is fine for 1-2 days if cool; otherwise, refrigerate but bring to room temp before serving.
- Freeze: Cooled, unfrosted cupcakes freeze beautifully for up to 2 months. Thaw at room temp.